
Lighting is the single most underestimated element in interior design. You can have the perfect furniture, the right paint color, and beautiful textiles — and the room will still feel wrong if the lighting is bad. Yet most people never think about it beyond screwing in whatever bulb came with the fixture.
78% of American households now use LED lighting, but the majority are using the wrong color temperature, the wrong brightness, and far too few light sources per room. The result: rooms that feel flat during the day and harsh at night.
Below are the 20 lighting questions people ask most often on Google, ChatGPT, and Reddit — each answered with specific numbers, formulas, and recommendations you can act on immediately. No “it depends on your style.” Where something genuinely depends on your situation, you get the two or three most common scenarios with a clear recommendation for each.
Color Temperature and Brightness
1. What Color Temperature Should I Use in Each Room?
Color temperature is measured in Kelvin (K). Lower numbers are warmer (yellow-orange), higher numbers are cooler (blue-white). Here is the room-by-room breakdown that lighting designers use:
- Bedrooms: 2700K. Warm light promotes melatonin production and signals your body to prepare for sleep. Research shows blue light from cooler temperatures suppresses melatonin for twice as long as warm light.
- Living rooms: 2700K–3000K. Soft and inviting. 2700K for evening-focused spaces, 3000K if the room gets heavy daytime use.
- Dining rooms: 2700K–3000K. Warm light flatters both food and skin tones. 2700K creates a classic dinner-party glow.
- Kitchens: 3000K for ambient lighting, 3500K–4000K for task areas (under-cabinet lights, above prep surfaces). You need accuracy when chopping and cooking.
- Bathrooms: 3000K–3500K for general lighting. 2700K–2800K at the vanity — this is the sweet spot for applying makeup and looking human in the mirror.
- Home offices: 3500K–4000K. Cool-neutral light boosts alertness and focus. Avoid 5000K+ unless you work with color-critical tasks like graphic design.
- Garages and workshops: 4000K–5000K. Bright, crisp light for detailed tasks and safety.
The open-plan rule: In open-concept spaces, keep adjacent areas within one Kelvin step. A 2700K living room flowing into a 4000K kitchen creates an uncomfortable visual clash. Aim for 2700K in the living zone and 3000K in the kitchen — close enough that the transition feels natural.
2. How Many Lumens Does Each Room Need?
Lumens measure brightness. The formula is: room square footage × lumens per square foot = total lumens needed.
- Bedrooms: 10–20 lumens per square foot. A 150 sq ft bedroom needs 1,500–3,000 lumens total.
- Living rooms: 10–20 lumens per square foot. Dimmer is better — you want flexibility, not floodlights.
- Kitchens: 30–40 lumens per square foot for ambient, 70–80 for task areas. A 150 sq ft kitchen needs 4,500–6,000 lumens ambient plus additional task lighting.
- Bathrooms: 70–100 lumens per square foot. Bathrooms need more light than any other room. The American Lighting Association recommends about 1,600 lumens just for vanity task lighting.
- Home offices: 50–70 lumens per square foot. Brighter than living spaces, dimmer than kitchens.
Quick reference: A standard 9W LED bulb produces about 800 lumens — equivalent to the old 60W incandescent, but using 75% less energy. To light a 150 sq ft living room, you need roughly 3–4 of these bulbs spread across multiple fixtures.
3. What Is the Difference Between 2700K, 3000K, 4000K, and 5000K?
2700K is the warm, yellowish glow of a traditional incandescent bulb. Cozy, relaxing, flattering to skin. 3000K is slightly whiter but still warm — the most versatile temperature for homes. 4000K is neutral white with no yellow or blue cast — clean and functional, used in kitchens and offices. 5000K is cool daylight — crisp and energizing, but harsh in living spaces. It makes bedrooms feel like hospitals.
The mistake most people make is buying whatever bulb is cheapest without checking the Kelvin rating on the box. A pack of 5000K bulbs in your bedroom will ruin the room’s atmosphere regardless of how beautiful the furniture is.
4. What Is CRI and Why Should I Care About It?
CRI (Color Rendering Index) measures how accurately a light source reveals colors, on a scale of 0 to 100. Natural sunlight is CRI 100. Most budget LED bulbs are CRI 80, which is acceptable. CRI 90+ is excellent — colors appear vibrant and skin tones look natural.
This is the metric nobody talks about, but it explains why your bathroom mirror makes you look terrible. A 2700K bulb with low CRI makes everything look muddy and washed out. The same 2700K with CRI 90+ reveals rich, clear colors. For bathrooms, closets, and kitchens, always buy CRI 90 or above. It is printed on every LED bulb box — you just have to look for it.
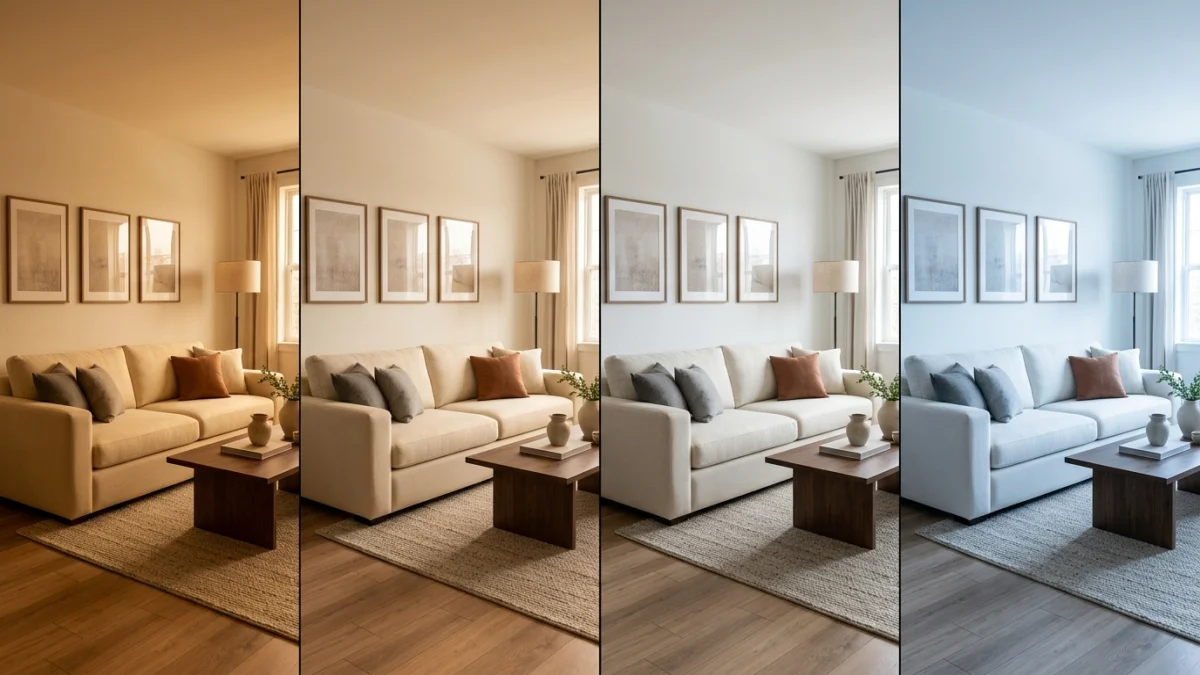
The same room at 2700K, 3000K, 4000K, and 5000K — color temperature changes how a room feels more than paint color
Sizing and Placement
5. How Do I Choose the Right Size Chandelier or Pendant?
The formula: add the room’s length and width in feet, then convert to inches. That is your chandelier diameter. A 10 × 12 foot room needs a 22-inch diameter chandelier. A 14 × 16 foot room needs a 30-inch fixture.
For dining tables: The chandelier should be one-half to two-thirds the width of the table. A 42-inch wide table needs a 21 to 28-inch fixture. Hang it 30 to 36 inches above the table surface. For every additional foot of ceiling height above 8 feet, raise the fixture 3 inches.
For fixture height: Allow 2.5 to 3 inches of fixture height per foot of ceiling. An 8-foot ceiling can handle a 20 to 24-inch tall chandelier. An 11-foot ceiling can go up to 33 inches.
The entryway rule: The bottom of the fixture should be at least 7 feet above the floor. In a two-story foyer, the fixture should hang in the upper third of the vertical space, not centered between floors.
6. How Far Apart Should Recessed Lights Be?
Space recessed lights at 0.8 times the ceiling height in feet. For an 8-foot ceiling, that is 6.4 feet — practically 4 to 6 feet apart. Place the first row 2 to 3 feet from the wall.
- 8-foot ceilings: 4-foot spacing, 650–850 lumen fixtures
- 9-foot ceilings: 4.5-foot spacing, 800–1,000 lumen fixtures
- 10–12-foot ceilings: 4.5–5-foot spacing, 1,000+ lumen fixtures
Kitchen exception: Pull recessed lights 12 to 18 inches out from the edge of upper cabinets. This prevents the cabinets from blocking the light and casting shadows on the counter where you actually work.
Wall washing for art: Position recessed lights 1.5 to 3 feet from the wall. Space between fixtures should match the distance from fixtures to the wall. This creates an even wash of light that highlights artwork and architectural features.
7. How Low Should a Pendant Hang Over a Kitchen Island?
30 to 36 inches above the countertop. Space multiple pendants 24 to 30 inches apart, center to center. Leave 6 inches of clearance from each end of the island.
For island length: under 5 feet uses 1 to 2 pendants, 6 to 7 feet uses 2 to 3 pendants, and 8+ feet uses 3 pendants or one long linear fixture. The pendant diameter should be one-half to two-thirds the island width — so a 36-inch wide island gets 18 to 24-inch pendants.
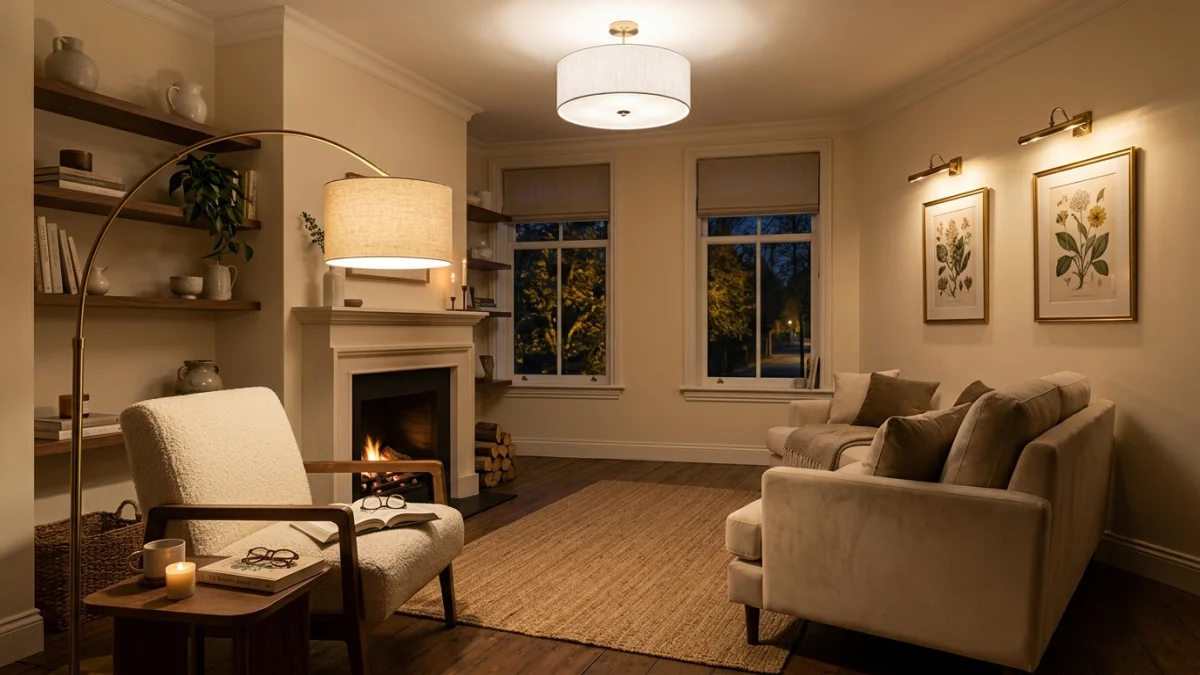
Three layers of lighting in one room: ambient (ceiling), task (reading lamp), accent (picture lights)
Room-by-Room Lighting
8. How Do I Layer Lighting in a Room?
Every room needs three layers of lighting: ambient, task, and accent. Each layer serves a different purpose, and together they create depth.
Ambient lighting is the base layer — general illumination from ceiling fixtures, recessed downlights, or large pendants. It should be soft and diffuse, never harsh. Task lighting is functional — table lamps for reading, under-cabinet lights for cooking, desk lamps for working. Accent lighting is the finishing layer — picture lights for art, LED strips behind furniture, spotlights on shelving. Accent light should be roughly 3 times as bright as the ambient light aimed at the feature.
The minimum: Every room needs at least 3 to 5 light sources. Putting all lights on dimmers is the single most impactful lighting upgrade you can make — it costs about $15 per dimmer switch and lets you control the mood of the room completely.
9. How Do I Light a Living Room?
A living room needs flexibility because it serves multiple purposes — movie watching, reading, hosting, relaxing. The lighting recipe for a typical 12 × 14 foot living room:
- 1 central pendant or semi-flush ceiling fixture (ambient)
- 2 table lamps on end tables (task and ambient)
- 1 floor lamp behind or beside the sofa (reading task light)
- 2 accent lights — picture lights above art, LED strips behind the TV, or uplights behind a plant
All at 2700K–3000K, all on dimmers. This setup gives you full brightness for cleaning and activities, medium for hosting, and low for evening relaxation or movie watching.
10. How Do I Light a Bedroom for Better Sleep?
Use 2700K exclusively. Avoid cool white light after sunset. Blue light from 4000K+ bulbs suppresses melatonin production, making it harder to fall asleep.
The ideal bedroom has zero overhead downlights directly above the bed (they are blinding when you lie down). Instead: two bedside table lamps or wall-mounted reading lights (task), one ambient light on a dimmer (ceiling fixture or floor lamp), and optionally warm LED strips behind the headboard or under the bed frame for a soft glow.
The sleep science: Program smart bulbs to gradually dim and warm in the evening. Red and amber light does not affect circadian rhythms and can actually increase melatonin production. If you are serious about sleep quality, amber nightstand bulbs are the best $10 upgrade you can make.
11. How Do I Light a Kitchen Properly?
Kitchens need more light than any other room except bathrooms. The three kitchen lighting zones:
- General ambient: Recessed lights across the ceiling at 3000K. Space them 4 to 6 feet apart.
- Task lighting: LED strips under upper cabinets at 3500K–4000K. Use aluminum channels with diffuser lenses for professional results and even light distribution. Puck lights work for display inside glass-front cabinets.
- Island pendants: 30 to 36 inches above the countertop, 24 to 30 inches apart. Pendant lighting over the island is as much decorative as functional — it is the jewelry of the kitchen.
12. How Do I Light a Bathroom?
The golden rule: side sconces flanking the mirror are better than any overhead light. Overhead-only mirror lighting creates shadows under the eyes, nose, and chin — the least flattering light possible. This is why hotel bathrooms always have side sconces.
Mount sconces 60 to 70 inches from the floor, spaced 28 to 30 inches apart. If you must use a vanity light bar above the mirror, it should be 75 to 80 percent of the mirror width. Color temperature: 2700K–2800K at the vanity for accurate but flattering light. Total vanity brightness: about 1,600 lumens.
For the rest of the bathroom, add a waterproof recessed light in the shower (3000K) and general ambient lighting (3000K–3500K). A small night light near the floor on a motion sensor prevents middle-of-the-night blindness.
13. How Do I Light a Home Office for Video Calls?
The most important light source is the one facing you, not behind you. Place your key light slightly above eye level and slightly off-center. 4000K–5000K reads as “natural daylight” on camera and produces a clean, professional appearance.
The biggest video call lighting mistake is mixing natural window light with warm artificial light. One side of your face looks blue, the other looks orange. Either face the window and use daylight exclusively, or close the blinds and use consistent artificial light.
For the room ambient, 3500K–4000K at the desk for focus during working hours. If your office doubles as a bedroom or living area, smart bulbs that shift to 2700K after work hours make a dramatic difference. See our accent wall guide for home office wall ideas that double as video call backgrounds.
Practical Problems
14. How Do I Light a Room With No Overhead Lighting?
Many rental apartments and older homes have no ceiling fixtures in bedrooms and living rooms. Here is the complete renter-friendly solution, ranked by impact:
- Arc floor lamp: A tall arc lamp directed toward the ceiling bounces light off the white surface, mimicking an overhead fixture. This single piece solves 60% of the problem.
- Plug-in wall sconces: Mount with adhesive strips (3M Command), no drilling required. Battery-operated sconces from brands like Poplight install in 20 seconds, charge via USB, and last about 50 hours per charge.
- Table lamps at different heights: One tall, one short. Height variation prevents the flat, shadowless feel of single-source lighting.
- LED strip lights: Adhesive-backed strips behind a bookshelf, TV console, or headboard add warm ambient glow without any electrical work. Budget: $15 to $30.
- Plug-in pendant: Hang from a ceiling hook (Command hook), route the cord along the wall and down to a plug. Not as clean as hardwired but functional and temporary.
Total cost to fully light a room with no ceiling fixture: $100 to $250 for one floor lamp, two plug-in sconces, and an LED strip. Zero electrical work, zero holes in the wall.
15. How Do I Fix a Dark Room?
A room feels dark for one of four reasons — and the fix is different for each:
- Not enough light sources: Add more fixtures. One overhead light cannot illuminate a room properly. Minimum 3 to 5 sources.
- Wrong color temperature: Warm light at 2700K can feel dim at low brightness. Switch to 3000K for rooms that need more perceived brightness without going clinical.
- Dark walls absorbing light: If you have dark walls (which can look amazing — see our dark interiors guide), you need significantly more light sources. Add wall sconces, picture lights, and LED strips to bounce light off surfaces.
- No natural light amplification: Place a large mirror on the wall opposite the window to reflect and double the available natural light. Replace heavy curtains with sheer ones. Both are free or nearly free changes that make a measurable difference.
16. How Do I Stop Lighting From Looking Too Harsh?
Harshness comes from two things: direct exposure to the bulb and wrong color temperature. Fix both:
First, shield the bulb. Exposed bare bulbs create glare and hard shadows. Use fixtures with shades, diffusers, or frosted globes. Even a simple cloth shade on a table lamp transforms the quality of light from sharp to soft.
Second, check the Kelvin rating. Anything above 4000K in a living space will feel harsh regardless of the fixture. Switch to 2700K–3000K.
Third, dim everything. Installing a $15 dimmer switch on your main ceiling light and running it at 60 to 70 percent brightness is the single cheapest way to make a room feel softer.
17. How Do I Hide Ugly Light Fixtures in a Rental?
Remove the existing fixture (keep it safe — you will reattach it when you move out) and install a temporary replacement. Screw-in pendant adapters turn any standard ceiling socket into a pendant light for $10 to $25. Paper lantern shades in Japanese style fit over bare bulbs for $5 to $15 and transform the look of a room instantly.
For the boob lights that plague every rental apartment — the standard dome flush-mount — slip-on cover replacements exist from brands like Kwalu and various Amazon sellers. They clip over the existing fixture and change the look in 30 seconds.
Smart Lighting and Budget
18. Is Smart Lighting Worth It in 2026?
Yes, for bedrooms and home offices. Optional for everywhere else. Smart bulbs with tunable color temperature let you shift from 4000K focus light during the day to 2700K relaxation light at night — automatically. Human-centric lighting systems showed a 1.5x increase in melatonin secretion compared to static lighting in research studies.
The price has dropped dramatically. Govee Matter-compatible bulbs cost about $12 each and connect directly to your phone without a hub. Philips Hue remains the most reliable ecosystem but costs 3 to 4 times more. WiZ Connected LED strips start at $20.
Where smart lighting is NOT worth it: Closets, garages, hallways — anywhere the light is either on or off with no need for mood adjustment. Use standard LED bulbs and save the smart budget for rooms where you actually live.
19. What Is the Cheapest Way to Improve Room Lighting?
Three changes under $50 that make the biggest difference:
- Replace all bulbs with the correct Kelvin rating ($15–$25 for a home). Most homes have a random mix of color temperatures. Standardizing to 2700K in living spaces and 3000K in kitchens and bathrooms creates instant cohesion.
- Add one dimmer switch ($8–$15). Put it on the room’s main overhead light. Running a light at 75% brightness instead of 100% makes the room feel softer and saves 20% on electricity for that fixture.
- Add one floor lamp or table lamp ($20–$40). A second light source at a different height than the ceiling fixture immediately adds depth and dimension to any room.
The math: LEDs use 75% less energy than incandescent bulbs and last 25 times longer. Switching 40 bulbs in a home from incandescent to LED saves approximately $9,494 over the bulbs’ lifetime. The upfront cost pays for itself in the first year.
20. How Do I Use LED Strips Without Making My Room Look Tacky?
LED strips look bad when you can see them. They look great when you can only see the light they produce. The rule is always indirect: tuck strips behind headboards, under floating shelves, inside crown molding, behind TV consoles, under kitchen cabinets — anywhere the strip itself is hidden and only the glow is visible.
Use warm white (2700K–3000K) for a sophisticated ambient effect. Avoid RGB color-changing strips in living spaces unless you are specifically going for a gaming room or entertainment vibe. Aluminum channels with diffuser lenses ($5 to $15 per meter) eliminate the dotted-line effect of individual LEDs and create smooth, even light.
See Your Lighting Before You Buy
Not sure whether a pendant, chandelier, or floor lamp will work in your space? Upload a photo of your room to MeltFlex and describe the lighting you want. The AI generates a photorealistic visualization showing new fixtures in your actual room with your existing furniture and dimensions. Test three options before you buy one.
For more room design guidance, see our 25 interior design rules answered, accent wall ideas guide, how to make a small room look bigger, and dark and moody interior design guide.