You have a floor plan — maybe from an architect, a builder, a real estate listing, or even a quick sketch on paper. Now you want to see it in 3D. Traditionally, that meant learning CAD software, hiring a 3D artist, or spending hours manually drawing walls in a room planner. Not anymore.
In 2026, AI-powered floor plan to 3D converters can take any 2D floor plan image and automatically generate an interactive 3D model — complete with walls, doors, windows, room boundaries, and even furniture. In this guide, we will walk you through the entire process step by step, completely free.
What Is a Floor Plan to 3D Converter?
A floor plan to 3D converter is a tool that transforms a flat, 2D floor plan into an interactive three-dimensional model. Instead of looking at lines on paper, you see your home from every angle — walk through rooms, check proportions, and understand how spaces connect.
Traditional methods require CAD software like AutoCAD, SketchUp, or Revit. You manually draw every wall, set exact dimensions, and build the model from scratch. This takes hours of work and real technical skill.
AI floor plan to 3D converters skip all of that. You upload a photo or scan of your floor plan, and the AI does the rest — detecting walls, identifying rooms, placing doors and windows, and generating a complete 3D model in seconds. Tools like MeltFlex take it further by letting you place real furniture, change materials, and generate photorealistic renders — all from that single floor plan upload.
What Types of Floor Plans Can You Convert to 3D?
One of the biggest advantages of AI-powered conversion is flexibility. You are not limited to clean, professional drawings. Here are the floor plan types that work:
- Architect drawings — professional floor plans with precise dimensions and labels
- Builder or developer plans — floor plans from new home brochures or construction documents
- Real estate listing floor plans — the floor plan images you see on property listings online
- Hand-drawn sketches — quick sketches on paper, graph paper, or even a napkin
- Photos of floor plans — take a photo of a printed floor plan with your phone
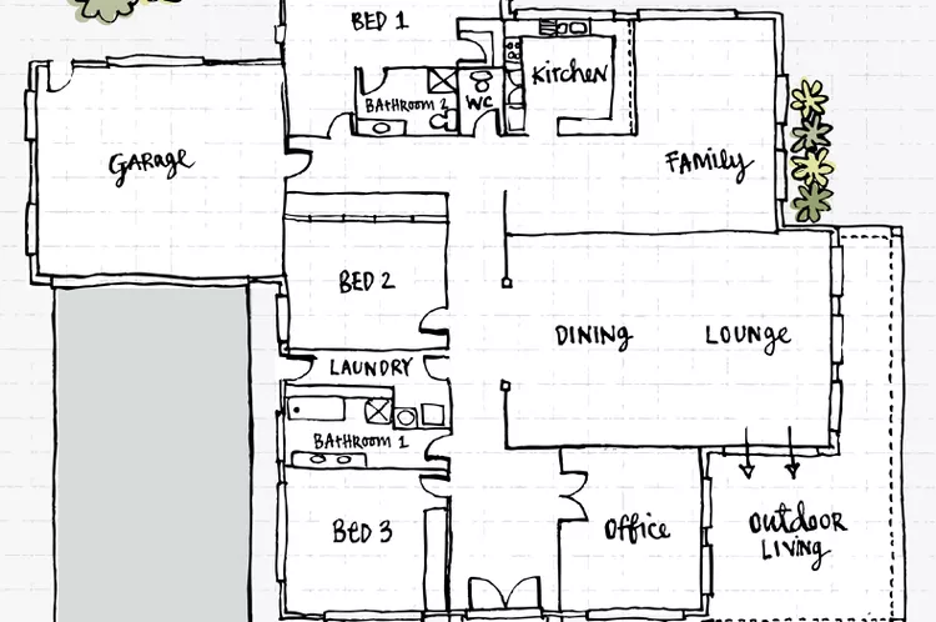
The image below shows a hand-drawn floor plan with rooms labeled — bedrooms, kitchen, dining, lounge, office, and outdoor living areas. This is exactly the kind of sketch you can upload to convert into a 3D model.
How to Convert a Floor Plan to 3D: Step-by-Step
Step 1: Upload Your Floor Plan
Go to MeltFlex and upload your floor plan image. The AI accepts JPG, PNG, and most common image formats. The floor plan can be any size, any quality, any style — from a high-resolution architect PDF to a phone photo of a hand sketch.
Once uploaded, the AI analyzes the image and identifies the layout structure — where walls are, where doors and windows are placed, and how rooms connect to each other.
Step 2: AI Converts to 3D Model
Within seconds, the AI generates a complete 3D model from your floor plan. Walls are extruded to realistic heights, doors and windows are cut into the right positions, and each room is separated with the correct boundaries.
The screenshot below shows the MeltFlex workspace after converting a floor plan to 3D. On the left, the interactive 3D model with multiple rooms. On the right, the furniture catalog with real products you can place in any room.
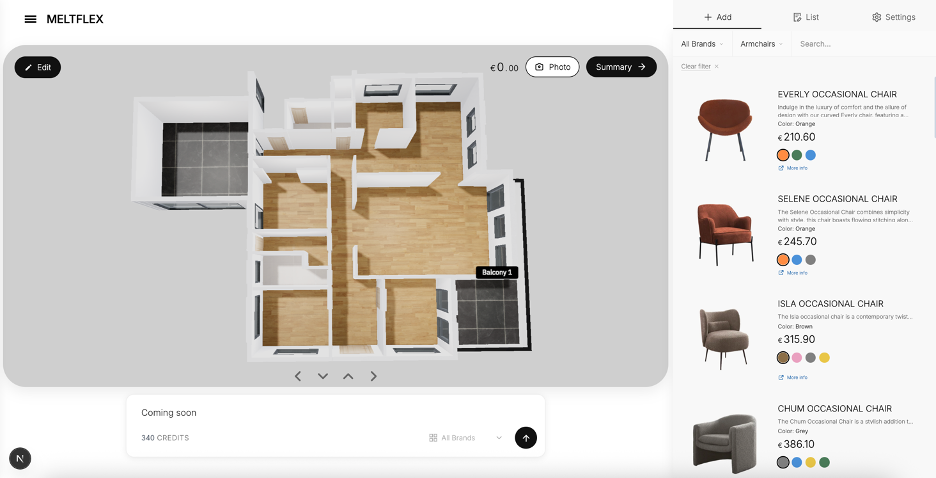
You can rotate, zoom, and navigate the 3D model freely. The top-down view shows the entire layout at a glance — perfect for understanding room sizes and how spaces flow together.
Step 3: Customize Materials and Textures
With your 3D floor plan model ready, you can customize every surface. Change the flooring material for each room individually — hardwood for the living room, tile for the kitchen, carpet for the bedrooms. Swap wall colors, adjust door styles (from white wood to rustic oak), and change window frames. All changes happen in real-time as you click.
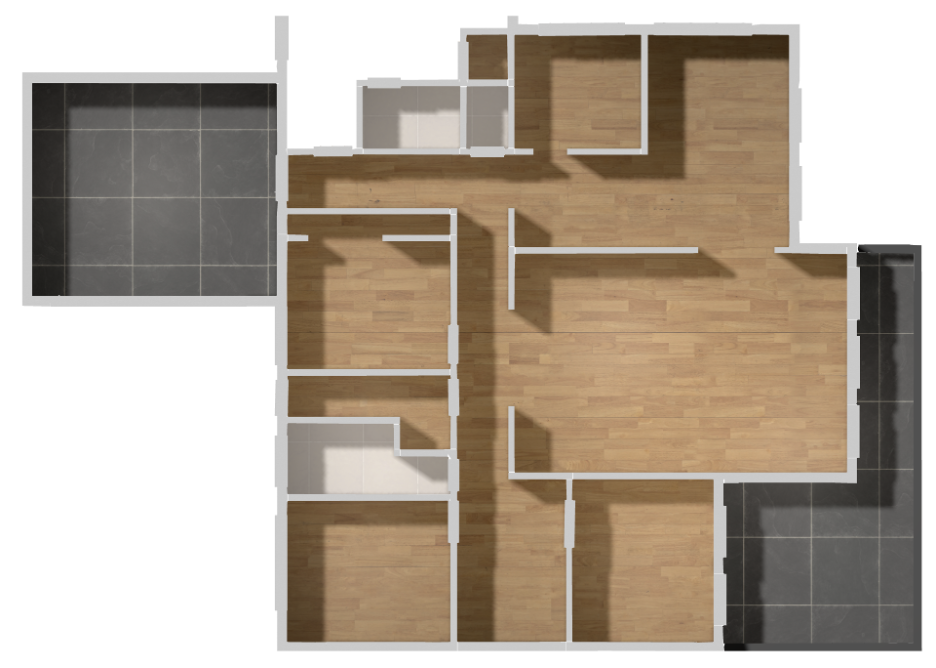
Notice in the top-down view above how each room has a different flooring texture applied — this is the per-room customization that lets you see exactly how material choices affect the overall feel of your home.
Step 4: Place Real Furniture
This is where the floor plan to 3D conversion becomes truly useful. Browse the furniture catalog with real products from curated brands — sofas, tables, beds, desks, shelving, lighting. Each piece has real dimensions and real prices.
Drag furniture into your rooms, rotate it, position it exactly where you want. The 3D view shows you the real proportions — will that sofa fit? Is the coffee table too big for the space? You see the answers immediately instead of guessing.
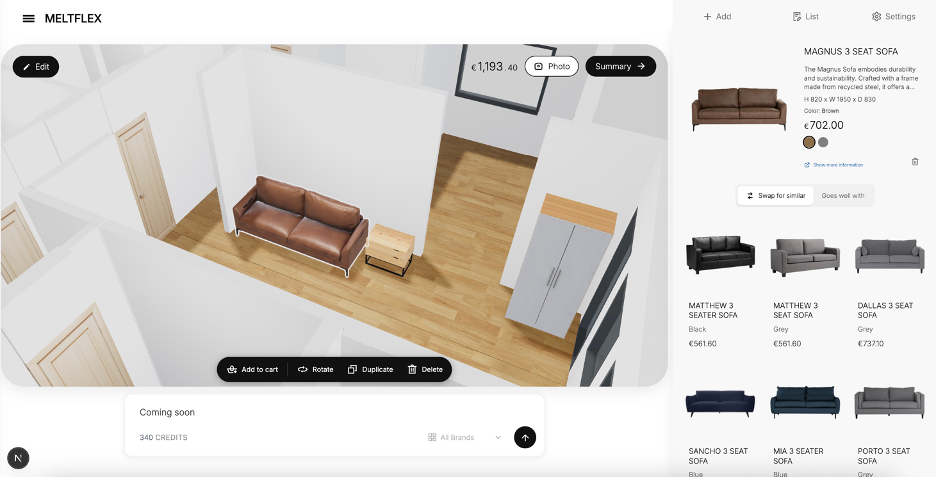
In the image above, a sofa has been placed in the living room with the full product panel visible — showing the price, available alternatives, and the option to add to cart directly from the 3D design view.
Step 5: Generate Photorealistic AI Renders
Once your rooms are furnished and materials are set, generate photorealistic AI renders. The AI takes your 3D scene — the furniture you placed, the materials you chose, the room layout — and produces images with natural lighting, realistic shadows, and true-to-life textures. The result looks like professional interior photography.
Here are three renders of the same room with different sofa styles, showing how one furniture change transforms the entire feel of a space:
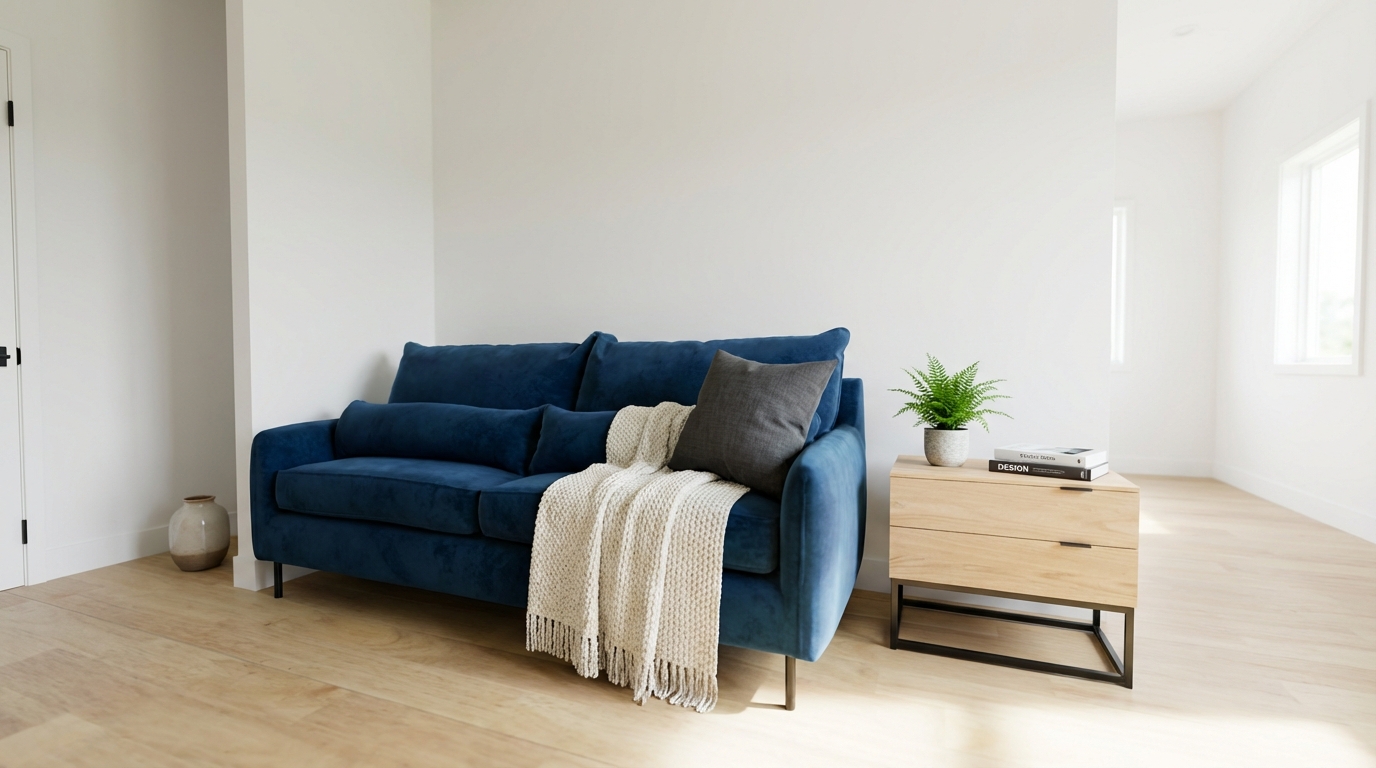
A blue velvet sofa with a knit throw creates a modern, cozy atmosphere. The natural light from the window highlights the fabric texture, and the oak side table with a plant adds warmth. Every piece in this render is a real, purchasable product.
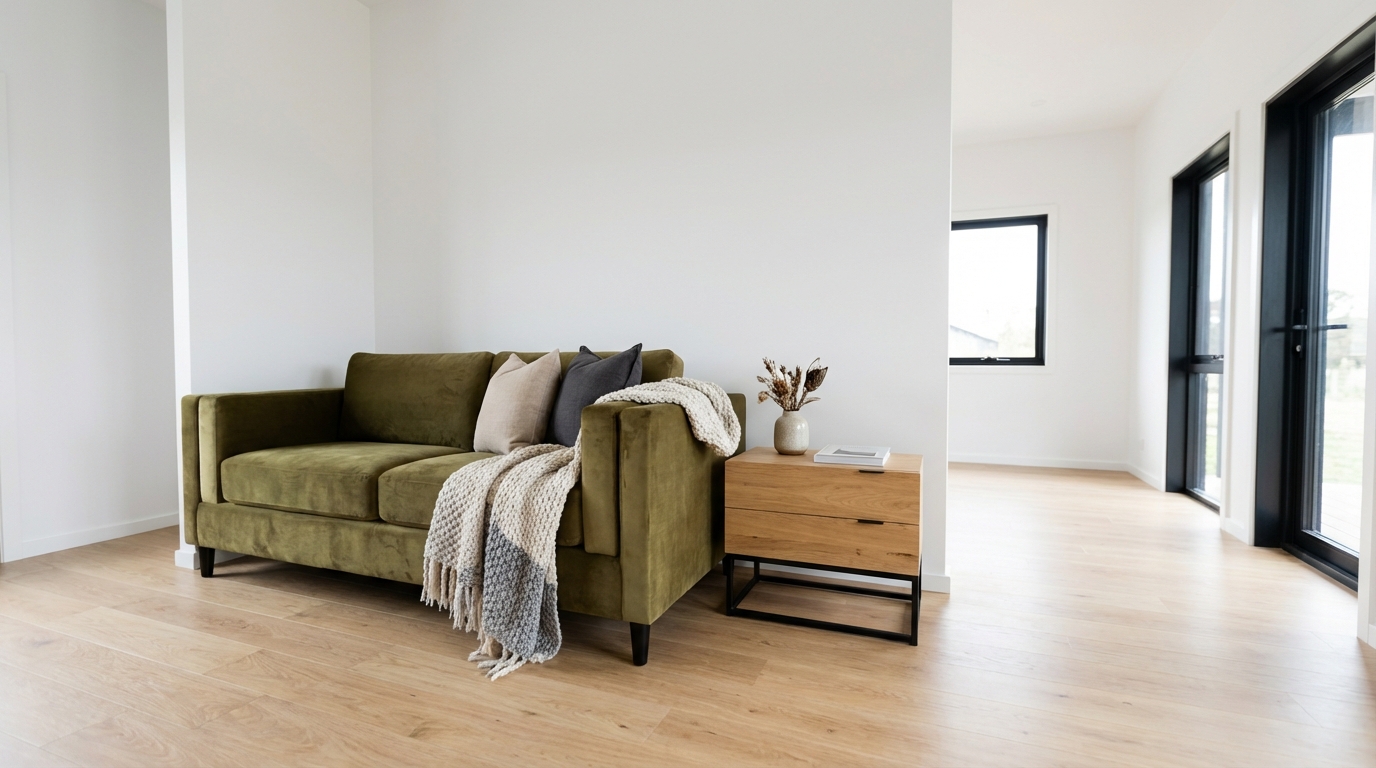
The same room with an olive green sofa — completely different mood. The darker fabric against the light hardwood floor creates contrast, while the oak side table ties the earthy tones together. Black-frame windows add a modern edge.
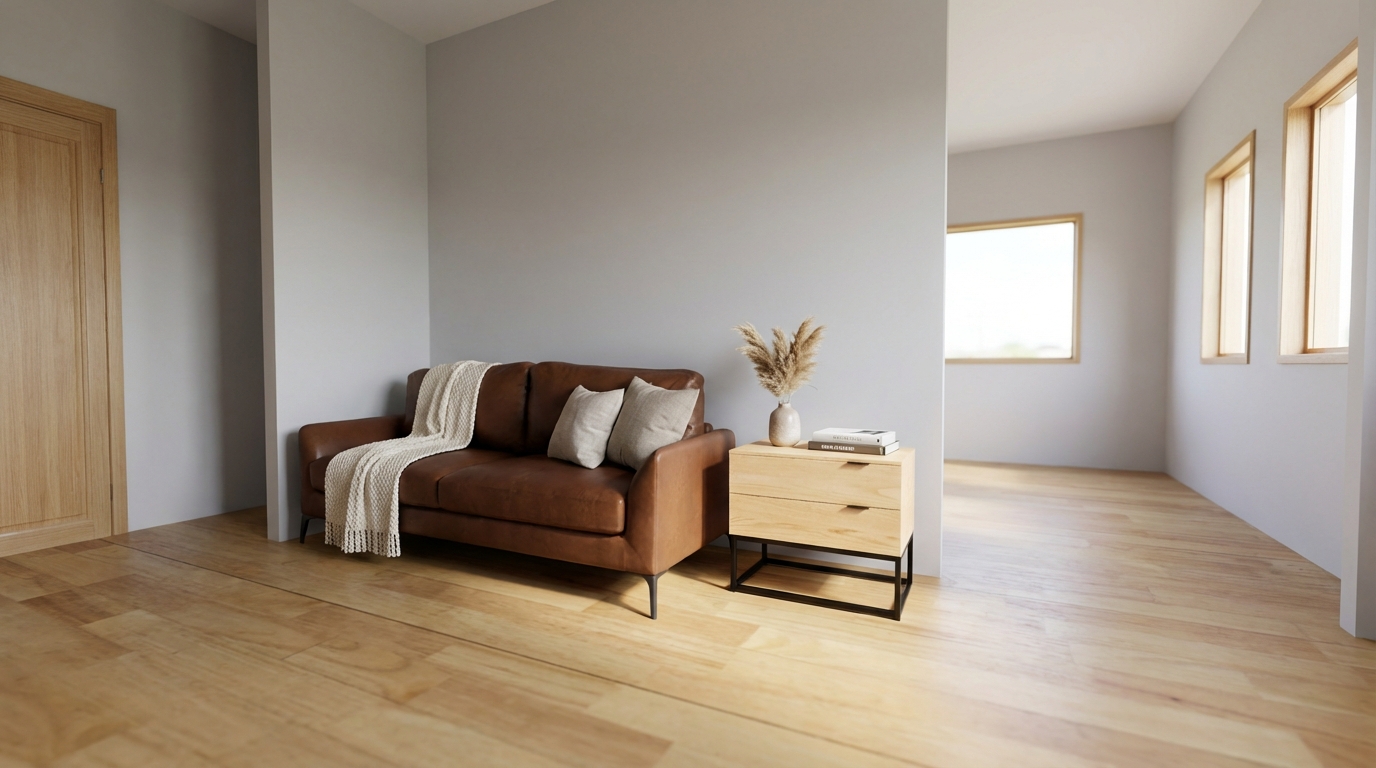
A brown leather sofa against soft grey walls creates a warm, classic look. The wooden door visible on the left shows how the room's door texture choice integrates with the overall design. This render also demonstrates how different wall colors completely change the room's character.
Floor Plan to 3D: Why AI Beats Traditional Methods
If you have tried converting a floor plan to 3D before, you probably used one of the traditional methods. Here is how they compare to AI-powered conversion:
Manual CAD Software (AutoCAD, SketchUp, Revit)
- Requires technical expertise and training
- You manually draw every wall, door, and window
- Takes hours to days for a single floor plan
- Software licenses cost hundreds per year
- No built-in furniture with real prices
Traditional Room Planners (Planner 5D, HomeByMe, Floorplanner)
- You manually recreate the floor plan inside the tool
- No automatic conversion from an existing floor plan image
- Furniture is generic 3D models, not real products
- Free tiers are usually very limited
- Good for simple rooms, struggles with complex layouts
AI Floor Plan to 3D Converters (MeltFlex)
- Upload any floor plan image — AI handles the conversion automatically
- Works with hand-drawn sketches, architect plans, real estate photos
- Complete 3D model in seconds, not hours
- Real furniture from real brands with real prices and dimensions
- Photorealistic AI renders included
- Free to use — no software installation, no CAD skills needed
Tips for Getting the Best 3D Model from Your Floor Plan
1. Use a Clear Image
The AI works best with clear, well-lit images. If you are photographing a printed floor plan, make sure the image is flat, evenly lit, and in focus. Avoid shadows across the page and extreme angles.
2. Show All Rooms
Upload the complete floor plan showing all rooms. The AI creates a single 3D model of the entire layout, so partial floor plans will produce partial models.
3. Label Rooms (Optional but Helpful)
If your hand-drawn floor plan has room labels (like "Kitchen", "Bedroom", "Office"), the AI can use these to automatically assign room types. This helps with furniture suggestions and material presets.
4. Include Doors and Windows
Draw or include door and window positions on your floor plan. The AI uses these to create proper openings in the 3D model — door swing directions, window placements, and natural light simulation all depend on this.
What Can You Do After Converting Your Floor Plan to 3D?
The 3D model is just the starting point. Once your floor plan is converted, you can:
- Test furniture layouts — try different arrangements before buying anything
- Compare material options — see oak vs. walnut flooring, white vs. grey walls, in your actual space
- Generate AI renders — create photorealistic images for each room to help visualize the final result
- Share designs — export or screenshot your 3D model and renders to share with family, roommates, or contractors
- Shop directly — every piece of furniture in your design is real and purchasable, with prices visible in the design view
- Plan renovations — see how structural changes (removing a wall, adding a door) would affect the space
Common Questions About Floor Plan to 3D Conversion
How long does it take to convert a floor plan to 3D?
With AI, the conversion takes seconds. Upload your floor plan image and the 3D model is generated almost instantly. Placing furniture and customizing materials might take 10-30 minutes depending on how many rooms you have and how detailed you want to get.
Can I convert a hand-drawn floor plan to 3D?
Yes. AI floor plan to 3D converters work with hand-drawn sketches. The AI is trained to recognize walls, rooms, and openings even in rough drawings. For best results, draw clear wall lines and mark door and window positions.
Is the 3D model dimensionally accurate?
The AI creates proportionally accurate models based on your floor plan image. Wall ratios, room sizes relative to each other, and door/window positions are preserved. For exact centimeter measurements, a scaled architect drawing produces the most accurate 3D model.
Can I change the flooring and wall colors per room?
Yes. The 3D floor plan model supports per-room customization. Each room can have a different floor material (hardwood, tile, carpet, stone), different wall colors, and different door styles. Changes are instant — click a texture and see it applied in real-time.
Do I need to download any software?
No. MeltFlex runs entirely in your browser. There is no software to install, no plugins, and no account required to start. Upload a floor plan and the 3D conversion happens online.
Start Converting Your Floor Plan to 3D
Whether you are moving into a new apartment, planning a renovation, or just curious how your space would look with different furniture and materials — converting your floor plan to 3D is the fastest way to visualize it.
Upload your floor plan to MeltFlex and get a free interactive 3D model in seconds. Place real furniture, customize every surface, and generate photorealistic AI renders of your home — all without CAD software, technical skills, or any cost.
Still comparing options? See our hands-on test of the 9 best free floor plan to 3D model AI tools to find the right one for your needs.
For more interior design inspiration, check out our guides on living room design, bedroom design, and complete house interior design.