Open floor plans are the most popular layout in modern homes — and the hardest to furnish. When your living room, dining room, and kitchen share one giant space with no walls, every furniture decision affects the entire room. Put the sofa in the wrong spot and the dining area feels cramped. Choose the wrong rug size and the living zone floats disconnected in a sea of floor.
The challenge is real: how do you create distinct zones in a space with no walls? The answer is furniture placement, not decoration. This guide gives you10 proven open floor plan layouts, exact furniture sizing rules, and zoning techniques that professional designers use — plus a free AI tool to test every layout in 3D before you move anything. First, the pieces that make it all work.
Best Furniture for Open Floor Plans
The best furniture for an open floor plan does two jobs at once: it stays comfortable to live with, and it quietly divides the space into zones. Before you think about arrangement, choose pieces from these categories. They are what make an open plan feel intentional instead of like one big undefined room.
- A sectional or low-back sofa. The single most useful piece. A sectional anchors the living zone, and its back forms an instant divider. Keep the backrest low (under about 85 cm) so sightlines stay open across the whole space.
- A console or sofa table. Placed behind a floating sofa, a slim console (25 to 40 cm deep) draws the line between living and dining without blocking light or views. It is the cheapest, most effective zone divider you can buy.
- Modular, movable pieces. Ottomans, nesting tables, and modular seating let you reshape the space for everyday life or for guests. Open plans reward furniture that can flex.
- A round or oval dining table. Soft edges ease traffic flow in a shared space and seat more people in less width than a rectangular table. Ideal when the dining zone sits in an open walkway.
- An open-frame or backless bookshelf. A double-sided shelf or a low credenza separates zones while light still passes through, so the room never feels chopped into boxes.
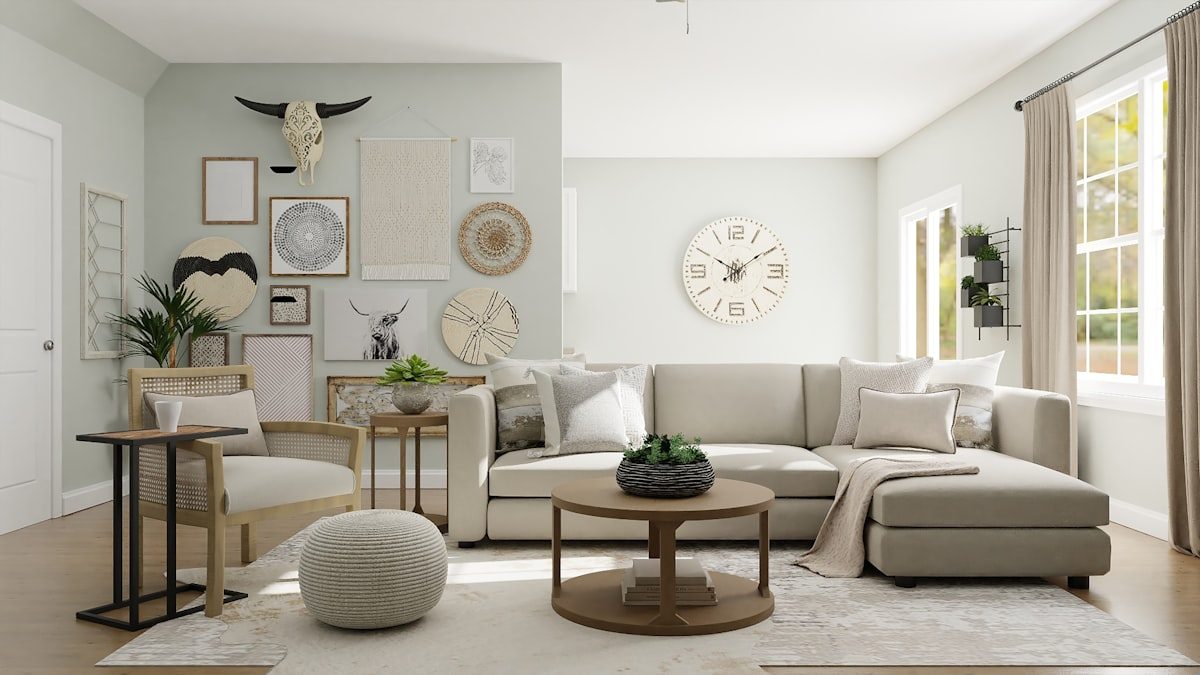
- Two or more area rugs. In an open plan, rugs are furniture. One per zone, sized so the front legs of the seating sit on it, turns bare floor into defined rooms.
- Slim-profile storage. A long, low credenza or media unit grounds the living zone and adds storage without walls. Keep it under about 75 cm tall so the space keeps breathing.
The thread through all of these: low profiles, and pieces that divide without blocking. Tall, solid furniture stranded in the middle of an open plan rebuilds the walls you paid to remove. Once you have the right pieces, the layout falls into place. You can test any sofa, table, or divider in your actual room with MeltFlex in about 20 seconds before you buy a thing.
Why Open Floor Plans Are Hard to Furnish
In a traditional home, walls make decisions for you. The living room is here, the dining room is there, and the kitchen is in the corner. Open floor plans remove those decisions and hand them to you.
The three problems every open floor plan owner faces:
- No focal point. In a closed room, the sofa faces the wall with the TV or fireplace. In an open space, there are 4+ walls to choose from. Where does the sofa face?
- Scale confusion. Furniture that looked perfect in a showroom gets swallowed by a large open space — or overwhelms a smaller open plan. Proportions are deceptive.
- Zone bleed. Without clear boundaries, the living zone melts into the dining zone which melts into the kitchen. The space feels like one big undefined room instead of three functional areas.
Every layout below solves all three problems. Pick the one that matches your floor shape.
The Golden Rules of Open Floor Plan Furniture
Before choosing a layout, memorize these rules. They apply to every open plan regardless of shape or size:
- Sofa backs define zones. The back of your sofa is the most powerful room divider you own. Place it facing away from the dining area and it creates an instant visual wall.
- One rug per zone. Each functional area (living, dining, workspace) gets its own rug. The rug edge IS the zone boundary. No rug = no zone.
- 90-120 cm walking paths. Leave at least 90 cm between furniture groupings for walking paths. These paths are the "hallways" of your open plan. Block them and the space feels cramped.
- Anchor to a focal point. Every zone needs one: TV or fireplace for the living zone, the table for the dining zone, the island for the kitchen. All furniture in each zone faces its anchor.
- Float furniture away from walls. In open plans, pushing furniture against walls creates a dead void in the center. Pull the sofa 30-60 cm from the wall. It feels counterintuitive in a large space but creates intimacy within each zone.
10 Open Floor Plan Layouts
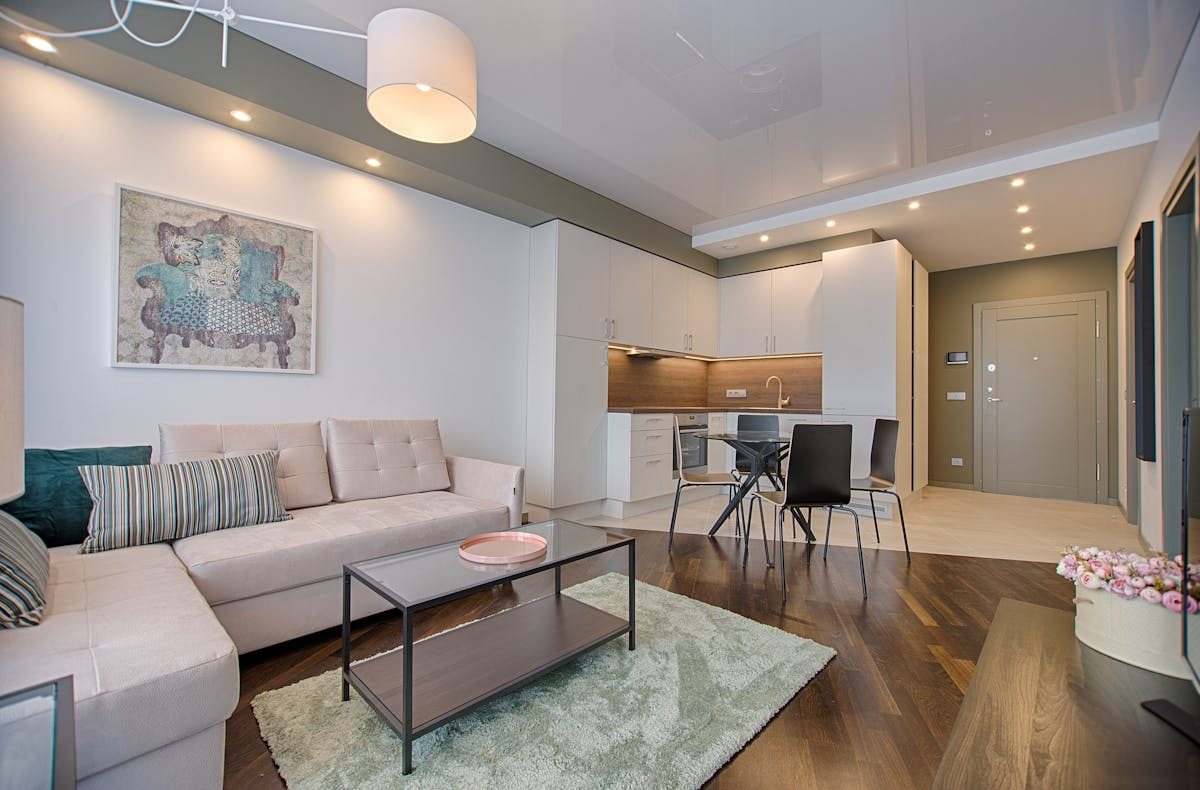
Layout 1: The Classic L (Living + Dining)
The most common open plan layout. The living zone and dining zone sit side by side in an L-shape, with the kitchen behind one of them.
How to arrange it:
- Sectional sofa or sofa + armchairs facing the TV wall
- Console table behind the sofa as a divider between living and dining
- Dining table perpendicular to the sofa, centered under a pendant light
- Large rug under the sofa group, separate rug (or none) under the dining table
Best for: Rectangular open plans 30-50 m² with kitchen on one end.
Layout 2: The Island Divider (Kitchen-Centered)
The kitchen island becomes the natural boundary between kitchen and living space. This layout works when the kitchen is in the center of the open plan, not tucked against a wall.
How to arrange it:
- Kitchen island positioned perpendicular to the main wall, dividing cooking from living
- Bar stools on the living side of the island for casual dining
- Sofa facing away from the island, toward the TV or window
- Formal dining table near the window for natural light
Best for: Open plans where the kitchen is the center of social life. Great for entertaining.
Layout 3: The Floating Sofa (Large Open Plans, 45+ m²)
In large open plans, the sofa sits in the middle of the room — not against any wall. This creates a living room island surrounded by walking paths, with the dining zone behind the sofa and the kitchen beyond.
How to arrange it:
- Sofa floated in the center of the space, back toward the dining zone
- Coffee table in front, two armchairs flanking either side
- Large rug (minimum 240x300 cm) anchoring the entire seating group
- Console table or narrow bookshelf behind the sofa as the zone divider
- Dining table 120+ cm behind the sofa with its own pendant light
Best for: Large open plans where wall-hugging furniture creates a dead center. The floating sofa fills the space and creates purpose.
Layout 4: The Symmetrical (Formal Open Plans)
Two matching sofas face each other with a coffee table between them, centered on a fireplace or feature wall. The dining zone sits behind one sofa. This creates a formal, balanced living zone that looks intentional from every angle.
How to arrange it:
- Two identical sofas facing each other, 150-180 cm apart
- Coffee table centered between them
- Both sofas on one large rug
- Fireplace, art wall, or TV at the head of the arrangement
- Dining zone behind one sofa, separated by the sofa back + console table
Best for: Homes where the living room is visible from the front door. Creates an impressive visual anchor for the entire open plan.
Layout 5: The TV Corner (Open Plans with Awkward TV Placement)
The biggest complaint in open floor plans: "Where do I put the TV?" This layout solves it by placing the TV on a side wall (perpendicular to windows to reduce glare) and angling the sofa toward it.
How to arrange it:
- TV mounted on a side wall at seated eye level (100-110 cm center height)
- Sofa angled to face the TV, not parallel to the main wall
- Armchair on the opposite side for a conversation angle
- The angled furniture creates a natural triangular zone
- Dining table on the other side of the room, away from the TV wall
Best for: Open plans where the obvious TV wall faces windows (glare) or is too far from the seating area.
Layout 6: The Gallery Walk (Long Narrow Open Plans)
Long, narrow open plans (common in converted lofts and row houses) need a linear layout. Zones line up along the length: kitchen → dining → living, with a clear walking path along one side.
How to arrange it:
- Kitchen at one end, living room at the other, dining in the middle
- All furniture pushed to one side, keeping a 90-120 cm walking path on the other
- Sofa against the long wall, facing across (not along) the room
- Dining table between kitchen and living, acting as a zone transition
- Runner rug in the walking path to unify the length
Best for: Open plans under 4.5 m wide. Loft conversions, railroad apartments, and narrow row houses.
Layout 7: The Conversation Pit (Social Open Plans)
Forget the TV. This layout creates a social hub where all seating faces inward — toward each other. A round coffee table or ottoman in the center, with sofas and armchairs arranged in a circle or U-shape.
How to arrange it:
- Sofa + two armchairs arranged in a U-shape or circle
- Round coffee table in the center (easier to reach from all seats)
- No TV in the living zone (or TV on a swivel mount, turned away during socializing)
- The open side of the U faces the kitchen for interaction while cooking
Best for: Hosts who entertain frequently. Families who prefer conversation over TV. Open plans connected to the kitchen where the cook wants to participate.
Layout 8: The Work Triangle (Open Plan + Home Office)
Remote workers need a desk in the open plan without it feeling like they live in an office. This layout creates a discreet work zone that is functional during work hours and invisible during off hours.
How to arrange it:
- Desk against the wall behind the sofa, facing away from the living zone
- The sofa back hides the desk from the living area visually
- A narrow bookshelf between desk and sofa for extra separation
- Task lamp on the desk (different light temperature than living zone lamps)
- When working: you face the wall. When relaxing: you face the TV. Psychological separation.
Best for: Anyone working from home in an open plan. See our home office design guide for more workspace ideas.
Layout 9: The Bookshelf Divider (Maximum Zone Separation)
When you want real separation without walls, a floor-to-ceiling open bookshelf acts as a room divider that lets light through while blocking sightlines. This creates the strongest zone definition possible in an open plan.
How to arrange it:
- Open-back bookshelf (IKEA Kallax or similar) positioned perpendicular to a wall
- Living zone on one side, dining zone on the other
- Style the bookshelf with books, plants, and objects on both sides — it looks finished from every angle
- Leave the top shelf empty or low-height items only to maintain light flow
Best for: Renters who cannot build walls. Open plans where zones feel uncomfortably blended. Families who want a visual barrier between play area and adult living zone.
Layout 10: The Minimal Open (Small Open Plans, 25-35 m²)
Small open plans cannot afford furniture that serves only one purpose. This layout uses the minimum number of pieces, each doing double duty, to create distinct zones in a tight space.
How to arrange it:
- Apartment-size sofa (150-170 cm) — not a full sectional
- Round dining table (80-100 cm) that doubles as a desk — positioned between kitchen and living
- Two lightweight chairs that can move between dining and living as needed
- No coffee table — use a side table or the dining table for drinks
- One large rug that covers both living and dining zones (unifying a small space is better than fragmenting it)
Best for: Open plan studios and small apartments under 35 m². See our studio apartment design guide for even more small-space layouts.
Furniture Sizing Guide for Open Floor Plans
The most common mistake in open plans is buying furniture that is too small (gets swallowed by the space) or too large (blocks walking paths). Here are the exact dimensions that work:
Sofa
- Small open plan (25-35 m²): 150-180 cm sofa or loveseat. No sectional.
- Medium open plan (35-50 m²): 200-240 cm sofa or L-shaped sectional (240-270 cm total).
- Large open plan (50+ m²): Large sectional (270-300 cm) or two facing sofas (200 cm each).
Dining Table
- 2-4 people: Round 80-100 cm or rectangular 120x80 cm.
- 4-6 people: Rectangular 150-180x90 cm or round 120 cm.
- 6-8 people: Rectangular 200-240x100 cm. Only if your open plan is 45+ m².
Rug
- Living zone: 200x290 cm (minimum) to 240x300 cm (ideal). All front sofa legs must sit on the rug.
- Dining zone: 200x300 cm under a 6-seat table. Must extend 60 cm beyond table on all sides.
- No rug at all is better than a too-small rug. A 120x170 cm rug in a living zone looks like a bath mat.
How to Zone an Open Floor Plan Without Walls
Zoning is the art of creating separate "rooms" without physical boundaries. In an open floor plan, you have five tools:
- Rugs: The strongest visual zone marker. Different rug under each area = different room.
- Lighting: Pendant light over the dining table, floor lamp in the living zone, task lamp at the desk. Each zone gets its own light signature.
- Furniture backs: The back of a sofa, a console table, or a bookshelf creates a visual wall where there is none.
- Ceiling height variation: If you have exposed beams or a dropped ceiling above the kitchen, it naturally zones the space. Work with your architecture.
- Paint or accent walls: One painted wall behind the living zone (different from the kitchen wall color) defines the boundary. See our paint color guide for choosing the right shade.
Plan Your Open Floor Plan Layout with AI (Free)
Open floor plans are the hardest rooms to visualize because proportions are deceptive. A sofa that looks the right size in your head might block the walking path to the kitchen. A dining table for six might make the living zone feel cramped.
MeltFlex solves this. Upload your floor plan — an architect drawing, a hand sketch, or a real estate listing photo — and get an interactive 3D model in seconds.
- Test every layout from this guide: Move the sofa to 5 positions in 2 minutes. See which one opens up the walking paths best.
- Check exact dimensions: Does a 240 cm sectional leave enough room between the dining table and the wall? See it at real scale.
- Try different zones: Place rugs, tables, and shelving to create different zone configurations. Find the one that makes your open plan feel like separate rooms.
- Generate renders: See photorealistic images of your open plan with furniture, lighting, and colors — before buying anything.
Upload your floor plan and plan your open layout in 3D — free →
Open Floor Plan Mistakes to Avoid
- Pushing everything against the walls: The #1 open plan mistake. It creates a bowling alley void in the center. Float your sofa. Pull furniture away from walls.
- One overhead light for the entire space: A single ceiling light flattens the space and removes all zone definition. Use 3-5 different light sources at different heights.
- Matching everything: Open plans need visual variety between zones. Different rug textures, different lighting styles, different furniture materials. Matching everything makes the space feel like a furniture showroom, not a home.
- No walkway planning: People walk through your open plan dozens of times per day. If the path from kitchen to living room requires squeezing past chairs, your layout is wrong. Map walking paths first, then arrange furniture around them.
- Ignoring the kitchen sightline: You will see the kitchen from the living zone. If the kitchen is messy, that view ruins the entire space. Design the living zone to face away from the kitchen, or ensure the kitchen has enough closed storage to stay clutter-free.
Open Floor Plan Layout Checklist
- Can you walk from the front door to every zone without squeezing past furniture? (90-120 cm paths minimum)
- Does every zone have its own rug (or is the space small enough for one unified rug)?
- Does every zone have its own light source (not relying on one ceiling light)?
- Is there a clear focal point in the living zone (TV, fireplace, or window)?
- Is the sofa back creating a zone boundary (not floating uselessly in the middle)?
- Can you sit in the living zone without seeing kitchen clutter?
- Is there a surface within arm's reach of every seat (side table, coffee table, console)?
- Have you tested the layout at real scale in a 3D planner?
Start Planning Your Open Floor Plan
An open floor plan is not a problem — it is an opportunity. The same space that feels like an undefined box with the wrong furniture becomes a flowing, multi-functional home with the right layout. The difference is always furniture placement, not decoration.
Start by uploading your floor plan to MeltFlex. See your open space in 3D, test the layouts from this guide, place real furniture at exact scale, and find the arrangement that makes your open plan feel like home.
Design your open floor plan in 3D — free →
Related guides: living room design ideas, studio apartment layouts, how to choose paint colors, 8 interior design styles, and 3D room planner guide.