Everyone who has bought a sofa online knows the small panic that follows the delivery van. You loved it on screen, and now it is in your living room swallowing half the floor, or marooned against one wall looking like a doll’s couch. The whole problem is scale. You could see the sofa, you just could not see it in your room, at the right size, before you paid. That is exactly the gap AI room measurement is starting to close, and it turns out you can get most of the way there from a single photo.
Quick answer: AI can estimate a room’s dimensions and square footage from one photo, and for the question most people actually care about, will this piece of furniture fit and look right, that estimate is more than enough. The most useful version is not a number at all. You photograph your room, drop in the exact sofa you are eyeing, and a tool like MeltFlex renders it back at true scale, sized to your space. A flat photo carries no built-in scale though, so for an exact, on-the-record floor area you still need a reference object or a LiDAR scan. Here is what is possible, how accurate it is, and where the sources land.
The short version
- A single photo carries no scale. Reference objects, depth sensors, or a floor plan are what turn an estimate into a measurement.
- The pipeline is segment, estimate depth, scale to a reference, then integrate the floor area for square footage.
- Accuracy runs from ~15 to 25 percent (no reference) down to a few centimetres (LiDAR / ARKit RoomPlan).
- Best use cases: listing square footage, will-it-fit furniture checks, and virtual staging at true scale.
- MeltFlex has no measurement endpoint. Its API is the design and staging layer you run once you know the room’s scale.
Can AI actually measure a room from one photo?
Yes and no, and the nuance is the whole story. A neural network can look at a photo of a room and produce a confident set of dimensions. The catch is that a single 2D image has no inherent sense of size. The same picture could be a doll’s house or a ballroom, because nothing in the raw pixels tells the model how many real centimetres one pixel represents. That missing piece is called scale, and recovering it is the entire game.
Humans solve this instinctively using context. We know a door is about 80 centimetres wide and 2 metres tall, a kitchen counter sits around 90 centimetres high, and a standard step is roughly 18 centimetres. AI estimators do the same thing, either by recognising those familiar objects as references or by leaning on a depth model trained on millions of scenes. When a known reference is present, the estimate tightens dramatically. When it is absent, the model is essentially guessing the scale from learned priors, which is where the error creeps in.
So the honest framing is this: AI measurement from a photo is a probabilistic estimate, not a tape measure. For deciding whether a sectional fits along a wall, that estimate is more than good enough. For a legally binding floor area on a property deed, it is not. Knowing which side of that line you are on decides everything else.
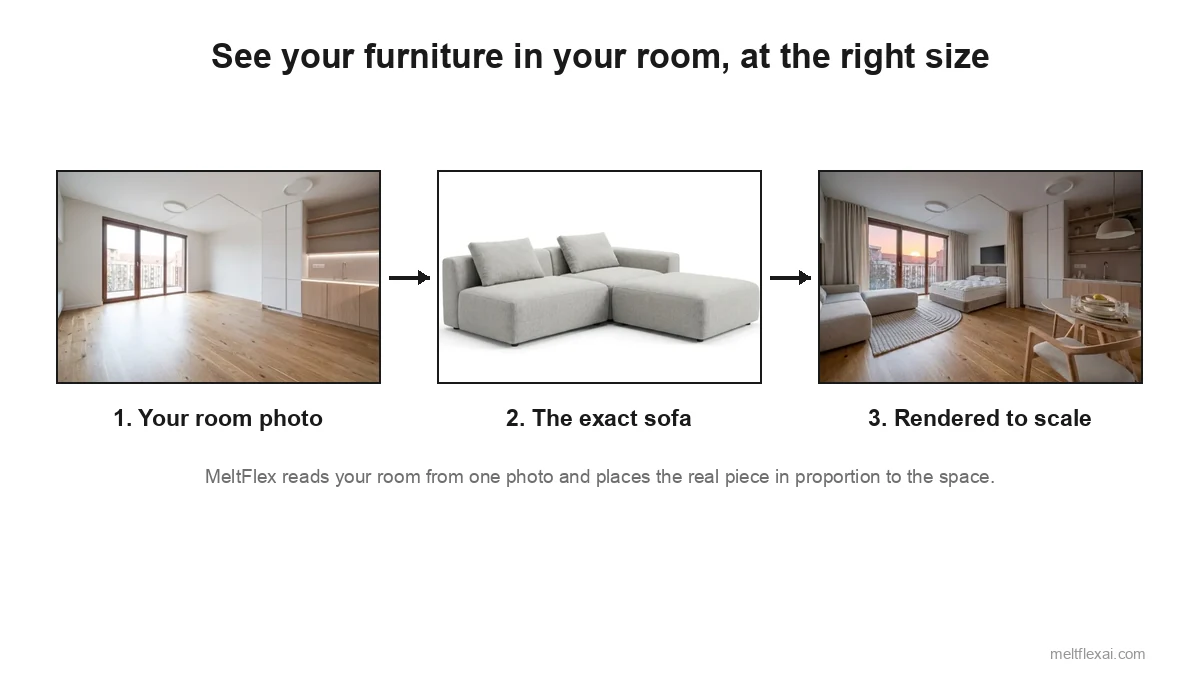
The version that actually helps: see the furniture at true scale
Here is the shift that matters. For most people the goal was never a tape-measure number, it was a decision: does this sofa fit, and does it look right in my room. You do not need centimetres for that, you need to see it. So instead of measuring the room and then trying to imagine the furniture in it, you let the AI do both at once. It reads the proportions of your room from the photo, then renders the actual piece you are considering into that space at a believable size.
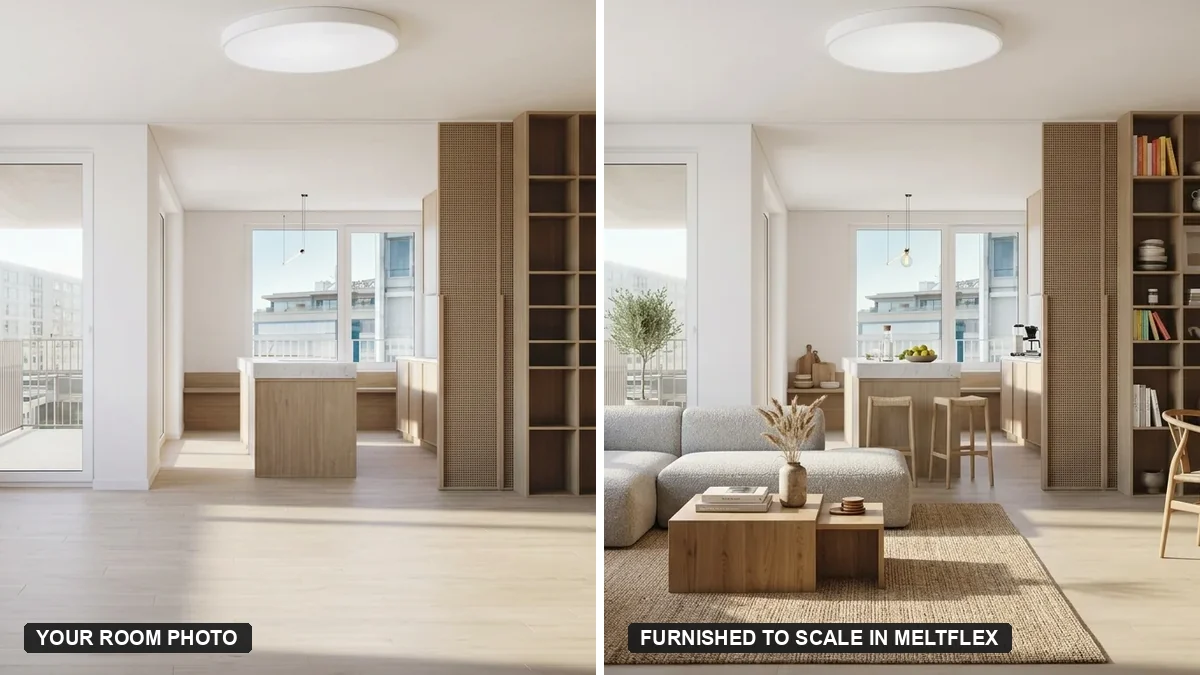
Your real room on the left, furnished to scale by MeltFlex on the right. Same layout and window, with the furniture sized to the space.
This is what MeltFlex is built for. You upload a photo of your real room, add a reference image of the specific sofa, bed, or table you are looking at, and it returns a photorealistic version of your room with that piece placed in proportion to the walls and the floor. Because it works from your actual room instead of inventing one, the result keeps your layout and your window, and the furniture lands at a size that tells you the truth about whether it fits. If you want the raw numbers as well, the furniture fit calculator handles the will-it-fit maths.
See your furniture in your room, at the right size
- Start from your real room. One photo is enough. No tape measure required.
- Add the exact piece. Drop in the sofa or bed you are considering as a reference image.
- See it to scale. MeltFlex renders it in proportion to your space, so the fit is obvious.
- Try every option. Swap pieces and styles in seconds, before you spend a penny.
How it works: from a photo to square footage
Almost every approach, whether you self-host it or call a cloud model, follows the same four-stage pipeline. Understanding it helps you reason about where error enters and which stage to invest in.
- Segmentation. First the model separates the room into surfaces, floor, walls, ceiling, and openings like doors and windows. This tells the system which pixels belong to the floor plane it eventually needs to measure.
- Monocular depth estimation. A depth model (open families like MiDaS and Depth Anything are common starting points) predicts how far each pixel is from the camera. This recovers the room’s shape, but only in relative terms, not real units yet.
- Scaling to a reference. The relative depth map is anchored to the real world using something of known size: a detected door, a sheet of A4 on the floor, the camera’s focal length and height, or a hardware depth reading. This is the single most important step for accuracy.
- Geometry and area. With a scaled floor plane, the system fits a rectangle or polygon to the floor, integrates its area for square footage, and reads off wall lengths and ceiling height. The output is a tidy set of numbers you can return as JSON.
The interesting engineering insight is that stages one and two are largely solved by off-the-shelf models. The accuracy of your whole feature lives in stage three. Invest your effort in good reference detection or sensor fusion, not in chasing a marginally better depth network.
How accurate is it, really?
This is the number your product decisions should hang on, so it is worth being precise. Accuracy is not a property of “AI” in the abstract, it is a property of the method you choose and the inputs you feed it.
| Method | Typical error | Best for | Needs |
|---|---|---|---|
| LiDAR / ARKit RoomPlan | 1 to 3% | Native apps, precise scans | Recent iPhone / iPad Pro |
| Multi-photo photogrammetry | 3 to 7% | Detailed 3D capture | Many overlapping photos |
| Single photo + reference | 5 to 10% | Listings, furniture fit | A known-size object in frame |
| Single photo, no reference | 15 to 25%+ | Rough proportion only | Just one image |
The practical takeaway: if you can keep a door or window in the shot, you move from the bottom row to the third row and roughly halve your error for free. If you are on a recent iPhone or iPad Pro and precision matters, Apple’s RoomPlan is hard to beat because it does the scaling in hardware with LiDAR. And if all you have is one photo, set expectations accordingly and lean on the estimate for fit and layout rather than quoting an exact area.
What you can build with it
Room estimates are rarely the product on their own. They are the input that unlocks a feature your users actually care about, and that same scale awareness is what keeps a render honest. Furnish a room at true proportions and it stays believable across every style you try.
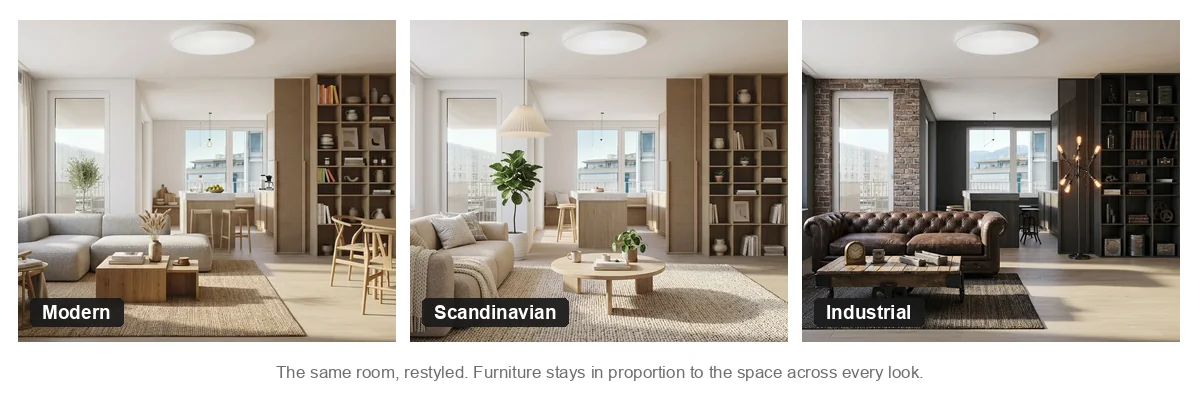
The same room, three styles. Furniture stays in proportion to the space in each one, which is exactly what scale awareness buys you.
- Listing square footage. Auto-fill an approximate floor area on a real estate or rental listing from the photos an agent already uploads, with a clear “estimated” label.
- Will-it-fit furniture checks. The highest-value consumer feature. Compare a product’s dimensions against the room and tell a shopper if a sofa fits with walking clearance. This is what our furniture fit calculator does.
- Virtual staging at true scale. Knowing the room size means a staging render furnishes it in correct proportions instead of dropping in a comically large bed. This is where the design layer comes in.
- Renovation and quoting tools. Square footage drives flooring, paint, and labour estimates, so a rough area from a photo speeds up early quotes.
- Inventory and insurance. Room dimensions help size contents, plan moves, and document spaces at scale.
Doing it via API: build versus buy
There is no single magic endpoint that does the whole job perfectly, so most teams assemble two layers: a measurement layer and a design layer. Here is the honest landscape.
For the measurement layer, your options are to run a depth model yourself (Depth Anything or MiDaS for monocular depth, plus a segmentation model and your own reference-scaling logic), to use Apple’s RoomPlan and ARKit if you are native on iOS, or to call a hosted depth or 3D-reconstruction model. The trade-off is the usual one: self-hosting gives you control and lower marginal cost, a managed model gives you speed to ship.
For the design and staging layer, once you know the room’s scale, that is where MeltFlex fits. The MeltFlex API does not measure rooms, it restyles and furnishes them. You send a room photo and optional reference furniture, and it returns a photorealistic redesign that respects the space. Wired after your estimate step, it lets you furnish a room at the correct proportions:
// 1. Your measurement step returns the room scale (your own model / RoomPlan)
const room = await estimateRoom(photoUrl);   // { widthM: 4.2, lengthM: 5.1, sqft: 230 }

// 2. Furnish it at true scale with the MeltFlex API
const res = await fetch("https://www.meltflexai.com/api/v1/generate", {
  method: "POST",
  headers: {
    "Authorization": "Bearer mf_sk_your_key",
    "Content-Type": "application/json",
  },
  body: JSON.stringify({
    prompt: `Stage this ${room.sqft} sq ft living room in warm minimalist style,
             keep the layout, scale furniture to the real room size`,
    image: roomPhotoDataUrl,            // base64 data URL of the room
    referenceImages: [sofaDataUrl],     // the exact sofa, placed to scale
  }),
});

const { image, creditsUsed } = await res.json();   // staged render, true to scale
Where MeltFlex fits in the stack
- Not a measurement API. It will not return square footage, and we would rather tell you that than sell you a number it cannot stand behind.
- It is the design and staging layer. Restyle and furnish any room photo via a single REST call.
- Built for scale. Per-call credit pricing, reference images, and base64 or URL inputs, documented in the API reference.
- Pairs with any estimator. Run your depth model or RoomPlan first, then stage the result at true proportions.
Getting more accurate numbers from a photo
Whether you build the estimator or guide users through a flow, the same handful of habits move you up the accuracy chart without any model changes:
- Keep a reference in frame. A door, a window, or a sheet of A4 on the floor gives the model a known size to anchor to, and it is the single biggest accuracy win available.
- Shoot straight on from a corner. A wide corner shot that shows two walls and the floor gives the geometry far more to work with than a tight angle.
- Mind the wide-angle lens. Phone ultra-wide cameras distort perspective and inflate room size. A standard lens, or correcting for the focal length, helps a lot.
- Use more than one photo when you can. Two or three overlapping shots unlock photogrammetry-style reconstruction and tighten the estimate considerably.
- Prefer good light. Depth models struggle with dim, low-contrast scenes, so a bright, evenly lit room is easier to read.
When you need real measurement, not an estimate
It is worth being blunt about the limits, because a feature that overpromises precision erodes trust fast. If your use case is legal, financial, or construction-grade, a photo estimate is the wrong tool. Official residential floor area in the US, for example, is measured to the ANSI Z765 standard, not eyeballed from a render. For a build quote, a property deed, or anything that goes on a contract, you still want a LiDAR scan, a laser measure, a measured floor plan, or a surveyor. Use the AI estimate for instant feedback and a fast first pass, then flag that an exact figure needs a proper measurement. Estimate for speed, measure for the record.
For the large middle ground, though, helping someone visualise a space, decide if furniture fits, or get an approximate listing area, a photo estimate is genuinely useful, ships fast, and works from inputs your users already have. That is the sweet spot, and it is exactly where dropping the real sofa into your real room and seeing it at scale beats any number on a page.
Sources and further reading
- Apple, RoomPlan: on-device LiDAR room capture that returns scaled dimensions on recent iPhone and iPad Pro.
- Apple, ARKit: AR depth and world tracking used for in-app room scanning.
- MiDaS and Depth Anything: open monocular depth-estimation models behind most single-photo approaches.
- ANSI, Z765 Square Footage standard: the recognised method for measuring single-family residential floor area, the benchmark a photo estimate is approximating.
Keep reading
- Measure a room from a photo with AI, the consumer-facing how-to if you are an end user rather than a developer.
- The MeltFlex virtual staging API for developers, a deeper look at the design and staging layer.
- What size furniture fits my room, the visual guide behind the will-it-fit use case.
- From a 2D floor plan to a 3D model with AI, when you have a plan rather than a photo.