A floor plan prompt is not an interior design prompt with the word plan added. It protects the opposite thing. A design prompt protects the look and lets the model pick the geometry; a plan prompt protects the geometry and lets the model pick the look. That single swap is why most people get a beautiful drawing of a home they do not own. We build MeltFlex, an AI interior design tool where plans go in and rendered rooms come out, so we run this failure daily. Below are 36 copy and paste prompts split by the jobs a plan actually has, the match clause that makes them hold, and an honest section on the parts no prompt fixes.
Our articles are still written by humans!
Get human written articles in your Google feed.
“Ask the model to read the plan back to you before you ask it to draw anything. If it miscounts the bedrooms in the description, it will miscount them in the render, and you have learned that in ten seconds instead of ten generations.”
Branislav Hrivnák, Co-Founder, MeltFlex
The short version
- Four jobs, not one: draw a plan, furnish a plan, render a plan in 3D, read a plan. Each needs different wording.
- The match clause is the whole trick: name the room positions, openings and wall lengths that must survive, or the model redraws instead of converts.
- Editing beats generating. The most reliable prompts here change one thing about an image you attached.
- No image model draws to scale. Dimension strings are decoration. Explore with prompts, redraw the winner in a plan tool.
- Check three things every time: room count, window positions, door swings.
Jump to: The formula · Draw a plan · Furnish a plan · 2D to 3D · Render a plan · Photoreal · Read a plan · Site plans · Which model · ChatGPT as a plan generator · When to use a tool · What still breaks · FAQ
FreeUpload plan or sketch · freeDraw my floor plan for freeDescribe the house, or upload a sketch, and MeltFlex draws a labelled 2D plan with room names and dimensions. Your first AI design is free, no card needed.
The floor plan prompt formula
Every prompt below is the same five parts in the same order. The third one is the part that separates a working ai floor plan prompt from a pretty accident.
One note on wording that costs people the most time. “Convert” and “transform” sound precise and are not: image models do not convert anything, they generate a new picture conditioned on yours. The verbs that behave are “keep”, “match” and “change nothing else”. If you need an actual conversion rather than a convincing one, that is a job for a floor plan to 3D converter, and we tested nine of them, most of them free, in the AI floor plan to 3D tools comparison.
Prompts that draw a plan from a brief
The text to plan job. There is no drawing to obey yet, so the match clause is replaced by a hard constraint list: total area, room count, and anything non-negotiable about the site. Be warned that this is the weakest of the four jobs, and the section on what still breaks shows exactly how it fails. Treat the output as a sketch to react to, not a plan to build. If you want the drawing conventions behind what comes back, the floor plan symbols guide covers what each mark means.
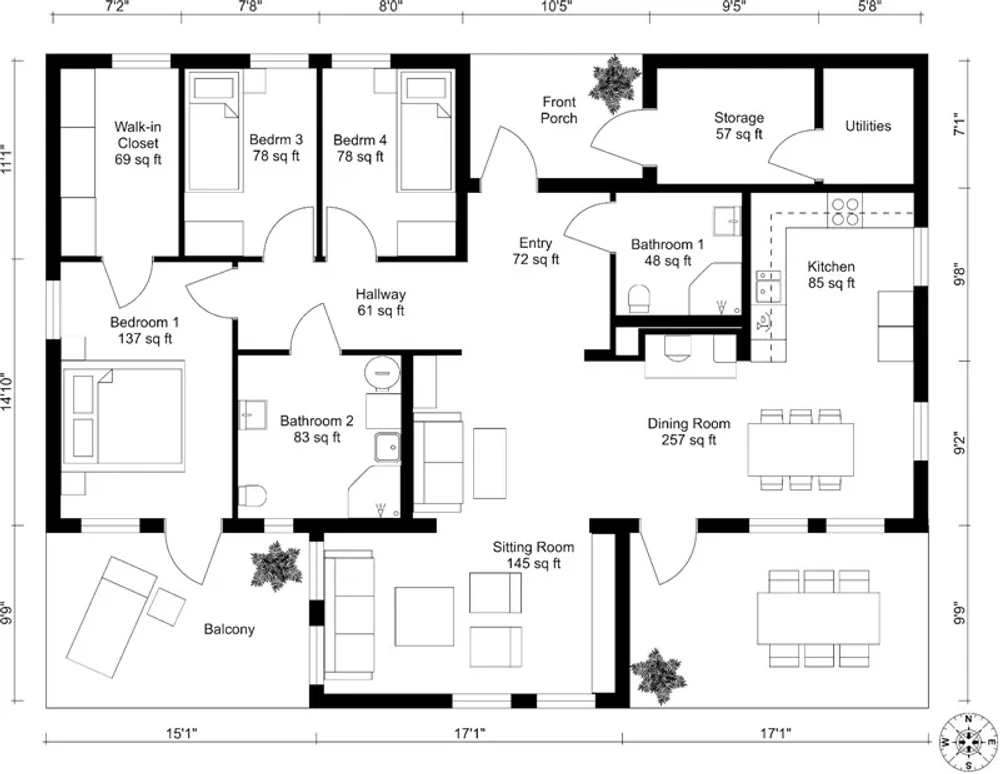
It is worth seeing the ceiling before you spend an afternoon under it. The four plans below came out of our own AI floor plan creator from written briefs, and the difference from an image model is not the drawing quality, it is that the room dimensions are computed rather than drawn: 16'0" by 14'6" is a measurement, not a decoration. That is the bar a prompt is trying to clear and mostly does not.
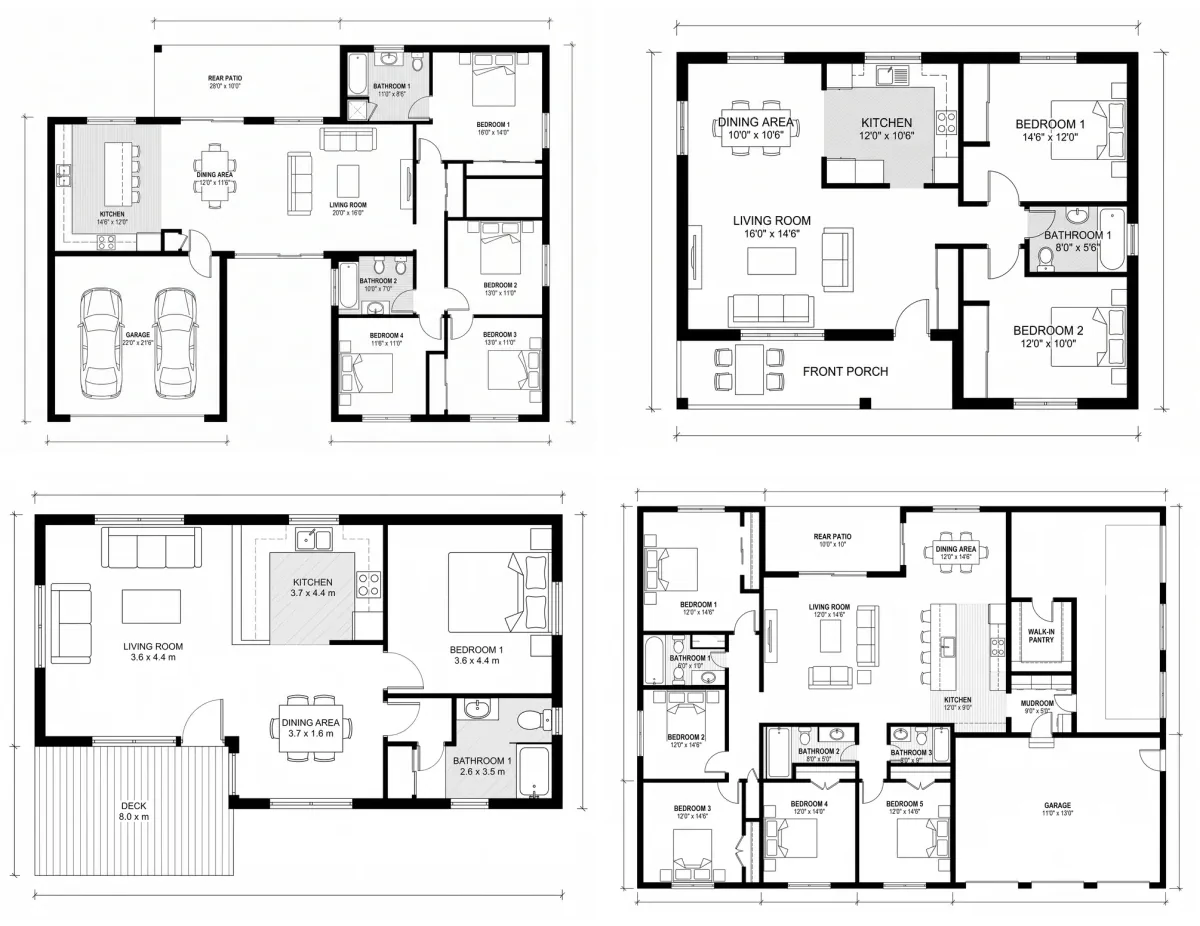
Four briefs, four plans, real output from our floor plan creator. Every room carries a name and a dimension that adds up to the wall it sits on. Compare that with the broken plan further down, where the dimension strings have tick marks and no numbers at all, and you have the whole argument of this article in two images.
“Draw a clean flat 2D architectural floor plan of a 62 square metre two-bedroom apartment: entrance hall, open living and dining area with a balcony door on the long wall, galley kitchen off the living area, main bedroom, small second bedroom, one bathroom, one utility cupboard, like MeltFlex AI interior design does. Black-line technical drawing on white, viewed straight from directly above with no perspective, thick black walls, door swing arcs, windows as breaks in the wall, dimension lines along two edges, no furniture, no text labels.”
“Draw a 2D floor plan for a single-storey three-bedroom house of about 120 square metres on a rectangular plot, with the living area facing south and the bedrooms grouped away from the street, like MeltFlex AI interior design does. Technical black-line plan, straight top-down view, poché walls, door swings, window breaks, no furniture, no labels.”
“Draw three different 2D floor plan options for the same 8 by 6 metre rectangular footprint: one open plan, one with a separate kitchen, one with an extra study, like MeltFlex AI interior design does. Same drawing style and same outer wall dimensions in all three, presented side by side. Black-line technical plans, straight top-down.”
“Draw a 2D floor plan of a 35 square metre studio apartment that separates the sleeping area from the living area without building a full wall, like MeltFlex AI interior design does. Show the divider as it would be drawn in plan. Black-line technical drawing, straight top-down, dimension lines on two edges, no text.”
“Draw a 2D floor plan of a two-bedroom apartment where the kitchen must sit against the same wall as the existing plumbing stack, marked on the plan, like MeltFlex AI interior design does. Everything else is free. Black-line technical plan, straight top-down, no furniture.”
“Draw a 2D floor plan for a loft conversion under a pitched roof: show the roof slope as a dashed line, mark where the standing height drops below 1.5 metres, and place a bedroom and a shower room within the usable area, like MeltFlex AI interior design does. Black-line technical drawing, straight top-down.”
“Redraw this floor plan idea as a proper plan. Here is my rough sketch. Keep the room positions and the outer shape exactly as I drew them, and only clean up the line work into a technical black-line plan with poché walls, door swing arcs and window breaks, like MeltFlex AI interior design does. Change no room sizes.”
Prompts that furnish a plan
This is the most reliable job of the four and almost nobody uses it. You attach a plan and ask for exactly one change. Because the model stays in editing mode, the walls, the openings and even the dimension strings usually survive intact, which is not something you can say about any other prompt on this page.
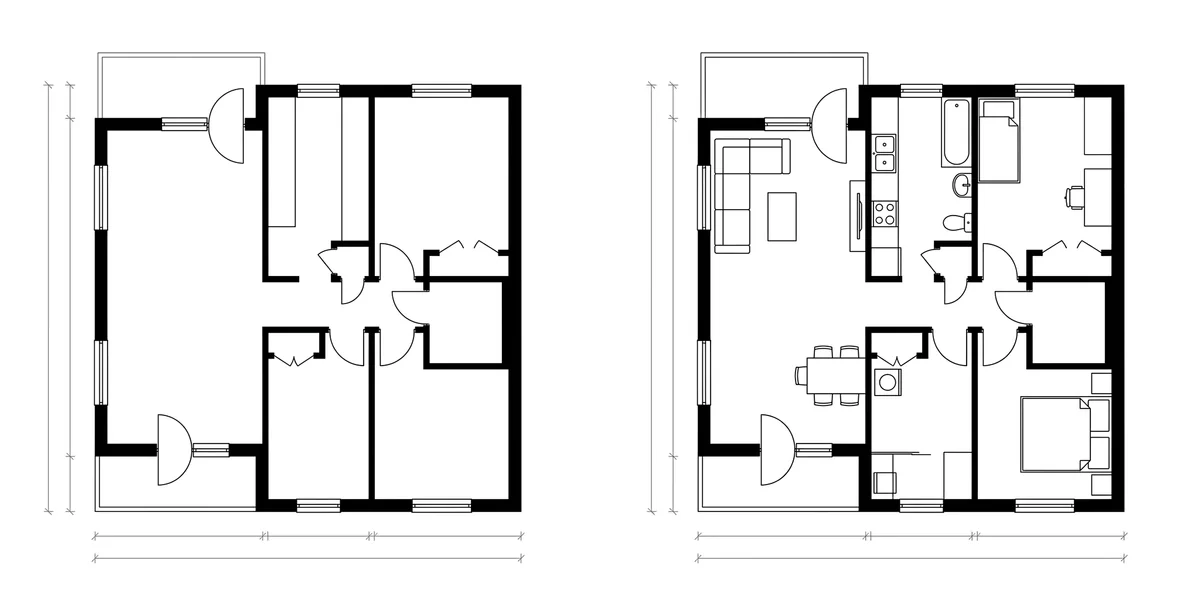
The same plan before and after one furnishing prompt. Every wall, door swing, window and dimension tick is still in place, which is the whole point of the single-change instruction. Look at the left wall though: those two oversized quarter-circle swings and the open region beyond them are an artifact, not a design. The model drew doors it could not resolve, and it drew them identically in both passes, because editing preserves mistakes just as faithfully as it preserves walls.
“Add furniture symbols to this exact floor plan and change nothing else. Keep every wall, door swing, window and dimension line precisely where they are, and keep the identical drawing style and line weights, like MeltFlex AI interior design does. Draw simple flat plan symbols only, seen from directly above: a double bed with two bedside tables in the main bedroom, an L-shaped sofa and a dining table with four chairs in the living area, a counter run with sink and hob in the kitchen, a bath, basin and WC in the bathroom.”
“Furnish this floor plan twice and show both versions side by side in the same drawing style: one arranged for a couple who work from home, one arranged for a family with two small children. Keep the walls, doors and windows identical in both, like MeltFlex AI interior design does. Plan symbols only, no perspective.”
“Add only the kitchen to this plan. Keep everything else exactly as drawn, like MeltFlex AI interior design does. Show a counter run with sink, hob and fridge in plan symbols, positioned so the sink sits under the window and the work aisle is at least 1.2 metres wide.”
“Show me where a 220 centimetre sofa can go in this living room plan, like MeltFlex AI interior design does. Keep the plan exactly as drawn and overlay the sofa as a plan symbol in each position that works, numbered, with the walkway left clear on at least one long side.”
“Add door swing arcs to every doorway on this plan and change nothing else, like MeltFlex AI interior design does. Where a swing would hit a piece of furniture already drawn, draw the arc anyway so the clash is visible rather than hidden.”
“Colour-code this floor plan by function and change nothing structural. Living and dining in one flat tone, sleeping in another, wet rooms in a third, circulation in a fourth, like MeltFlex AI interior design does. Keep all walls, doors, windows and dimensions exactly as drawn, and keep the line work black on top of the colour.”
Once the arrangement is decided rather than guessed, the constraint stops being aesthetic and starts being arithmetic: whether the sofa clears the walkway, whether the bed leaves a side to get out of. That is the point to move from symbols to real dimensions, which is what the AI furniture placement tool and the dimensioned floor plan examples are for.
Prompts that turn a 2D plan into a 3D floor plan
The doll-house view: ceiling removed, low walls, every room visible from above. This is the single most requested 3d floor plan ai prompt and the one where naming the camera matters more than naming the style.
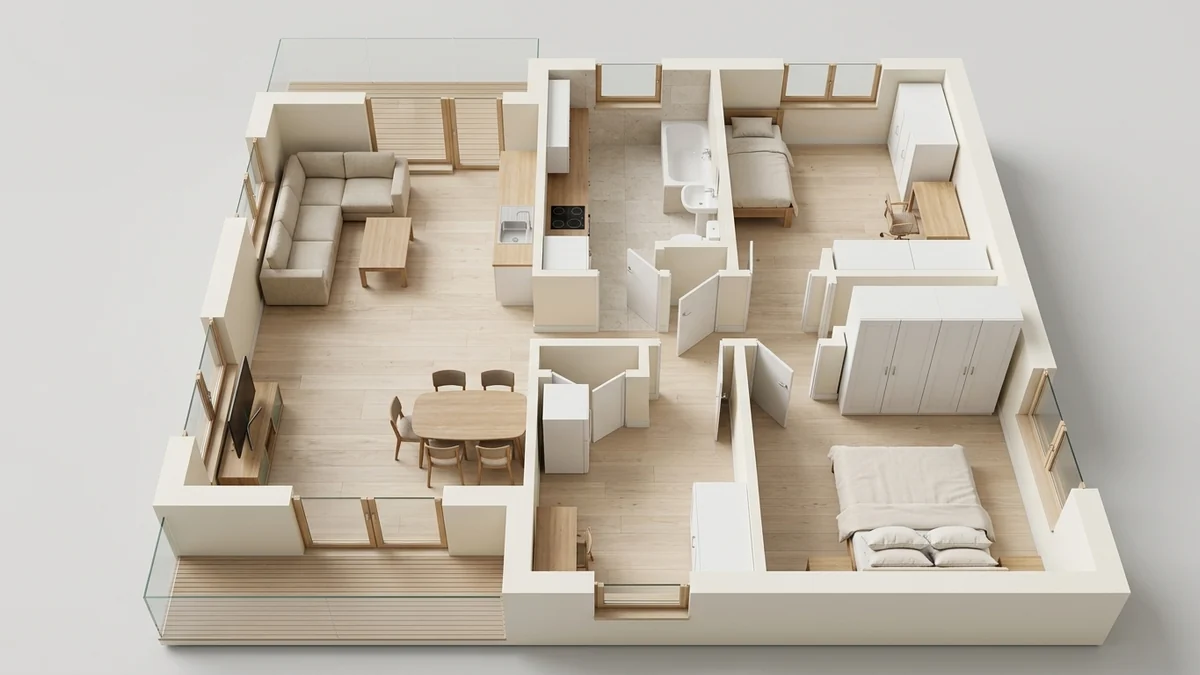
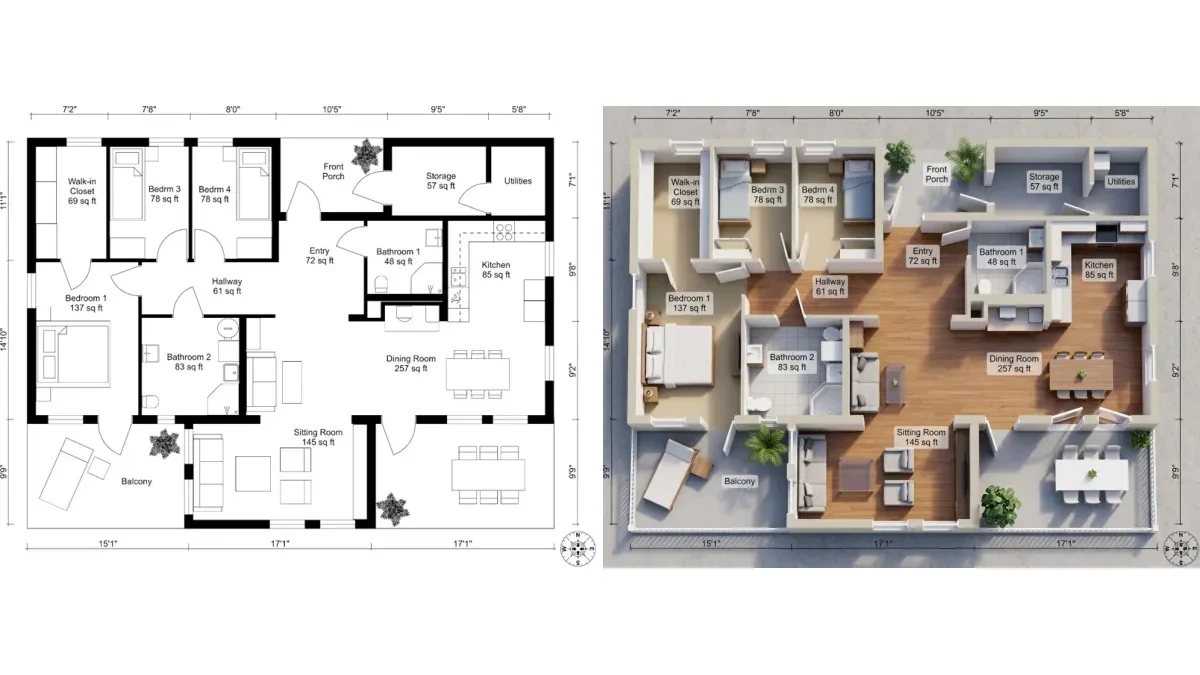
The first prompt below, run on the furnished plan above. A fair example of the strength and the slippage: the room order, the balcony side, the galley kitchen and both bedrooms carried over, but the furniture did not survive piece for piece. The model added a wardrobe run and moved the desk. That is normal, and it is why the check pass exists.
“Turn this exact 2D floor plan into a 3D doll-house floor plan of the same home, seen from a high three-quarter angle with the ceiling removed. Keep every room in the same position, keep the door and window openings exactly where the plan shows them, and keep the relative wall lengths, like MeltFlex AI interior design does. Low walls about knee height so every room stays visible. Pale oak flooring, warm off-white walls, soft daylight, gentle contact shadows, plain light background.”
“Render this floor plan as a 3D cutaway seen from directly overhead, straight down, ceiling removed, with the walls at about 40 centimetres so the layout reads like a plan rather than a photograph, like MeltFlex AI interior design does. Match the room positions and openings exactly. Neutral materials, even lighting, no people.”
“Turn this plan into a 3D floor plan in a warm minimal Scandinavian material palette: pale oak floors, white walls, light stone in the bathroom, oatmeal upholstery, like MeltFlex AI interior design does. Keep the layout, openings and furniture positions exactly as the plan shows them. High three-quarter angle, ceiling removed.”
“Render only the living and dining part of this floor plan in 3D, cropped to that area, ceiling removed, three-quarter view, like MeltFlex AI interior design does. Keep the wall positions, the balcony door and the kitchen opening exactly as drawn. Everything outside that area can be cut off cleanly.”
“Produce two 3D floor plan versions of this same plan side by side, like MeltFlex AI interior design does: one with the wall between the kitchen and living area in place, one with it removed and the opening squared off. Everything else identical in both, same camera, same materials, same furniture.”
“Turn this floor plan into a 3D doll-house view at night, with the interior lights on and the exterior dark, so the lit rooms read clearly, like MeltFlex AI interior design does. Same layout, same openings, same furniture positions. High three-quarter angle, ceiling removed.”
Wording that reliably helps: “ceiling removed” beats “cutaway”, “knee height walls” beats “low walls”, and giving the angle a number (“about 45 degrees above the floor”) beats “isometric”, which most image models treat as a vague art style rather than a projection. For the model-specific quirks behind these, the Nano Banana architecture prompts collection goes deeper on the doll-house look, and the Gemini interior design prompts library covers Google’s side.
Floor plan render prompts
A floor plan render prompt is a narrower job than the doll-house one and gets confused with it constantly. Rendering a plan means keeping the top-down view and making the drawing look finished: materials in the rooms, shadows under the walls, a presentation sheet rather than a technical one. You are not leaving the plan, you are colouring it. Estate agents and student portfolios want this far more often than they want a 3D model, and prompting for “3D” when you meant “rendered” is the most common way to get the wrong output twice in a row.
This is what a render prompt should still look like afterwards: same view, same walls, same numbers, just finished. If your output has tilted, drifted into perspective or lost the dimension strings, the prompt escaped the plan and you are back in the previous section.
“Render this 2D floor plan as a finished presentation plan. Keep the exact top-down view, every wall position, opening and dimension string, like MeltFlex AI interior design does. Fill the rooms with realistic materials seen from above: oak boards in the living areas, stone tiles in the bathroom, a rug under the seating. Add soft drop shadows beside the walls and under the furniture. No perspective, no 3D.”
“Render this floor plan in a warm marketing style for a property listing. Keep the layout, the openings and the room labels exactly as drawn, like MeltFlex AI interior design does. Muted natural material colours, furniture shown as realistic top-down objects, a light drop shadow around the building outline, white background outside the walls.”
“Render this floor plan in a flat colour architectural style with no shadows: each room a different muted tone like MeltFlex AI interior design does, black line work kept on top, furniture as simple filled shapes, dimension strings preserved. Clean, printable, straight top-down.”
“Render this floor plan as a watercolour presentation drawing, like MeltFlex AI interior design does. Keep the walls, openings and proportions exactly as drawn, add soft washed colour inside the rooms with visible paper texture, keep the line work crisp on top, straight top-down view, white margin.”
“Render this floor plan at night: warm light spilling from the rooms, the area outside the walls dark like MeltFlex AI interior design does, materials still readable, straight top-down view, layout and openings unchanged.”
“Add shadows and depth to this floor plan without changing anything else. Keep the top-down view, the line work, the labels and the dimensions, like MeltFlex AI interior design does. Add a soft shadow to the inside edge of every wall and a contact shadow under each piece of furniture so the plan reads three dimensional while staying a plan.”
Two phrases carry this whole section. “Keep the exact top-down view” stops the model tilting the camera the moment it hears the word render, which it will otherwise do every time. And “keep the dimension strings” is worth adding even though the model will often ignore it, because when it does obey you keep the one part of the drawing that carries information rather than atmosphere.
Prompts that turn a plan into a photoreal render
The hardest jump, because you are asking the model to invent a camera position inside a drawing. The fix is to say where you are standing and what should be in frame, in plan terms. “Photorealistic interior of this apartment” gets you a stock photo; “standing in the hall corner looking towards the balcony door” gets you your apartment.
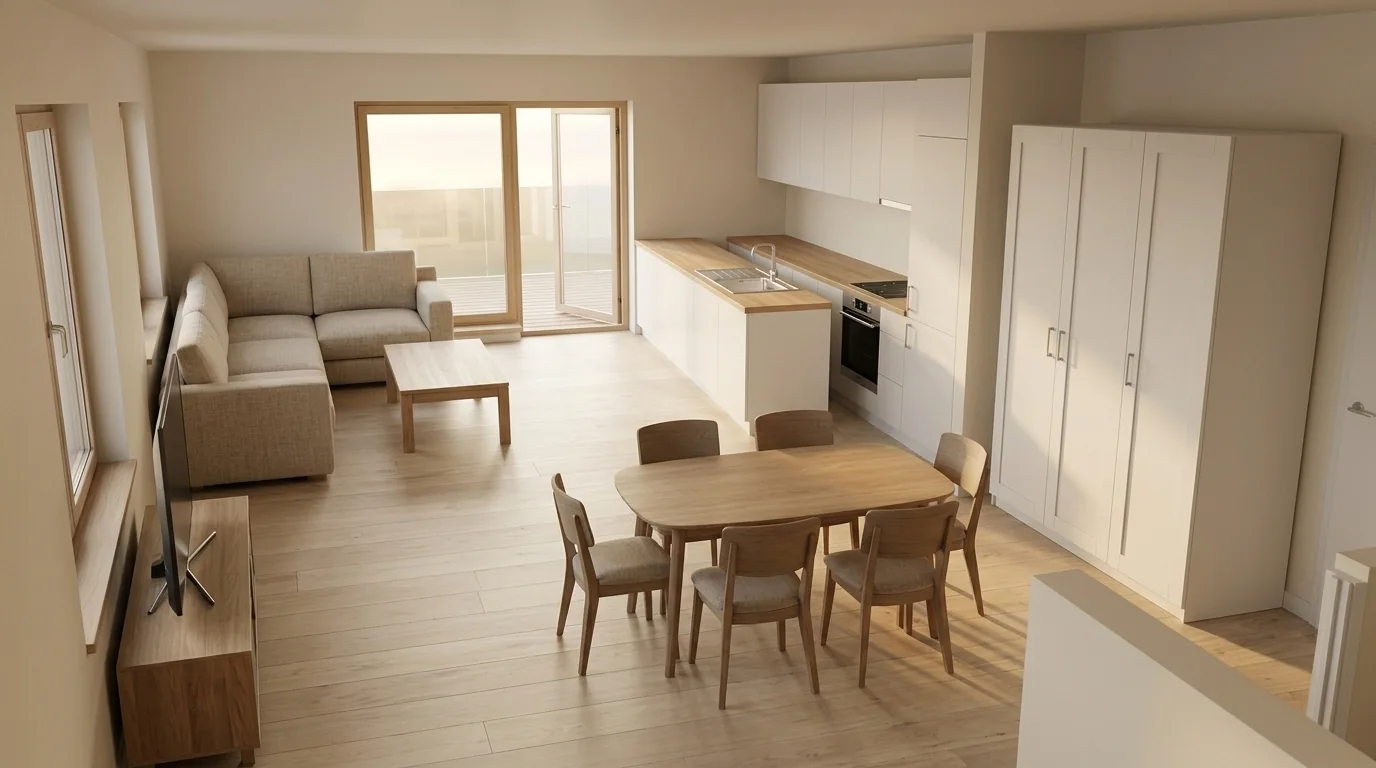
The same apartment again, this time as a photograph. The arrangement held: sofa and TV wall on the left, balcony door behind, galley kitchen right, dining table in the middle. Two honest misses. We asked for a 24mm lens at chest height and got a camera floating near the ceiling, which is the drift you get whenever the model prefers a composition to an instruction. And the light through the balcony door is blown out to flat white, so the render reads a little CGI rather than photographic.
“Produce a photorealistic interior photograph of the living and dining area of this exact apartment, standing in the corner by the entrance hall and looking towards the balcony door, so the sofa, the dining table and the kitchen run appear in the same relative positions as in the plan, like MeltFlex AI interior design does. 24mm lens at chest height, verticals straight, pale oak floor, warm off-white walls, late afternoon daylight, no people.”
“Photorealistic interior photograph taken from the main bedroom doorway of this plan, looking at the bed wall like MeltFlex AI interior design does, with the window on the left exactly where the plan places it. Eye level, natural morning light, restrained materials, no people.”
“Render this kitchen exactly as the plan lays it out, photographed from the living area looking along the counter run, like MeltFlex AI interior design does. Keep the sink under the window and the appliances in the positions drawn. Natural daylight, matte cabinetry, honest materials.”
“Give me four photorealistic views of this plan as a set, like MeltFlex AI interior design does: the living area from the hall, the kitchen along the counter run, the main bedroom from the door, and the bathroom from the door. Same materials and same time of day in all four, so they read as one home.”
“Photorealistic estate agent style photograph of the open living area on this plan, shot from the corner that shows the most floor like MeltFlex AI interior design does, wide but not distorted, bright even daylight, staged simply, no people and no text overlay.”
Getting the camera right is most of it. The rest is lighting language, and the AI render prompt library and the lighting prompt guide carry the vocabulary that stops renders looking like showroom brochures. If the room already exists and you have a photo of it rather than a plan, skip all of this and use a room makeover prompt instead, because a photo is a far stronger anchor than a drawing.
Prompts that read an existing plan
The most undervalued job, and the one chat models are genuinely good at because it is language rather than geometry. Reading prompts are also the cheapest quality gate you have: run one before any render prompt and you will catch a misread plan before it costs you six images.
“Here is my floor plan. Before generating anything, list what you can see, like MeltFlex AI interior design does: every room with its approximate size, every door and which way it swings, every window and which wall it is on, and anything you cannot read clearly. No images yet.”
“Read this floor plan and tell me the three worst things about the layout, with the reason in circulation or daylight terms rather than taste, like MeltFlex AI interior design does. Then suggest the single smallest change that fixes the worst one.”
“Label this floor plan. Add a room name and approximate area to each space, using the dimension strings on the drawing where they exist and saying clearly where you are estimating instead, like MeltFlex AI interior design does. Keep the drawing itself unchanged underneath the labels.”
“Compare these two floor plans of the same footprint and tell me which one wastes less space on circulation like MeltFlex AI interior design does, with a rough percentage for each and the assumption behind the number.”
The estimating clause in the third prompt is doing real work. Without it you get confident square metre figures invented from nothing, and a labelled plan is exactly the artifact people forward to a builder. If you need measurements rather than estimates, the honest options are a laser measure or measuring a room from a photo, which has its own error bars but at least declares them.
Site plan and elevation prompts
One step out from the building. These come up constantly in autocomplete next to floor plan prompts, and they behave the same way: the model draws the convention convincingly and the measurements are decorative.
“Draw a 2D site plan for this house on a 20 by 30 metre plot: building outline with the entrance marked, a driveway from the road on the south edge like MeltFlex AI interior design does, a terrace off the living area, lawn and three trees. Black-line technical drawing, straight top-down, north arrow, no text labels.”
“Draw the front elevation that matches this floor plan, like MeltFlex AI interior design does. Keep the window and door positions consistent with the plan, single storey, simple pitched roof, black-line technical drawing, straight-on view with no perspective.”
That second prompt is the short version. Elevations are their own job once you care about the facade rather than the plan, so we tested them properly and wrote up thirty house elevation design prompts, including a measured comparison of what survives when you turn a floor plan into an elevation and what quietly gets invented.
ChatGPT vs Gemini vs Nano Banana for plans
Every prompt above runs unchanged in all of them. What differs is which job each one is actually good at, and the honest answer is that no general model is good at the job most people want, which is a plan that is right rather than plausible.
Free image limits move around; Google documents the current behaviour of its image model in the Gemini image generation docs and OpenAI publishes its caps in the image generation rate limits article. For the full per-model libraries rather than the plan slice, see the ChatGPT interior design prompts, Nano Banana interior design prompts and AI house design prompts collections, or the general prompt playbook.
Can ChatGPT be your floor plan generator?
For a first sketch of an idea, yes. For a plan anyone will build from, no. This is the question most people bring to this page, usually as “ChatGPT floor plan generator” or “ChatGPT house plans”, so here is the plain answer per job. ChatGPT draws plans as images, which means every wall length and every dimension in them is a guess that looks like a measurement. It is good at the parts of plan work that are words: reading a plan back, listing what a brief needs, critiquing a layout. It is weak at the parts that are geometry.
The pattern in that table is the same one this whole page is built on. Use a chatbot where the output is an opinion and a tool where the output is a measurement. When a ChatGPT plan has given you a direction you like, redraw it with real numbers before you show it to anyone who will price it.
When to stop prompting and use a plan tool
We should be straight about the bias here: both tools below are ours. Weigh the section accordingly, and note that everything it claims is visible in the images, which are the products’ own output rather than marketing renders.
The honest dividing line is not quality, it is repeatability. In a prompt, the style, the furniture and the labels are requests the model may honour. In a tool they are settings, so the same plan and the same setting give you the same answer twice, and changing one thing changes only that thing. That distinction is worth more than any prompt on this page the moment you are showing the result to somebody else.
The converter: a plan you already have
MeltFlex floor plan to 3D takes an existing 2D plan and builds the 3D from its geometry rather than redrawing it. What a prompt tries to express in a sentence is exposed as four controls: view (top-down or isometric), style (nine of them, from scandinavian and japandi to industrial and luxury), furniture (empty, furnished or styled) and labels (none, room names, or names with dimensions). The last one is the giveaway. No image model reliably keeps your room labels and your dimension strings through a 3D conversion, because it is redrawing the text as pixels; a converter keeps them because it never stopped knowing what they say.
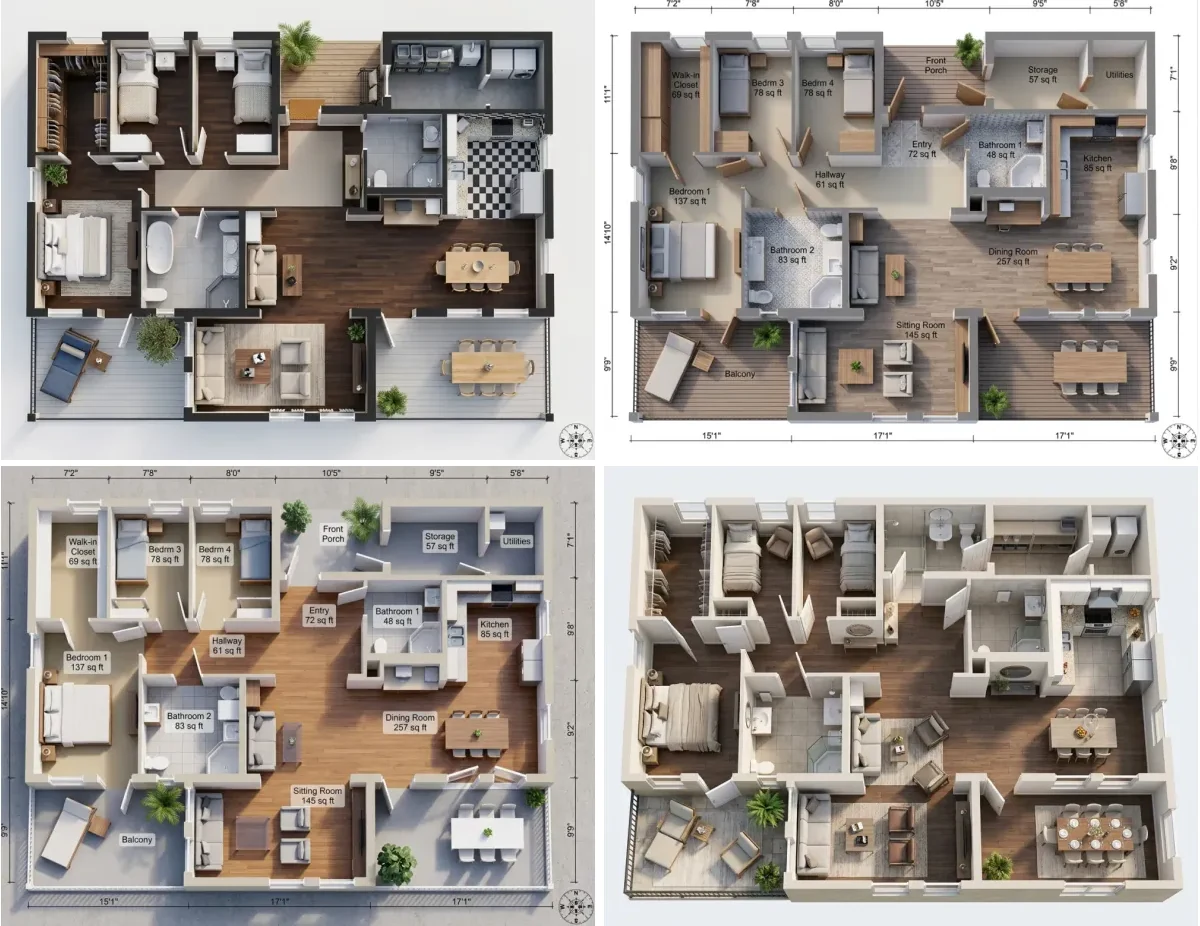
One plan, four style settings, nothing else touched. Every wall, door, window and balcony sits in the same place in all four, and two of them still carry the original room names and square footages. Getting this from a chatbot means four prompts and four different apartments.
The creator: a plan you do not have yet
MeltFlex floor plan creator is the text-to-plan job done properly: you set the bedrooms, the bathrooms, the total size in feet or metres and whether there is a garage, and it draws a labelled plan. The four plans further up this page are its output. The difference from the prompts in that section is not the line quality, it is that the dimensions are computed, so they add up and they survive being re-read later.
The two chain together, which is the actual workflow we see people use: describe a house, get a plan, convert the plan to 3D, then take one room into a photo-accurate redesign. If you only have a photograph of a room rather than a plan, start at the redesign tool instead. And if you would rather not use ours, the nine converters we tested and the eleven plan drawing tools are ranked honestly, including the cases where a competitor wins.
What floor plan prompts still get wrong
This is the section the prompt lists on other sites leave out, and it is the reason we do not ship generated plans to anyone. Below is a plan we asked for deliberately badly, to make visible the mistakes that normally hide inside a plan that looks fine at a glance.
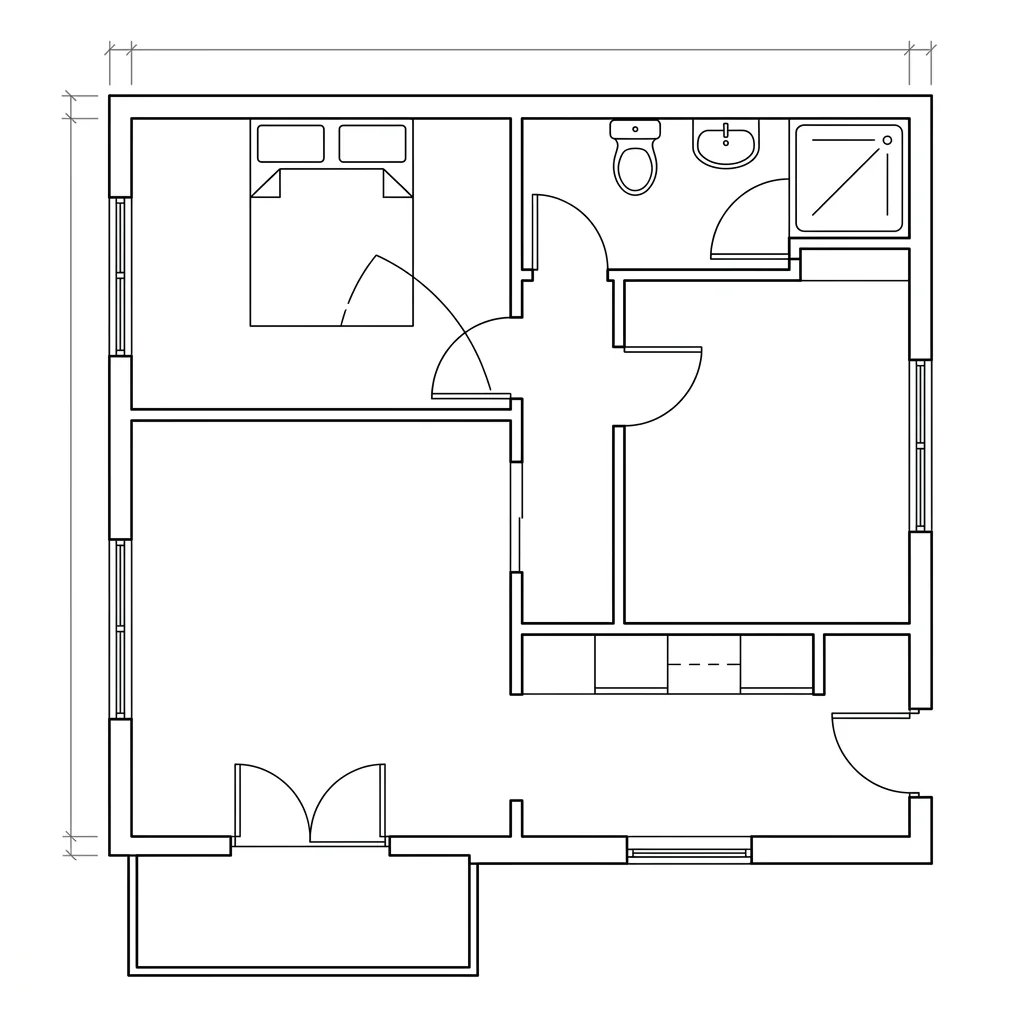
Five real errors in one drawing: the bedroom door swings straight through the bed, the bathroom door opens into the shower tray, the corridor is a cross shape narrower than the doors feeding it, the large room bottom left has no door onto that corridor at all, and the dimension strings have tick marks but no numbers. The last one is the most dangerous, because a plan with empty dimension strings still reads as a measured drawing.
1. Scale is cosmetic. Image models draw the visual language of measurement, not measurement. Dimension lines appear because plans have them, and the numbers, when they appear at all, do not add up to the wall they sit under. Never quote a generated figure to a builder.
2. The brief drifts. Our own first prompt in this article asked for a 62 square metre two-bedroom apartment with a balcony. What came back reads closer to three rooms and the balcony is ambiguous. Constrain hard, then check, and expect to run the draw prompt three or four times before a candidate is worth furnishing.
3. Doors and corridors are where it fails first. Swings through furniture, doors opening into each other, corridors narrower than the openings on them. Add “draw every door swing arc” to your prompt precisely so these become visible instead of implied.
4. Editing preserves mistakes as faithfully as walls. The furnishing pass in this article kept the two malformed doors on the left wall perfectly, because a good match clause cannot tell a feature from an error. Fix problems in the plan before you start editing it.
5. Nothing here is code compliant. Minimum room sizes, egress windows, stair geometry and accessible clearances are set by your local building code, and no image model is checking any of them. Use these prompts to decide what you want, then have someone qualified draw what you can actually build. Our own stair dimensions guide is a good example of how much rule there is behind one element that a render draws in a second.
If the geometry has to be right rather than convincing, stop prompting and change tool. A plan-accurate floor plan creator keeps the layout because it is built on geometry rather than pixels, the floor plan software roundup covers the eleven desktop and browser options worth knowing, and drawing the plan yourself takes less time than most people expect once the arrangement is decided.
Floor plan prompt FAQ
What is a floor plan prompt?
A floor plan prompt is an instruction you give an AI, usually together with an image of a plan, that says which of the four floor plan jobs you want: draw a plan from a written brief, furnish an existing plan, turn a 2D plan into a 3D view, or read and label a plan you already have. The part almost everyone leaves out is the match clause, the sentence that tells the model which parts of the drawing are not allowed to change. Without it the model treats your plan as a mood reference and gives you a different home that looks similar.
What is the best prompt to convert a 2D floor plan to 3D?
Attach the plan and use this shape: “Turn this exact 2D floor plan into a 3D doll-house view from a high three-quarter angle with the ceiling removed. Keep every room in the same position, keep the door and window openings exactly where the plan shows them, and keep the relative wall lengths. Pale oak floors, warm white walls, soft daylight.” Then check the render against the plan for room count, window positions and door swings before you use it for anything. General image models redraw rather than convert, so a plan-accurate converter is the safer route when the geometry has to be right.
Can ChatGPT or Gemini actually draw a floor plan to scale?
No, and this is the most useful thing to know before you start. Image models draw something that looks like a plan, not a measured drawing. In our own runs the dimension strings are often decorative, room proportions drift from the brief, and a corridor can end up narrower than the doors opening onto it. Use them to explore arrangements quickly, then redraw the winner in a plan tool. Gemini is currently the more literal of the two when you attach an existing plan, and ChatGPT is the better reader and planner when you want the plan described rather than drawn.
What is the best Gemini floor plan prompt?
Gemini responds best to a plan attachment plus a short, concrete instruction with a match clause, rather than a long paragraph of style words. For example: “Here is my floor plan. Redraw it as a furnished 2D plan in the same drawing style. Keep every wall, door swing, window and dimension line exactly as drawn. Add only plan symbols for furniture.” Because Gemini stays closer to an attached image than most models, the match clause tends to actually hold, which is why it is the model we reach for when the input is a real plan.
Which prompt gives a realistic 3D floor plan rendering with Nano Banana?
Nano Banana is strongest at the doll-house 3D floor plan look, so prompt for that explicitly rather than for a generic 3D render: name the high three-quarter angle, the removed ceiling, low walls so every room stays visible, and real materials for floors, walls and cabinetry. Add the match clause about room positions and openings. It handles material and lighting instructions well, but it is no better than the others at keeping your dimensions honest, so it still needs the check pass.
How do I prompt an AI to furnish a floor plan?
Send the plan and change one thing only. “Add furniture symbols to this exact plan and change nothing else. Keep every wall, door swing, window and dimension line where they are, and keep the identical drawing style. Draw flat plan symbols only, seen from directly above.” Naming the pieces room by room works better than asking for a furnished home. The single-change instruction is what keeps the model in editing mode instead of redrawing mode, and it is the most reliable floor plan prompt of the whole set.
Are floor plan prompts different from interior design prompts?
Yes, in what they protect. An interior design prompt protects the look of a room and lets the model choose the geometry. A floor plan prompt protects the geometry and lets the model choose the look. That is why the wording is different: design prompts lead with style and materials, plan prompts lead with what must match the drawing. If you want the room styled rather than the layout solved, the interior design prompt libraries are the better starting point.
Can ChatGPT generate a house plan?
It can draw an image that looks like a house plan, and it is useful for exploring room arrangements, but the dimensions are not real. Wall lengths rarely add up, room sizes drift from the brief and door swings can clash with furniture. Use ChatGPT to explore and to critique a plan, then redraw the version you like in a plan tool that computes the dimensions, such as the AI floor plan creator, before anyone prices or builds from it.
Is there a free AI floor plan generator?
ChatGPT and Gemini draw plan images free within their daily image limits, with no real scale. The MeltFlex AI floor plan creator draws one labelled plan with computed dimensions free without an account; after that, plans cost 10 credits each and a free account comes with 15 credits. Free plans carry a small watermark.