To draw a floor plan you measure the space, choose a scale, and then draw it in layers in a fixed order: walls first, then doors and windows, then the stair and the fixed things, then furniture, and last the labels, dimension strings, north arrow and scale bar. The order matters more than the medium. Done on graph paper at 1:50, in free software, or by describing the rooms to an AI floor plan creator, a plan drawn walls-first comes out readable, and a plan drawn furniture-first comes out wrong. The same goes for chatbots: our AI floor plan prompts show where ChatGPT and Gemini draw a convincing plan whose dimensions do not add up. Below is the six-step sequence drawn on one small flat so you can see each layer land, the rules for drawing doors, windows and stairs correctly, how to draw a plan of an existing house, and what the software and AI routes actually do for you. We build a floor plan creator and a floor plan to 3D tool, so the last sections are written by people who have watched a lot of hand-drawn plans go through a machine.
Our articles are still written by humans!
Get human written articles in your Google feed.
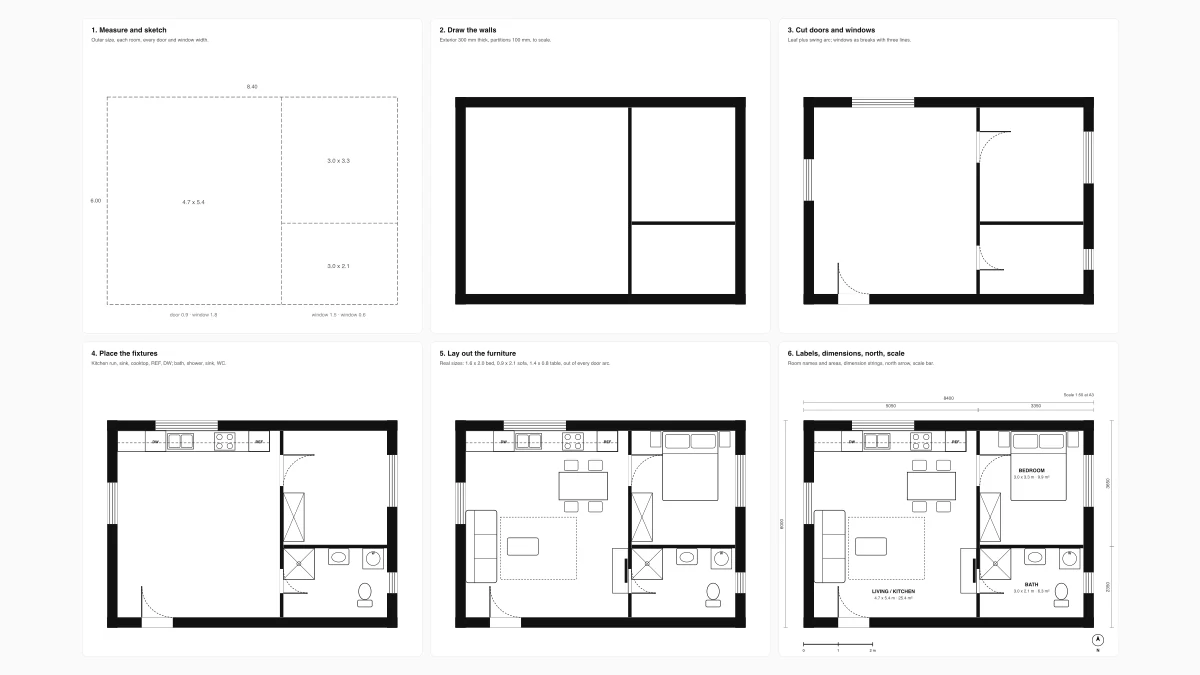
The cover is the six-step sequence this guide follows: one 8.4 by 6.0 metre one-bedroom flat, drawn from the measured sketch to the finished, dimensioned plan.
“Most first floor plans fail in the first five minutes, not the last: people start drawing the sofa before they have measured the wall it sits against. Our converter sees the result every day: plans with beautiful furniture and a bedroom that is 400 millimetres shorter than the house it is in. Walls first. Everything else is decoration on the walls.”
Matúš Koleják, Co-Founder, MeltFlex
The short version
- Measure first: wall to wall, every door and window, every fixed thing. Write it on a sketch.
- Pick the scale before the first line: 1:50 or 1/4″ = 1′ for a home; 1:100 or 1/8″ if it will not fit.
- Draw in layers: walls, openings, stair and fixtures, furniture, labels and dimensions.
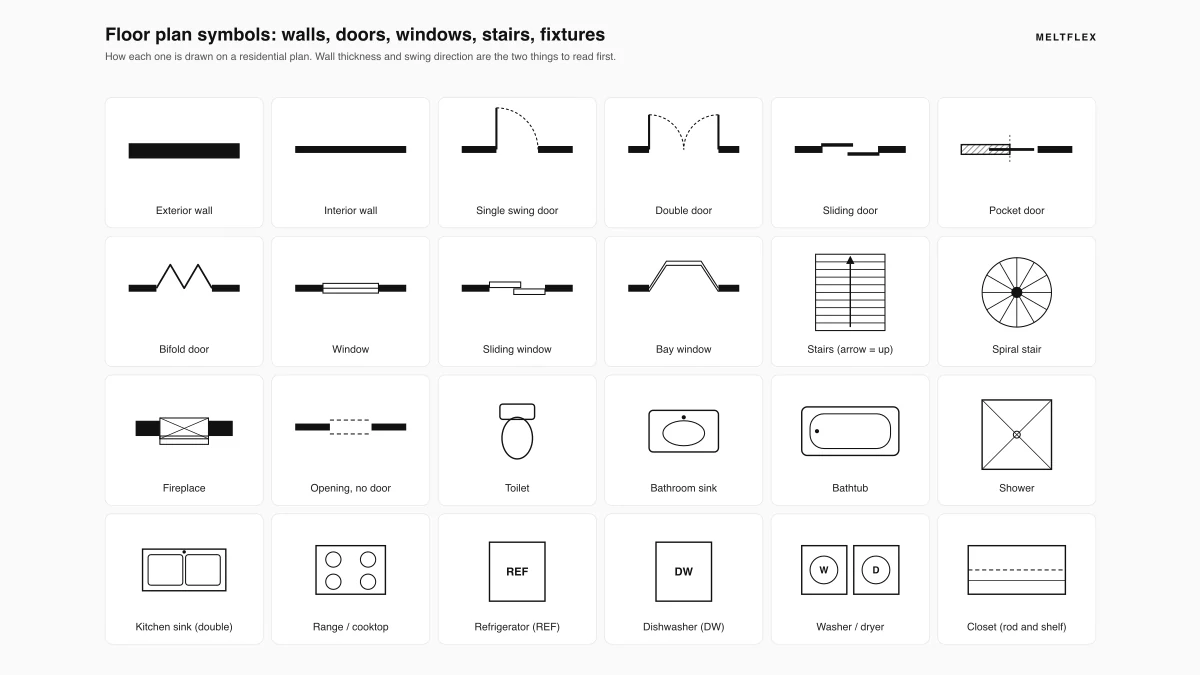
- Doors are a leaf plus an arc; windows are breaks with parallel lines; stairs are treads, an arrow and UP.
- Check the maths: interior dimensions plus walls must equal the overall string.
- Software and AI do the drafting, not the measuring. A concept plan from a brief takes twenty seconds; an as-built plan still takes a laser measure.
Jump to: What you need · The six steps · Doors · Windows · Stairs · Existing house · Renovation plans · Software · With AI · Mistakes · FAQ
FreeUpload plan or sketch · freeDraw my floor plan for freeDescribe the house, or upload a sketch, and MeltFlex draws a labelled 2D plan with room names and dimensions. Your first AI design is free, no card needed.
What you need to draw a floor plan
Whichever route you take, the measuring is the same and it is the part nobody can do for you. A laser measure reads wall to wall in a second and is accurate to a couple of millimetres; a tape needs a second person and sags on long runs. Measure at about a metre off the floor, which is where the plan cuts through the walls anyway, and measure each wall in one piece rather than adding up segments. If you do not yet read plans fluently, our floor plan symbols guide explains what every line you are about to draw means.
How to draw a floor plan in six steps
The same one-bedroom flat, 8.4 by 6.0 metres outside, drawn six times. Each panel adds one layer, and the layers are in the order a draughtsperson would draw them, because each layer depends on the one before: you cannot place a door until the wall exists, and you cannot place a bed until the door swing is known.
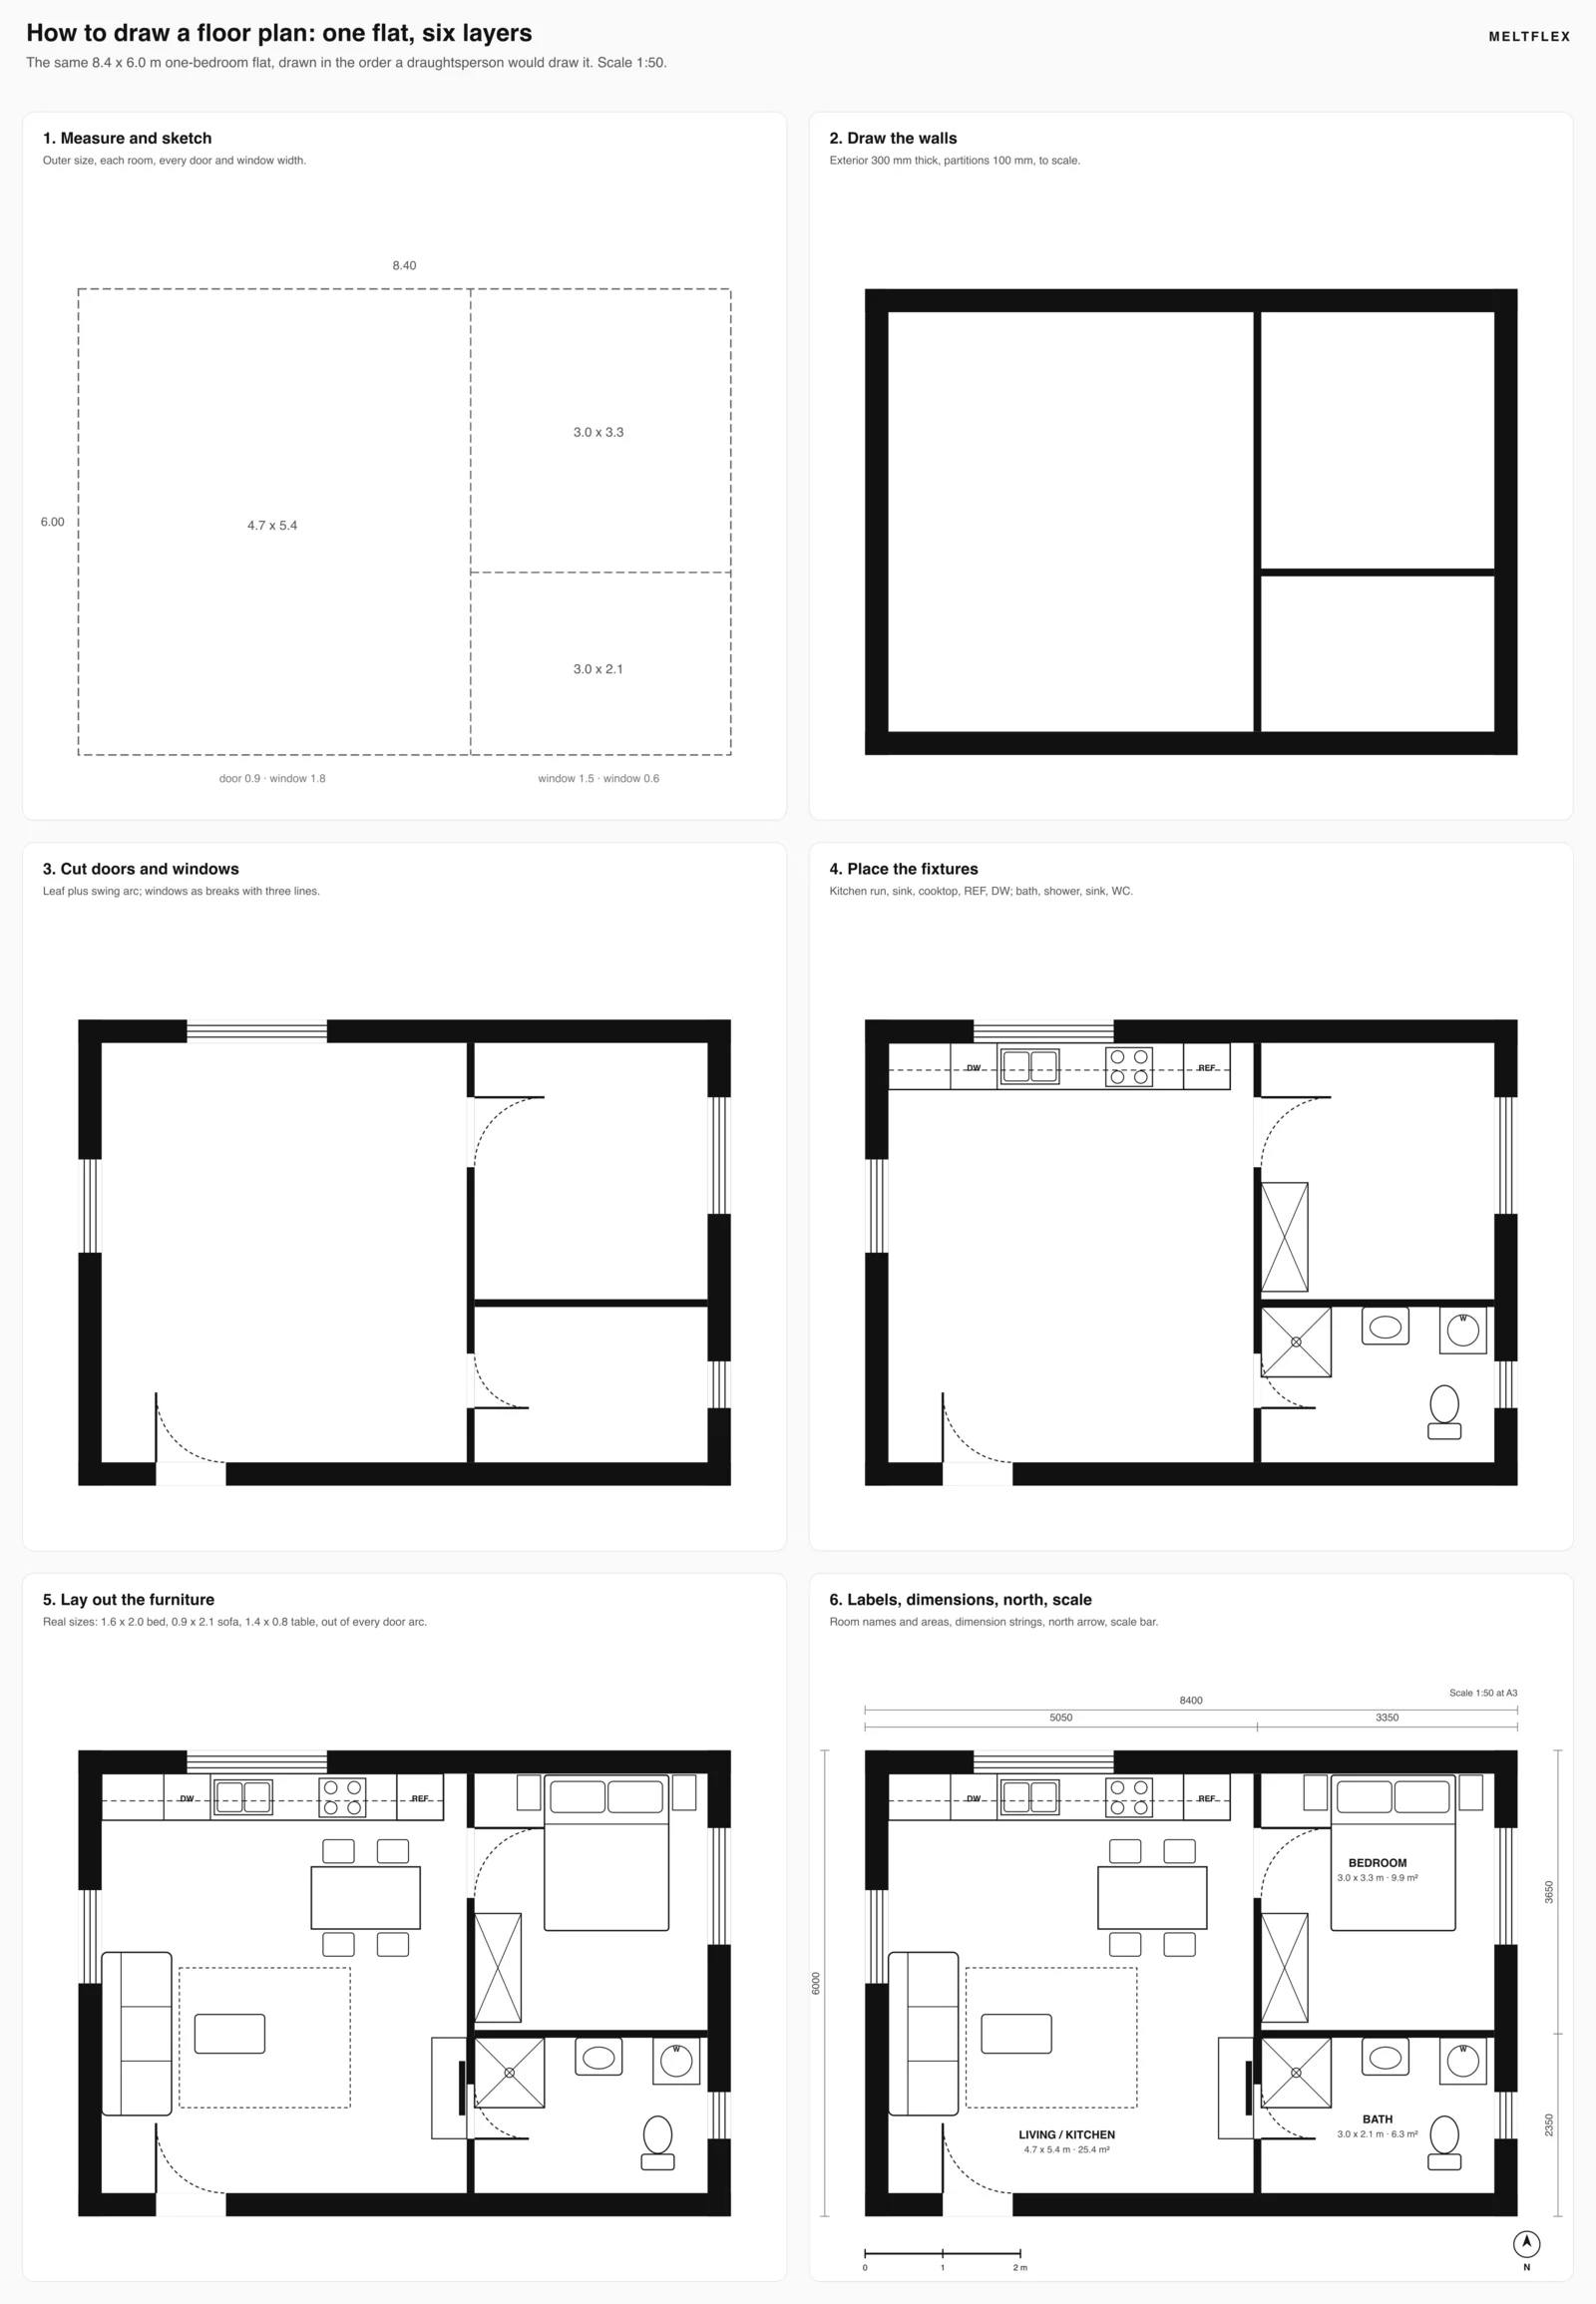
The six layers on one flat at 1:50. Panel 1 is what your measuring produces; panel 6 is what a builder, an estate agent or a 3D converter can use.
Step 1: measure and sketch
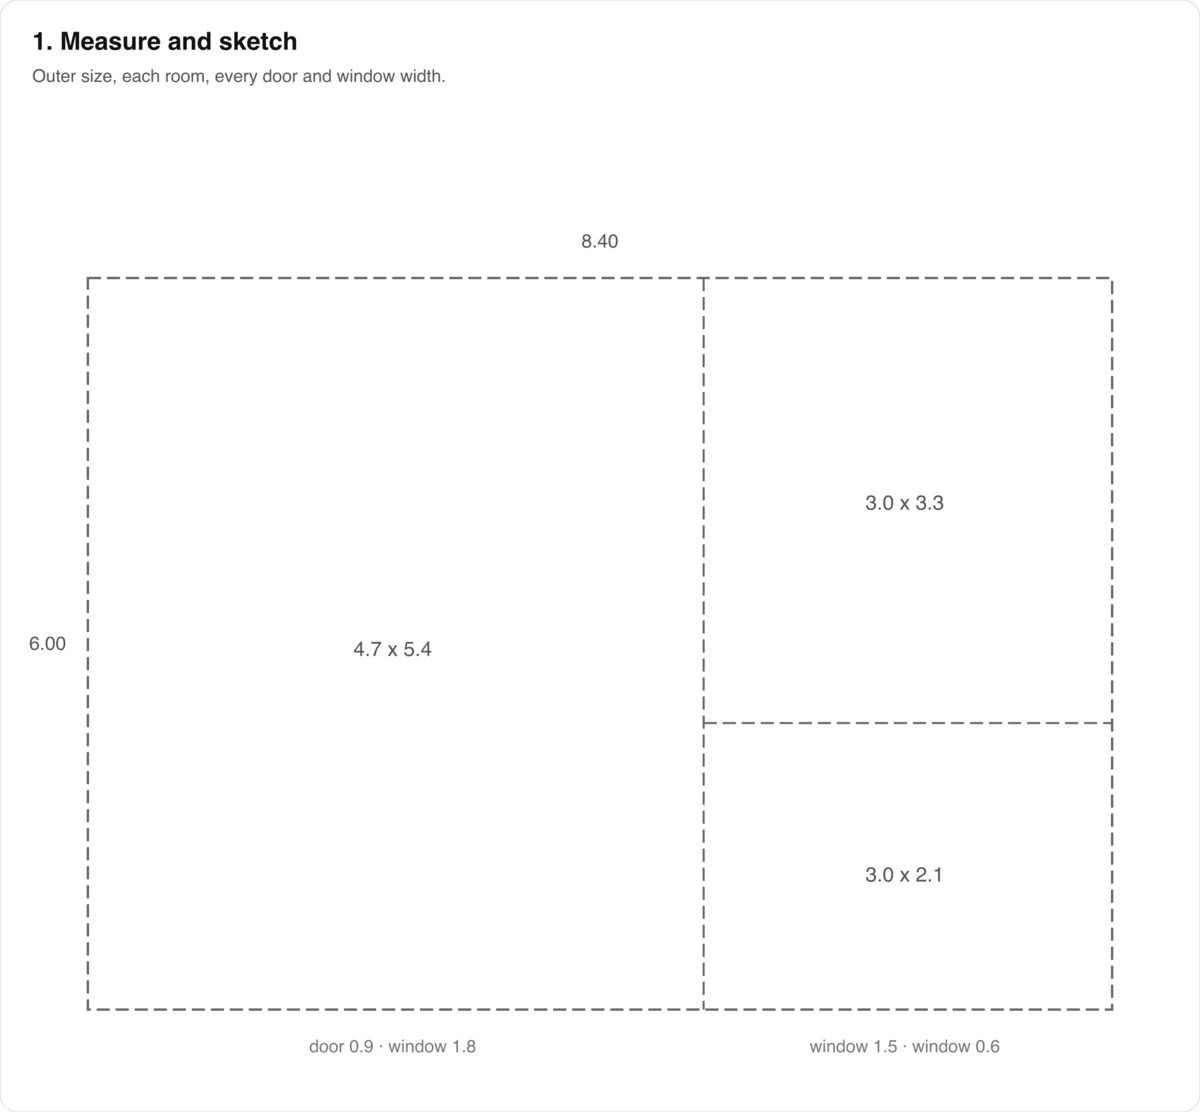
Walk the space with a laser measure and a sheet of paper. Draw each room roughly in proportion, not to scale, and write on the sketch: the length and width of the room wall to wall, the width of every door and window, the distance from the nearest corner to each opening, the thickness of the walls where you can see it (in a door reveal or at a window), and anything fixed: radiators, the stair, a chimney breast, the boiler, the kitchen run if it is staying. Measure the overall outside length and width as well, because that is the number you will check everything else against. A phone photo of each room from the door is worth taking; you will want to know where the sockets were.
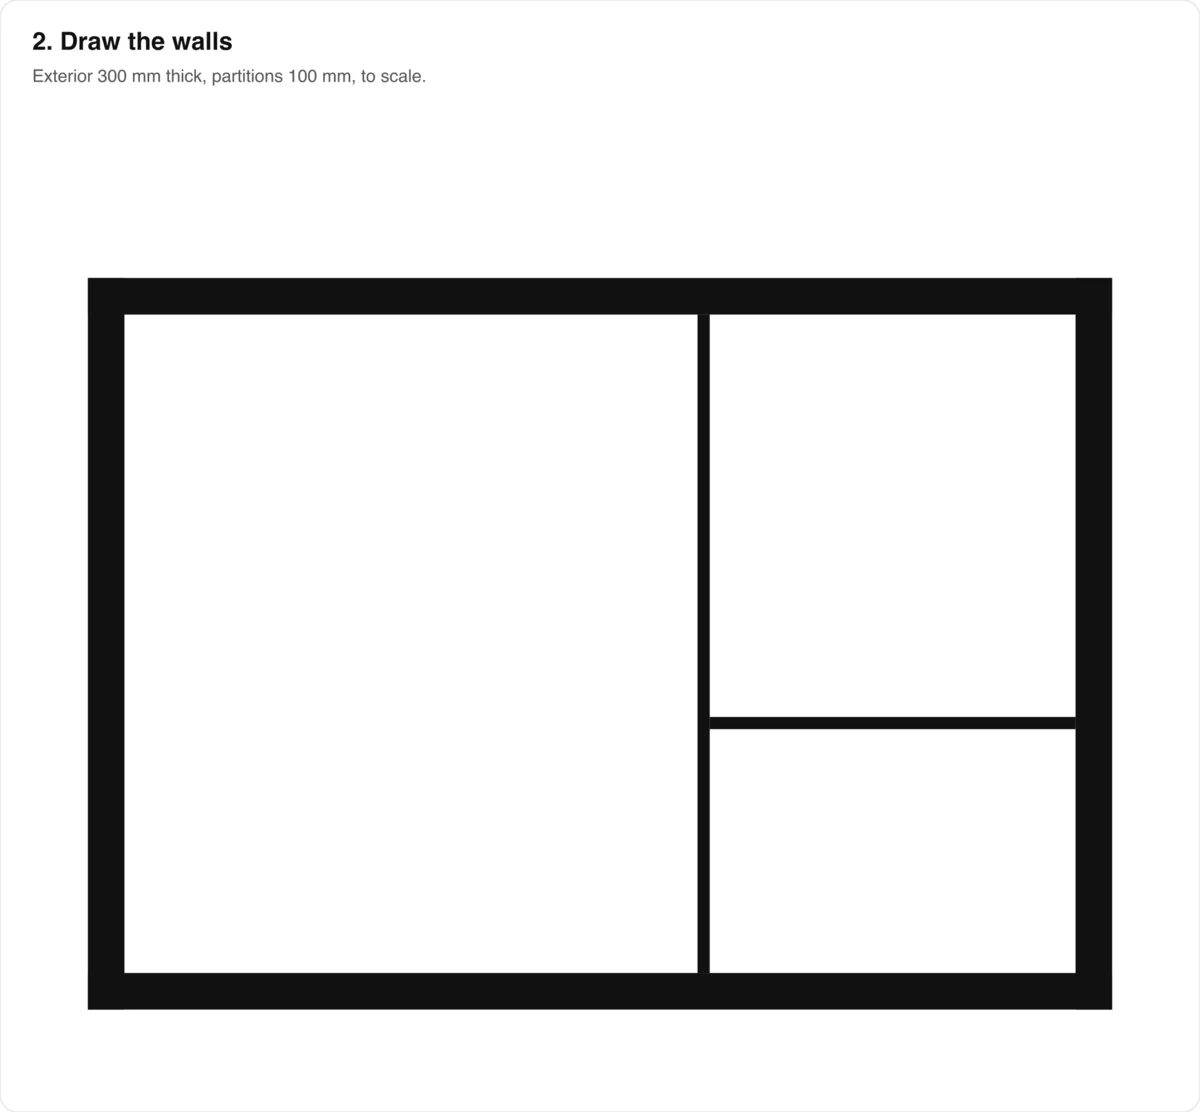
Step 2: choose the scale and draw the walls
Pick the scale before the first line. At 1:50 one metre on site is 20 millimetres on paper, so each 5 mm square of graph paper is 250 mm; at 1/4 inch to the foot each quarter-inch square is one foot. Start from the outer corner of the building and draw the exterior walls as a double line 300 mm apart at scale (a modern cavity or insulated wall; older solid walls run 230 to 250 mm, timber frame 150 to 200 mm). Then the interior partitions at 100 mm. Work around the plan in one direction so errors do not accumulate from both ends, and close every room. On paper, draw the wall centrelines lightly first and thicken them once everything meets; in software, set the wall thickness in the tool and let it draw the double line for you.
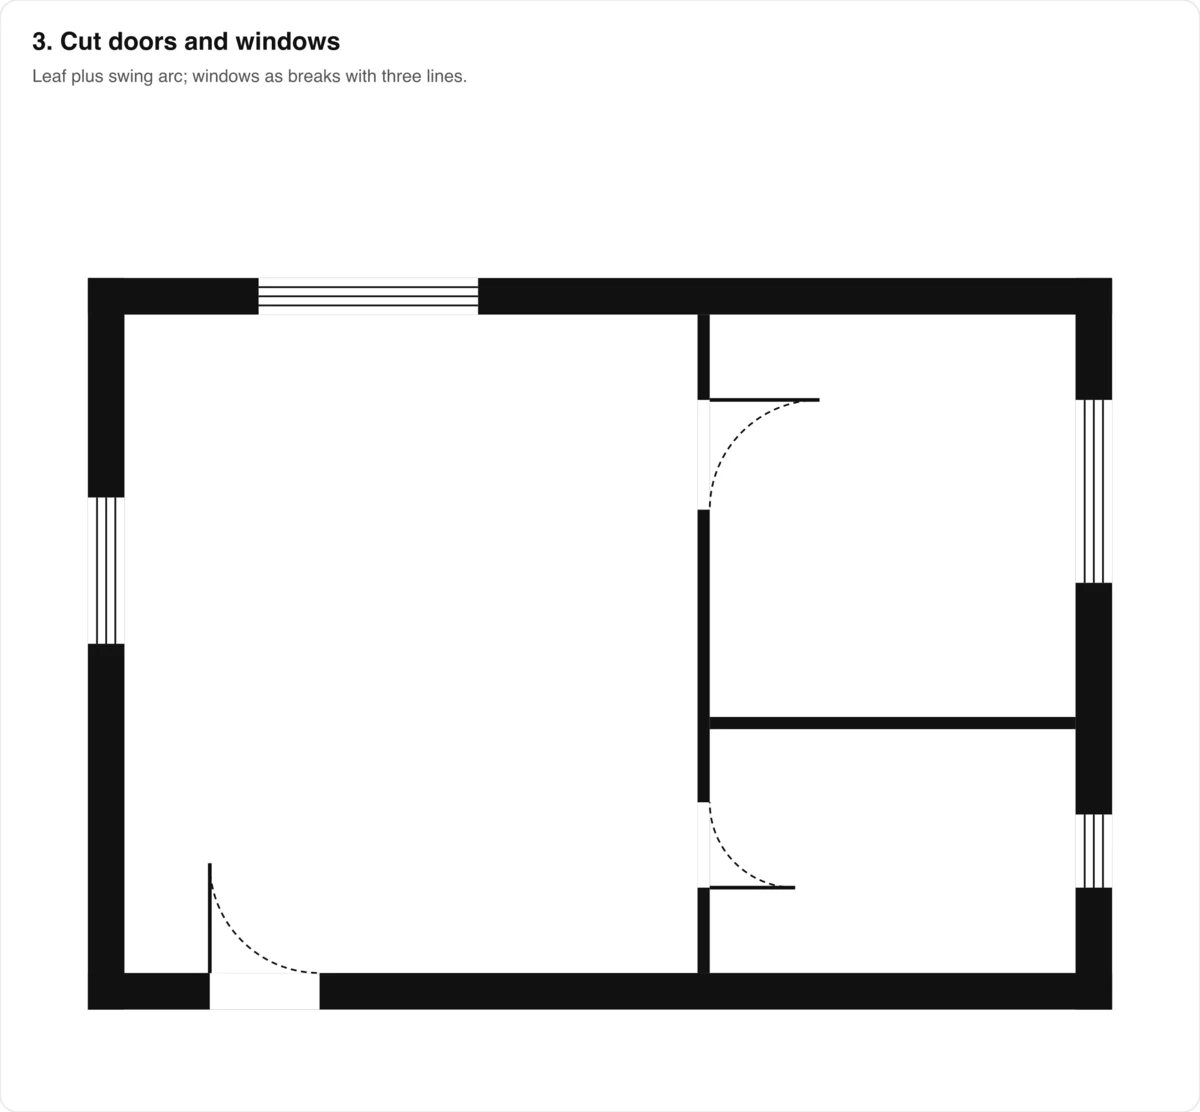
Step 3: cut the doors and windows
Every opening is a break in a wall at the measured distance from its corner. Doors get the leaf and the swing arc, which is covered in detail below; windows get the two or three parallel lines. This is the step where you check that the plan makes sense as a building: does the entry door swing into the hall and not into a wall, do two doors clash, does the bathroom window sit on an exterior wall. If something does not work here, it is a measuring error, and it is cheaper to find it now than after the furniture is drawn.
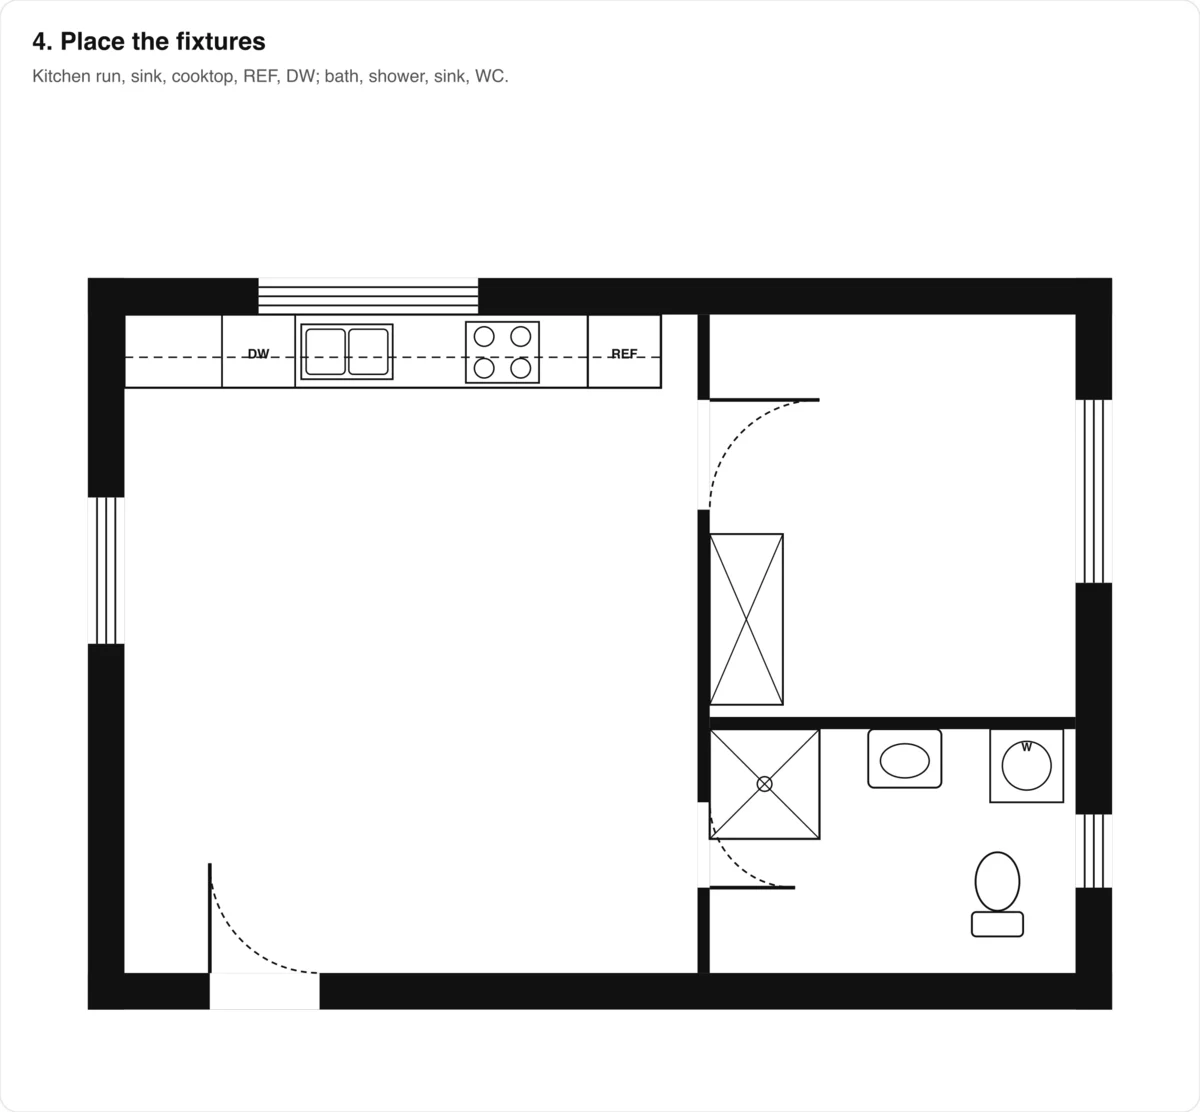
Step 4: draw the stair, the fixtures and the built-ins
Stairs first if there is one, because the stair footprint decides what fits around it; the geometry is in its own section below. Then the kitchen: base cabinets as a solid line 600 mm off the wall, wall cabinets as a dashed line 300 to 350 mm off the wall, the sink, cooktop, refrigerator and dishwasher at their real sizes. Then the bathroom fixtures, a 1,700 by 700 mm tub, a 900 by 900 shower, a 600 mm basin, a toilet about 700 by 400, each with its clearance in front. Then wardrobes, the fireplace, columns and anything else that is part of the building rather than the furnishing.
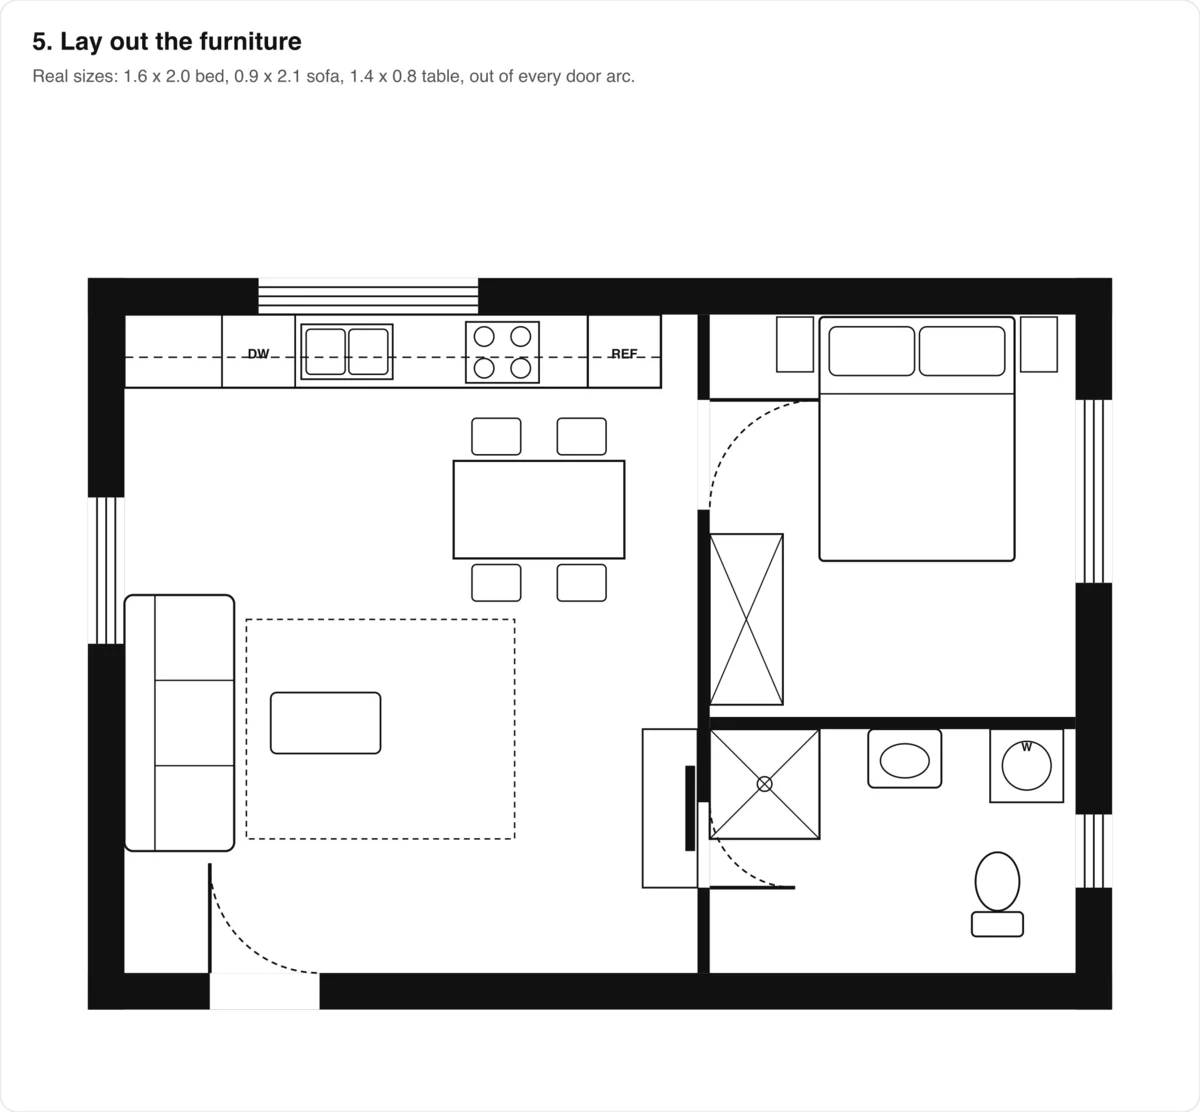
Step 5: lay out the furniture
Furniture is the only layer you are allowed to get wrong, which is exactly why it goes last. Draw it at true size from above, a 1,600 by 2,000 queen bed, a 2,100 by 900 three-seat sofa, a 1,400 by 800 dining table with 450 mm chairs, and keep every piece out of every door arc and at least 750 to 900 mm from anything it has to be walked around. The what size furniture fits guide has the sizes and the living room layout and bedroom layout guides have the clearances. If the room is the whole point of the exercise, our furniture placement tool will lay real pieces into a photo of it rather than symbols into a drawing.
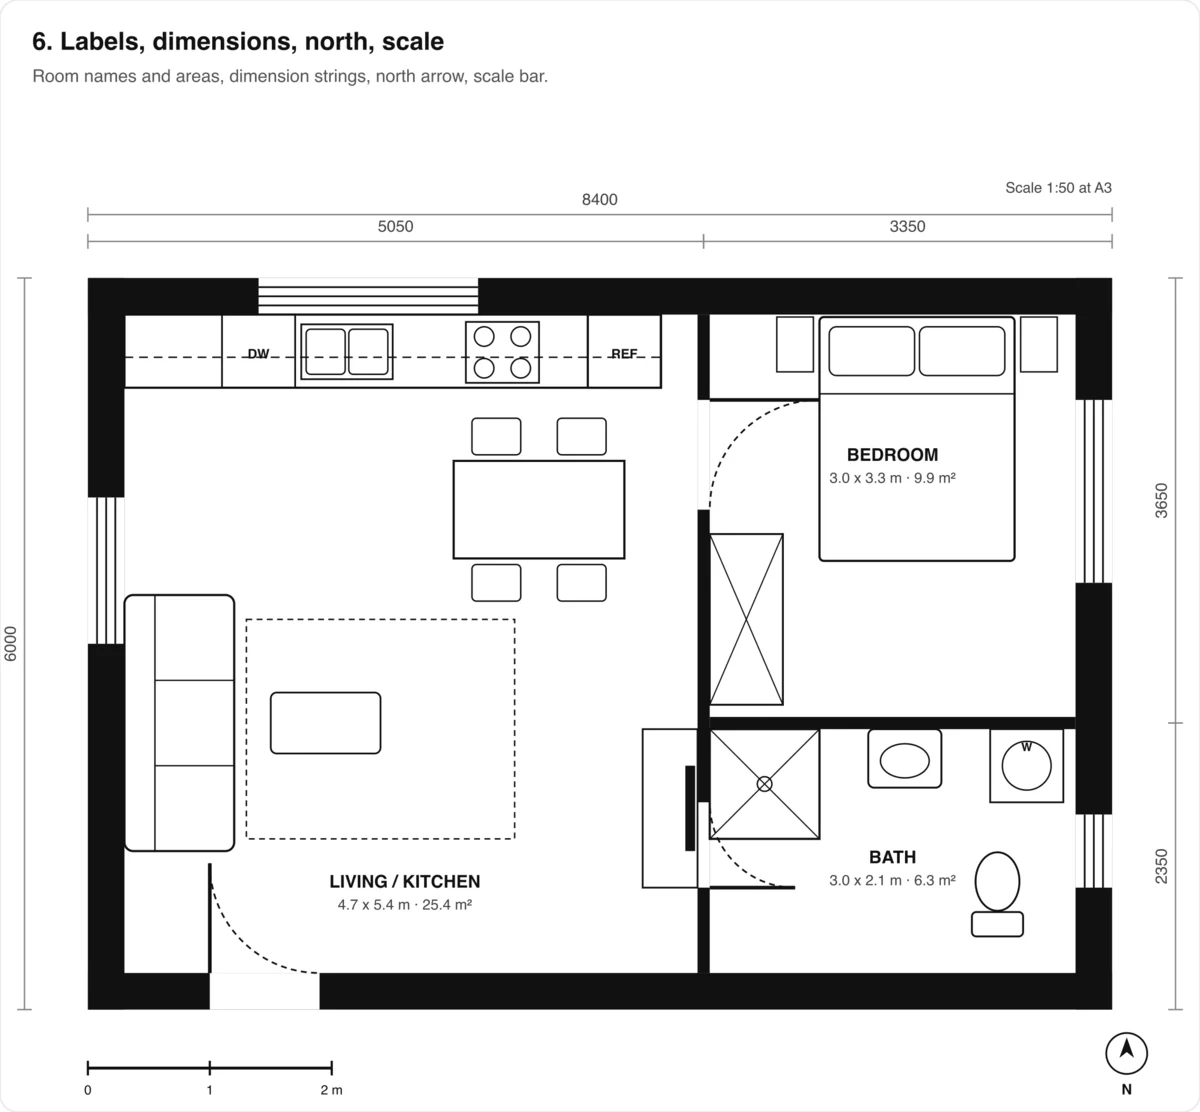
Step 6: labels, dimensions, north and scale
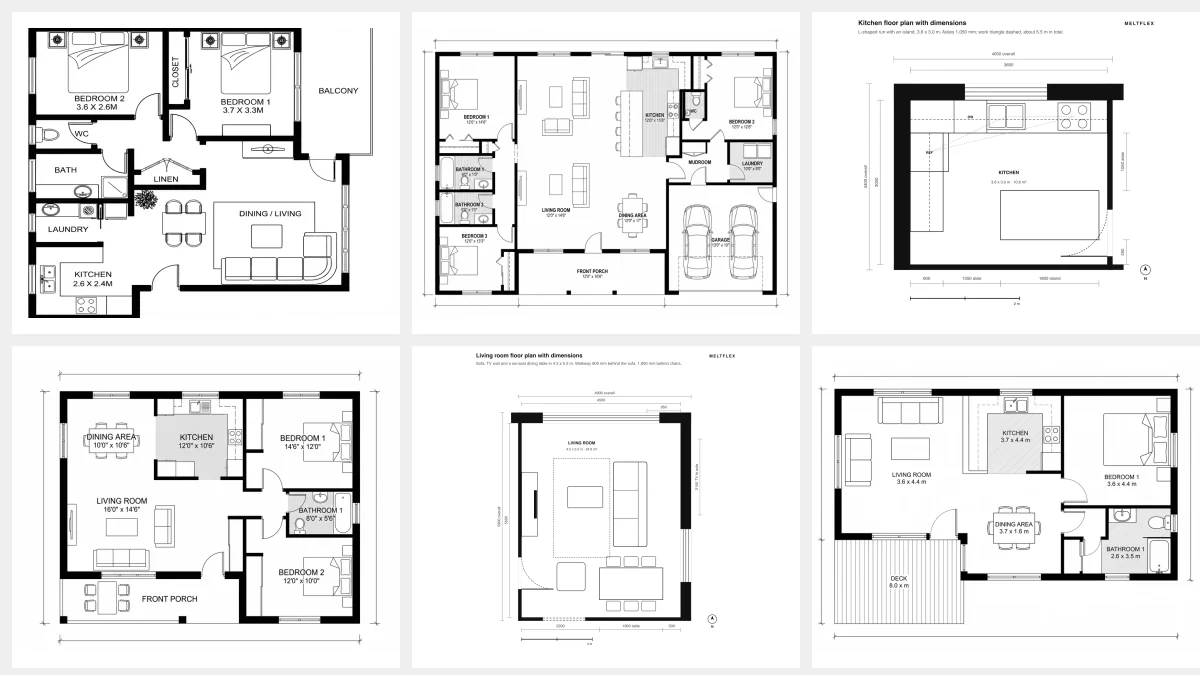
Name each room and write its wall-to-wall size and area under the name. Run dimension strings along the outside of the walls with a tick or arrow at each end: one overall string and one that breaks at each wall, in millimetres (no unit written) or feet and inches. Add a north arrow, a scale bar and the scale in words, and the date. Then do the arithmetic: the inside dimensions plus the wall thicknesses along any line must add up to the overall string. When they do not, a wall was measured wrong, and that is the wall to go back and check. For what finished dimension strings look like on thirteen real plans, from a tiny house to a five-bedroom barndominium, see our floor plan examples with dimensions.
How to draw doors on a floor plan
A door is the symbol people get wrong most, and it is a two-stroke drawing. Break the wall by the door width. From one side of the break, draw a straight line into the room, perpendicular to the wall and as long as the door is wide: that is the open leaf, and the side it starts from is the hinge. Then draw a quarter circle from the far end of that line back to the other side of the opening: that is the swing. The arc is on the side of the wall the door opens toward, and nothing can stand inside it.
Two checks after you have drawn every door: no arc crosses another arc, and no arc crosses a fixture or a piece of furniture you intend to keep. In a small bathroom the door arc against the toilet is the single most common clash, and the fix is a pocket door or an outward swing, both of which are a two-second change on the plan and a two-day change on site.
How to draw windows on a floor plan
Break the exterior wall by the width of the window and draw two or three thin lines along the wall inside the break: outer lines for the frame, inner for the glass. A window on a plan has a width and a position and nothing else; its sill and head height live on the elevations, so if the sill height matters (a bed under a window, a kitchen worktop against one) write it beside the symbol. A sliding window is two offset rectangles, a casement adds a thin arc on the outside showing the opening direction, and a bay window projects three angled segments beyond the wall line, with the floor inside counted as part of the room. Draw windows last among the openings, after the doors, because the doors decide where the furniture can go and the furniture decides which windows you will curse.
How to draw stairs on a floor plan
The stair is the one element you calculate before you draw, and the calculation is short. The imperial version of the same arithmetic, with the US code limits on riser, tread, headroom and handrail, is in our guide to stair dimensions.
US residential code caps the riser at 7.75 inches and sets the tread at 10 inches minimum, which is why American stairs look shallower than European ones on paper. Draw a landing as a plain rectangle at least as deep as the stair is wide. Draw a winder or spiral with the treads radiating from the centre of the turn, and a stair to a basement with DN instead of UP and the arrow reversed. On the upper floor plan the same stair appears with the arrow marked DN, and the part of the flight below the cut is drawn dashed or omitted. If you are restyling a stair you already have rather than drawing one, the AI stairs design tool works from a photo instead.
How to draw a floor plan of an existing house
An existing house is measured room by room and the drawing that comes out is called an as-built or measured survey plan. It is the base every renovation, listing and furniture plan is drawn on, and it is worth doing carefully once. The method is the six steps above with two additions: measure diagonals in any room that might not be square (if the two diagonals differ the room is a parallelogram and your rectangles will not close), and measure wall thicknesses at every door and window reveal, because the thickness is the difference between rooms that add up and rooms that do not.
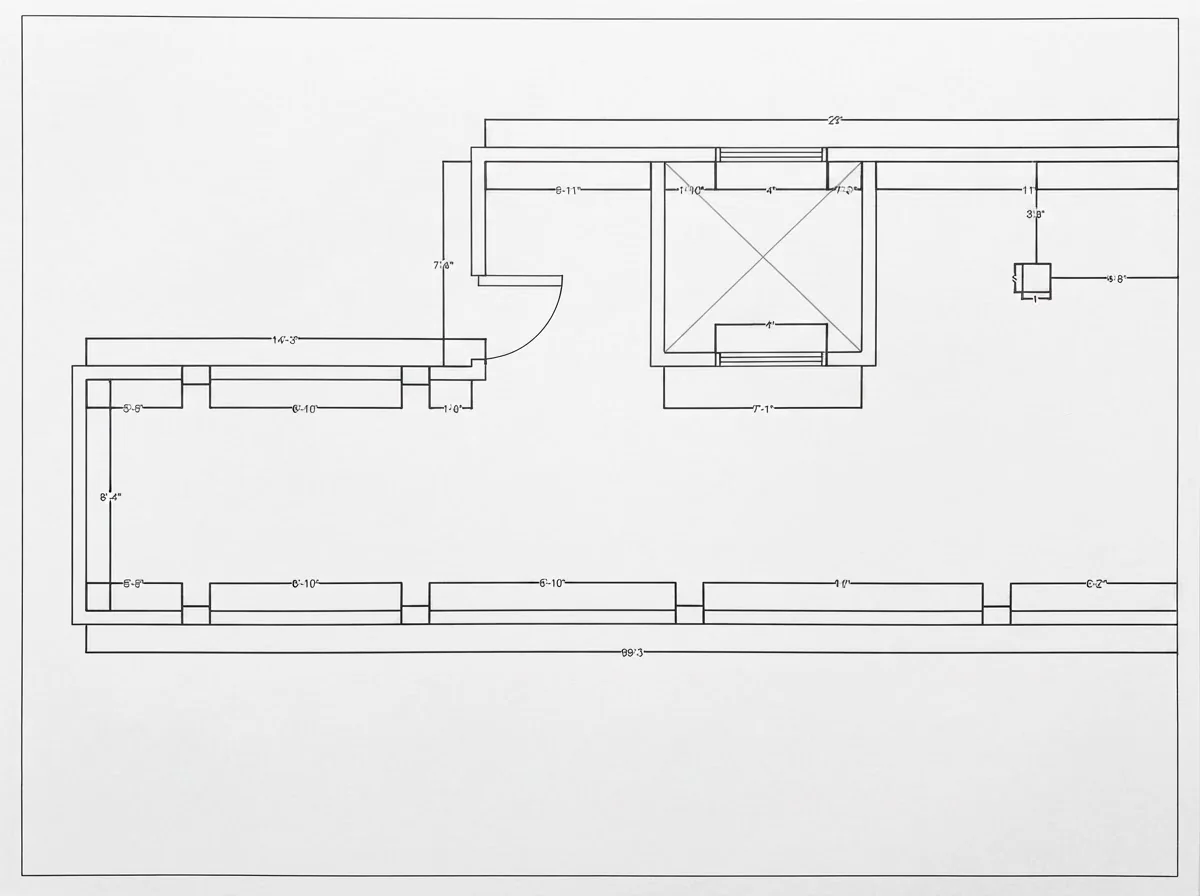
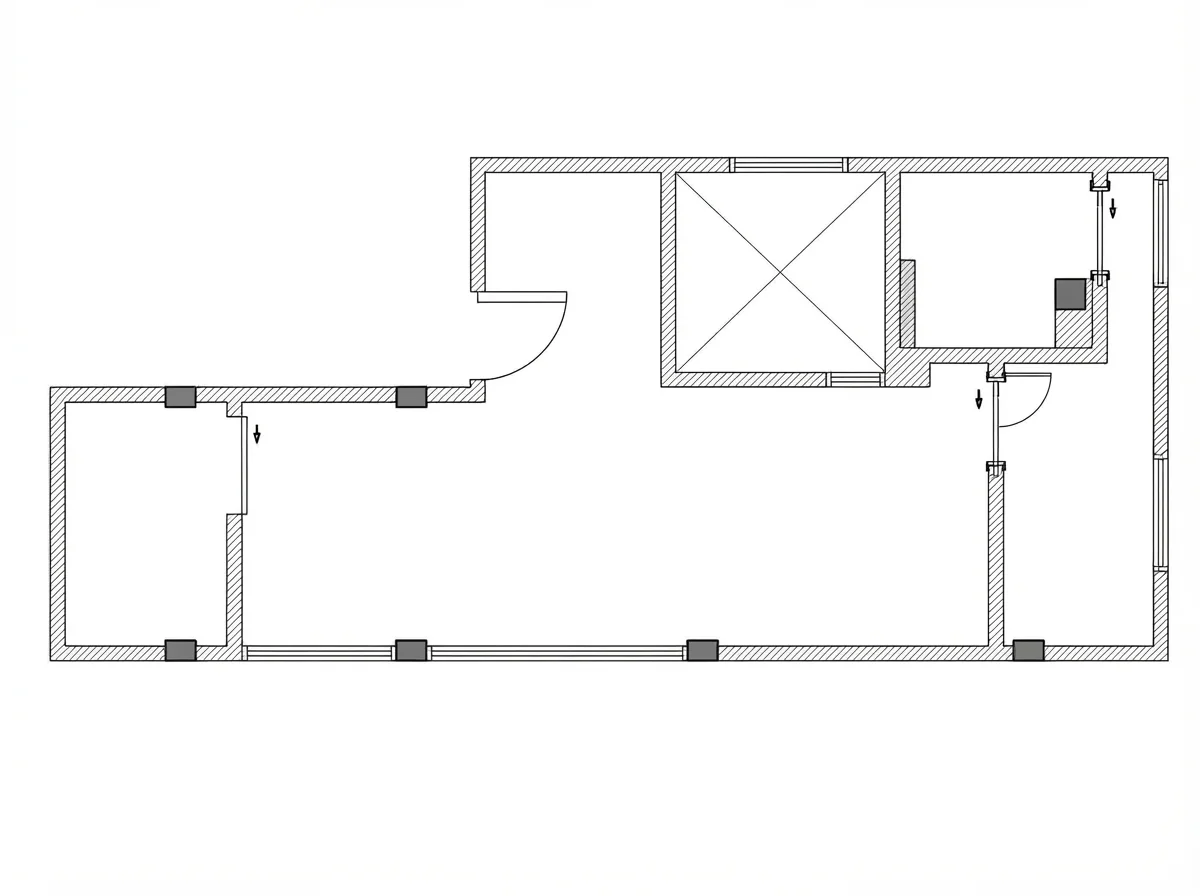
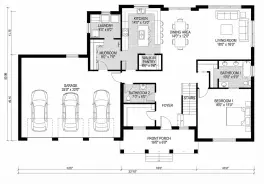
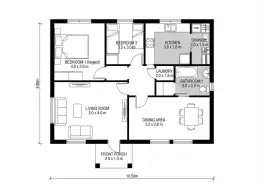
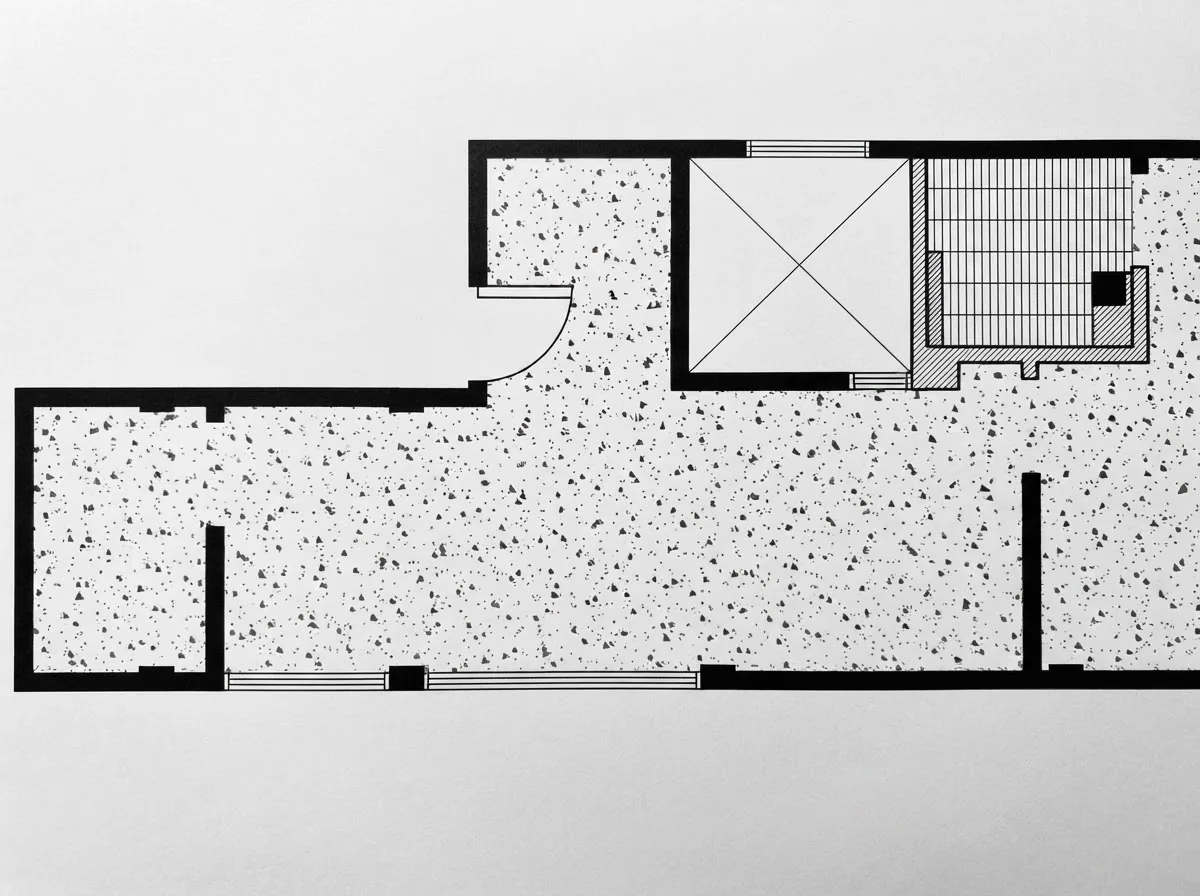
The pair above is from a student drawing set we redrew in ink, and it is the clearest way to see what a measured plan is for: the as-built is the shell you cannot change, the proposed plan is the partitions you can. Everything after that, the flooring plan, the furniture plan, the lighting plan, is drawn on a copy of the as-built with one more layer on it. The electrical layer is the one with its own symbol language; our guide to electrical plan symbols draws every outlet, switch and light symbol and the NEC rules for where they go.
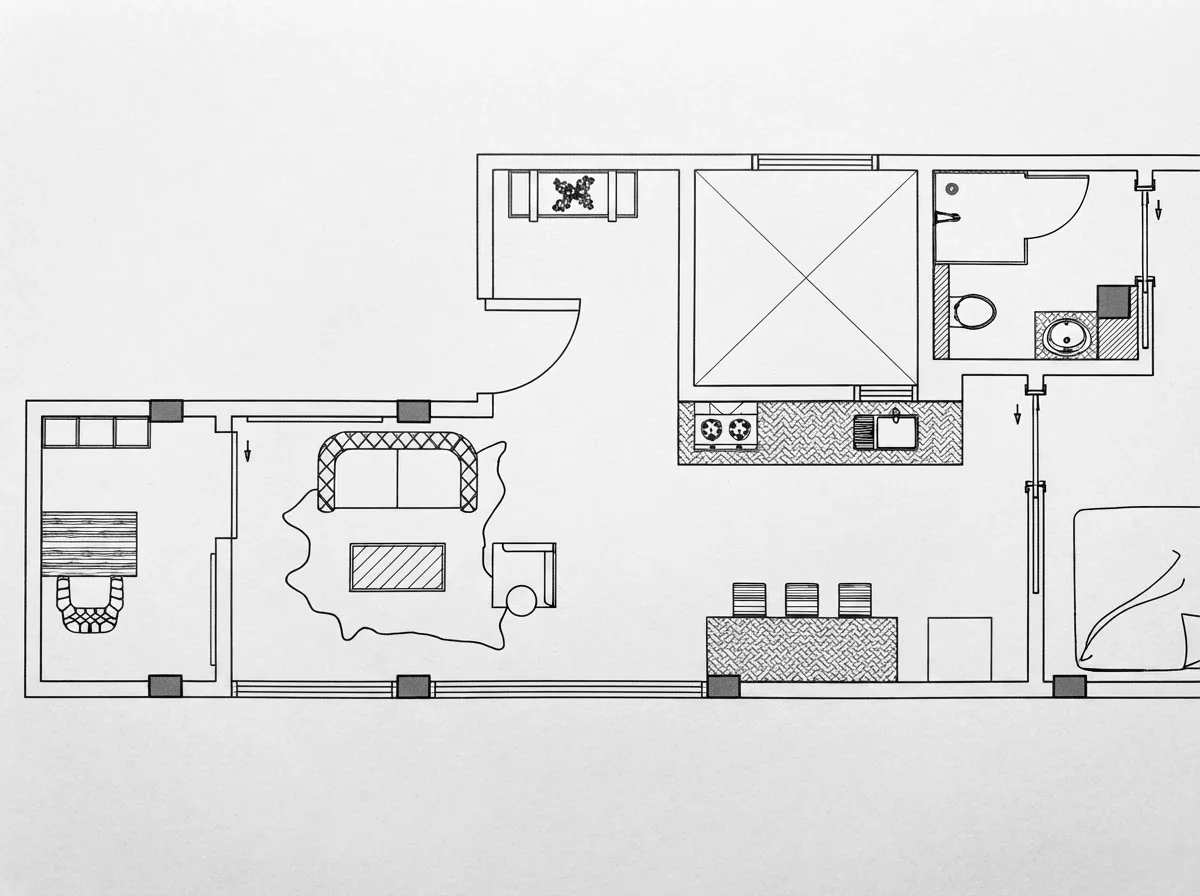
If you already have an old plan of the house, a photograph of it is a shortcut: our converter reads the walls and openings off a phone photo of a brochure or a scanned drawing and gives you a clean 2D plan and a 3D model to work from, which is covered in 2D floor plan to 3D model with AI. Check its dimensions against two of your own measurements before trusting it, because old plans lie and photographs distort. And if you have neither a plan nor the time to measure, our measure a room from a photo guide covers how far a photo-based estimate can be trusted.
Drawing a renovation or revision: change one layer at a time
A renovation plan is two drawings: the existing plan with the walls to be removed dashed or hatched (the demolition plan), and the proposed plan with the new walls drawn heavy so the change reads at a glance. The discipline that makes revisions easy is the same layering: keep the shell fixed, change the partitions, then redo the openings, then the fixtures, and only then the furniture. The sequence below is one plan revised three times.
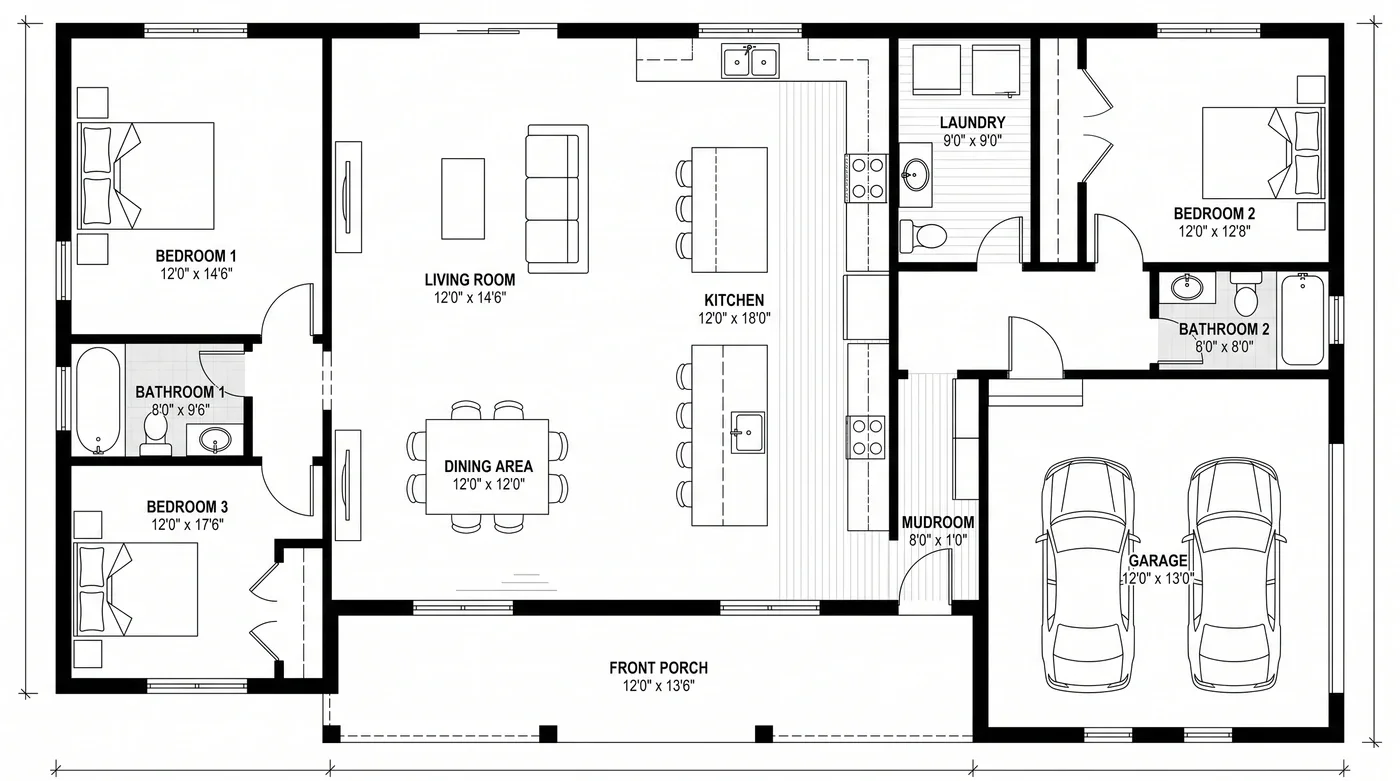
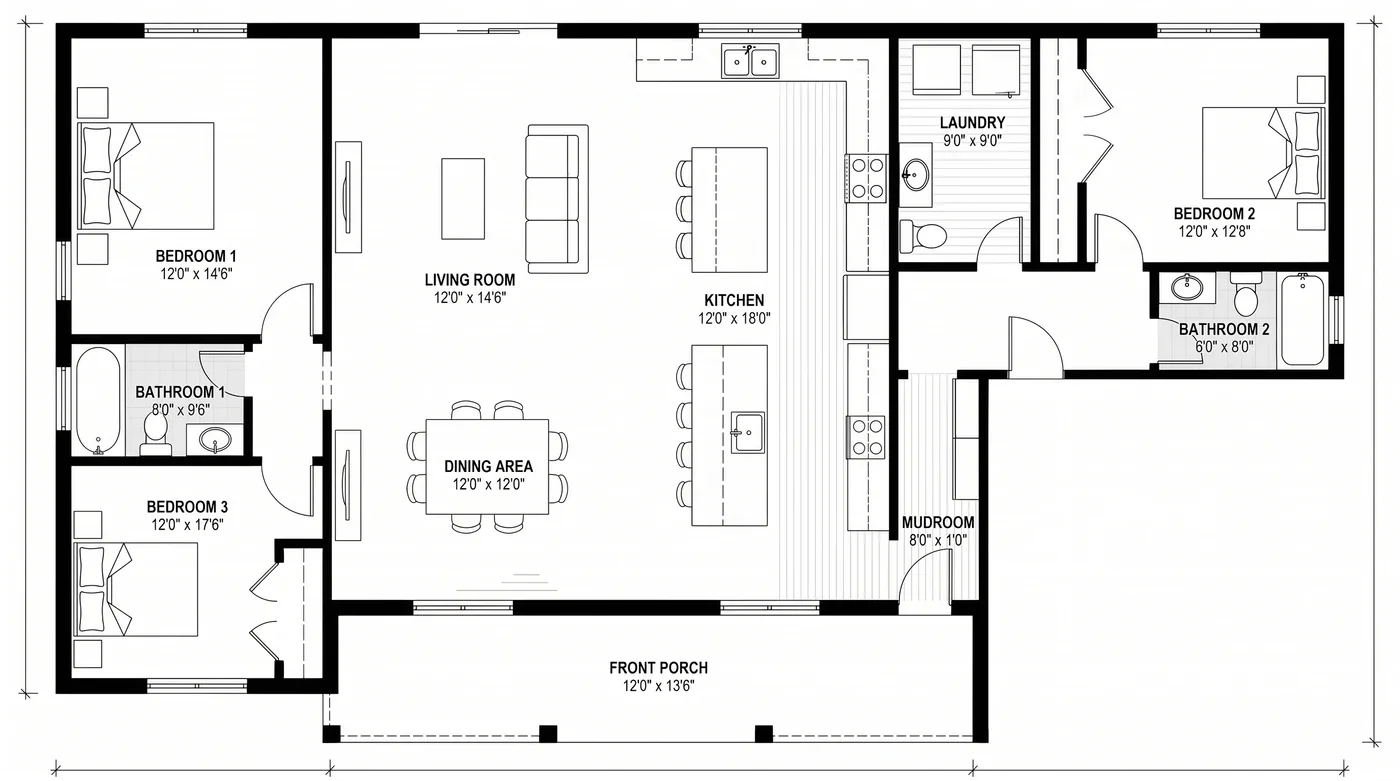
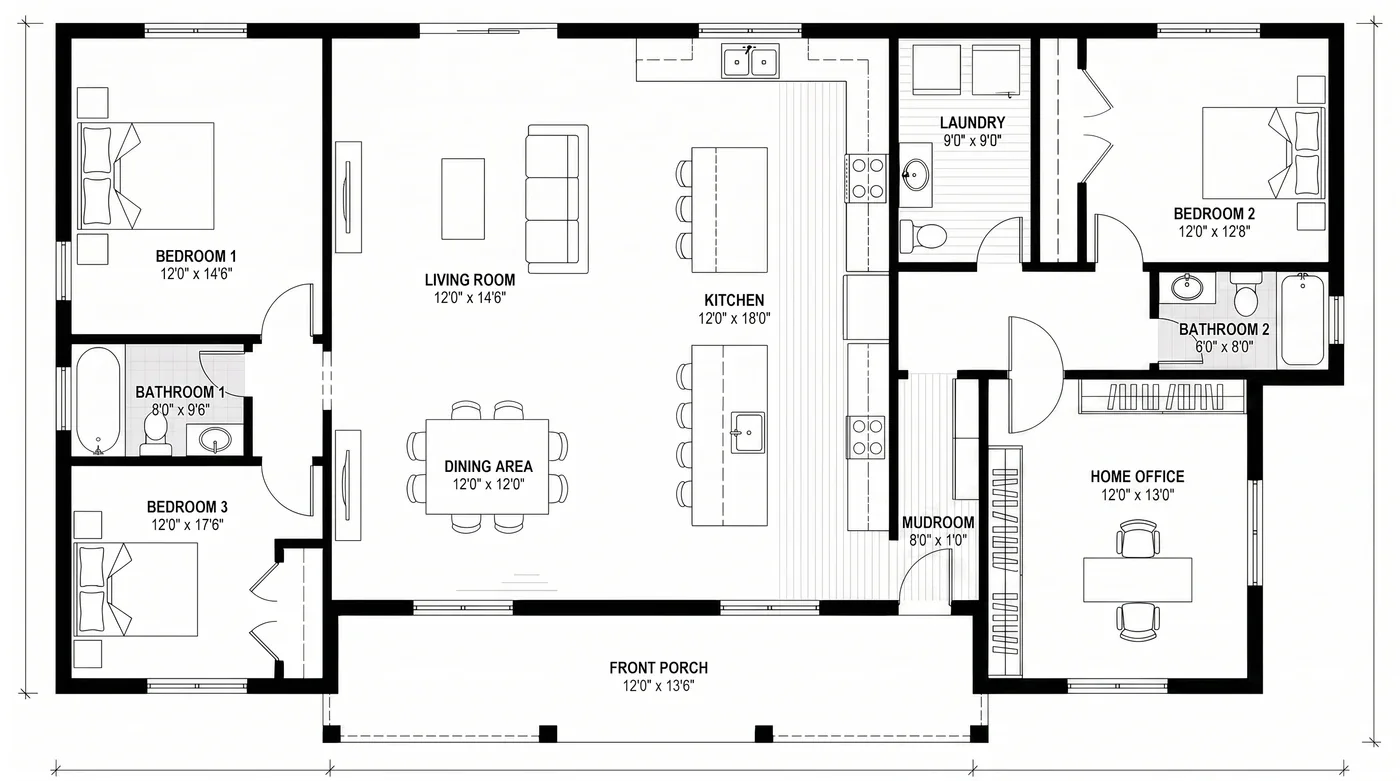
Those four frames are the hero of our floor plan creator and they were made the same way a draughtsperson revises: each drawing was produced from the previous one with a single instruction, never redrawn from scratch, which is why the walls stay registered from frame to frame. The lesson for a hand-drawn plan is identical: trace the shell, change one layer, and never redraw what has not changed.
Drawing a floor plan in software
Software does three things paper cannot: it keeps the scale honest, it draws the double lines and the door arcs for you, and it lets you move a wall without erasing the room. The order of work does not change. Set the units and scale first, draw the exterior walls as a closed loop, then partitions, then drop doors and windows into the walls (every tool snaps them in and draws the swing), then fixtures from the library at their real sizes, then furniture, then labels and dimensions. The three things to check before you export: that the wall thickness is set to something real and not the tool’s default, that the furniture library pieces are the size you own and not the size that flatters the room, and that dimensions are measured wall face to wall face.
We tested eleven of these in the floor plan software comparison, including which free tiers let you export something printable.
Drawing a floor plan with AI: from a brief, or from a sketch
There are two honest uses of AI here and one dishonest one. The honest ones: drafting a concept plan from a description when you have no drawing, and cleaning up a sketch or an old plan you already have. The dishonest one is expecting it to know your house; it does not, and a plan of an existing building still starts with a laser measure.
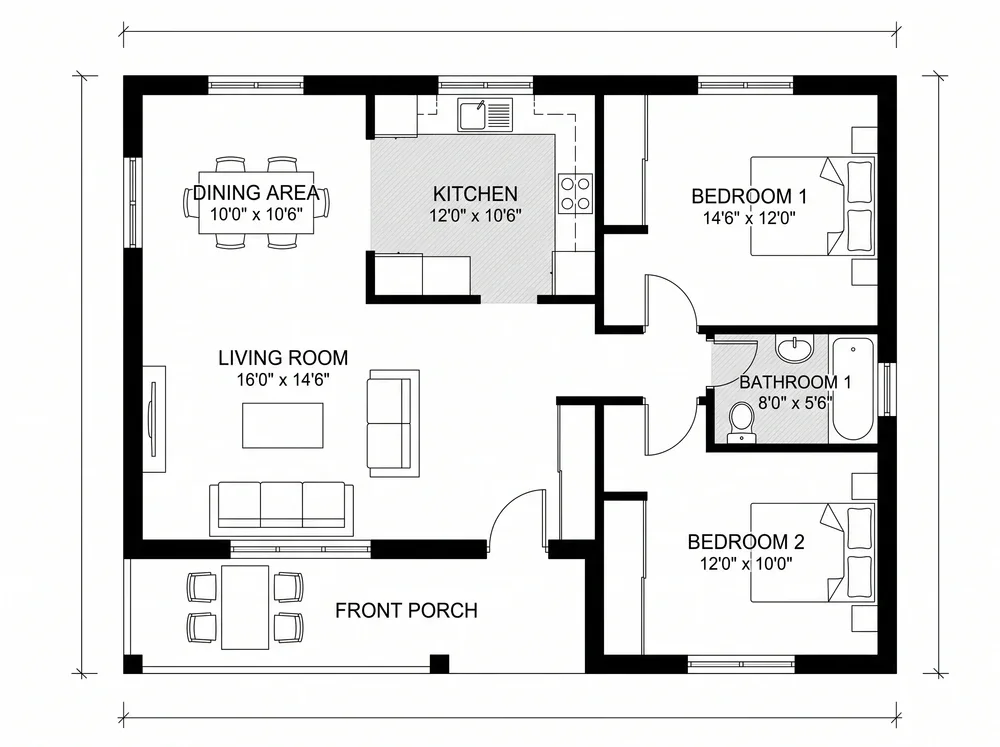
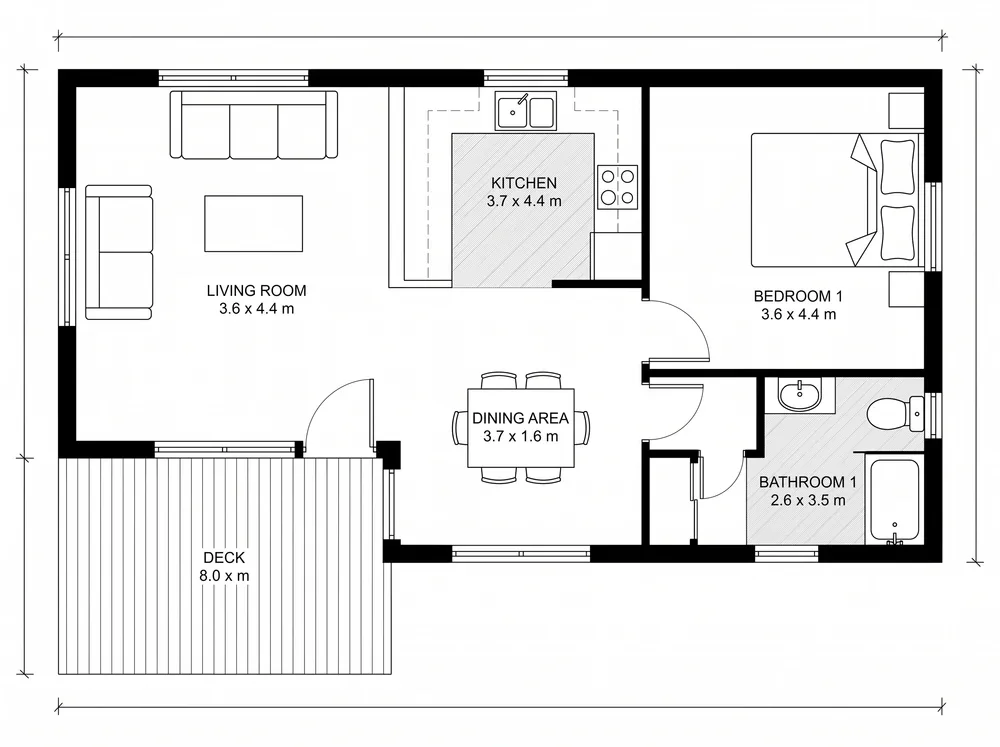
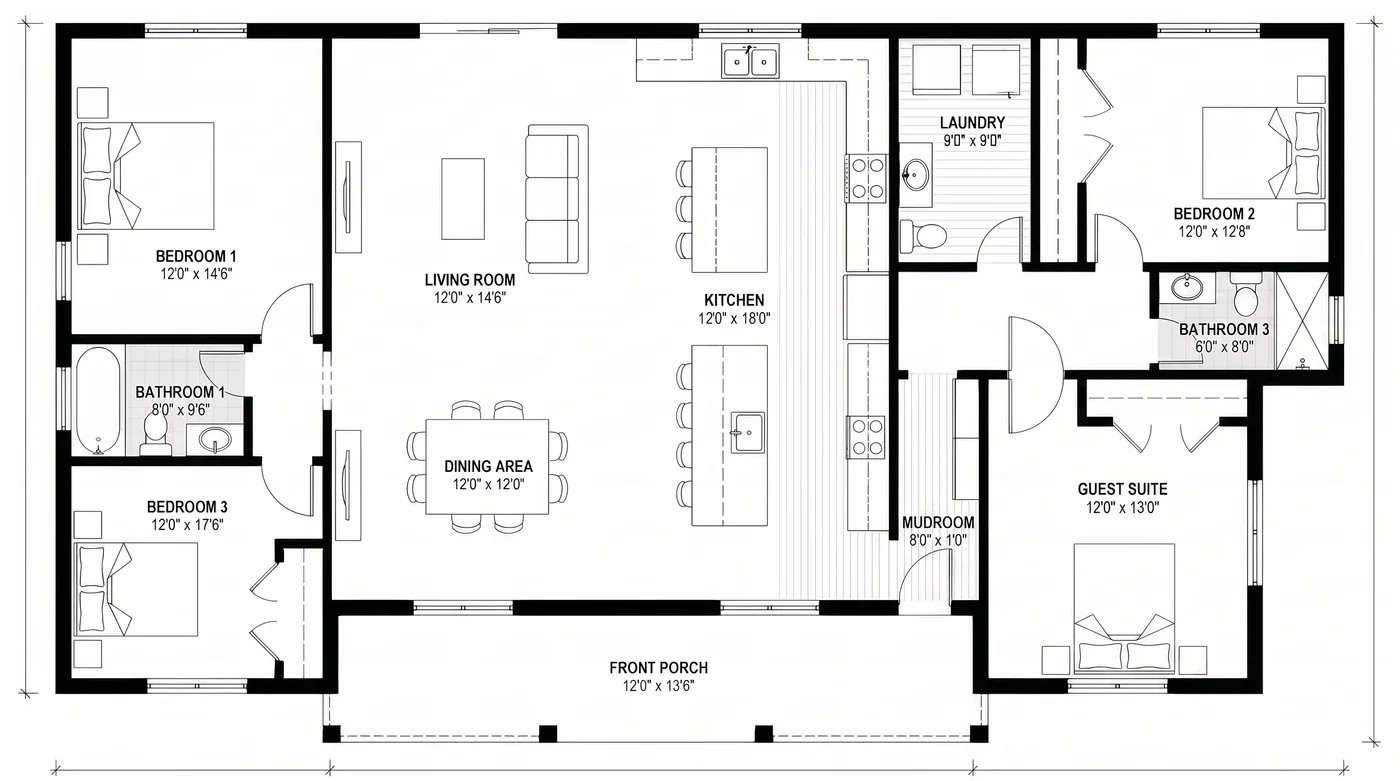
From a brief, the AI floor plan creator takes a room manifest (three bedrooms, two bathrooms, open kitchen, garage, around 150 square metres, one storey) and draws a labelled concept plan with dimensions; you iterate by changing the list. Two things we learned building it that apply to any AI drafting: enumerate the rooms rather than counting them (“Bedroom 1, Bedroom 2, Bedroom 3” draws three; “three bedrooms” sometimes draws four), and keep the brief under about a dozen rooms, because accuracy falls off with complexity faster than with wording.
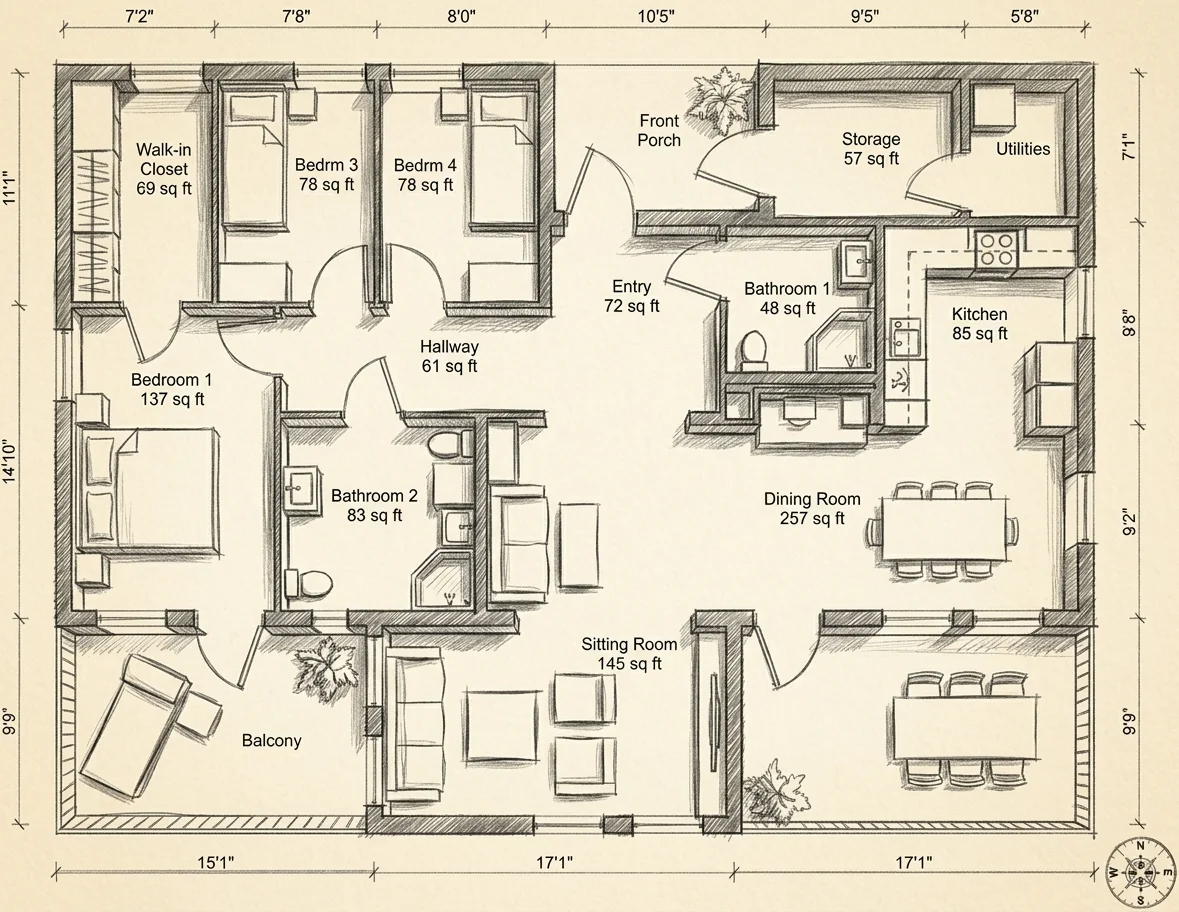
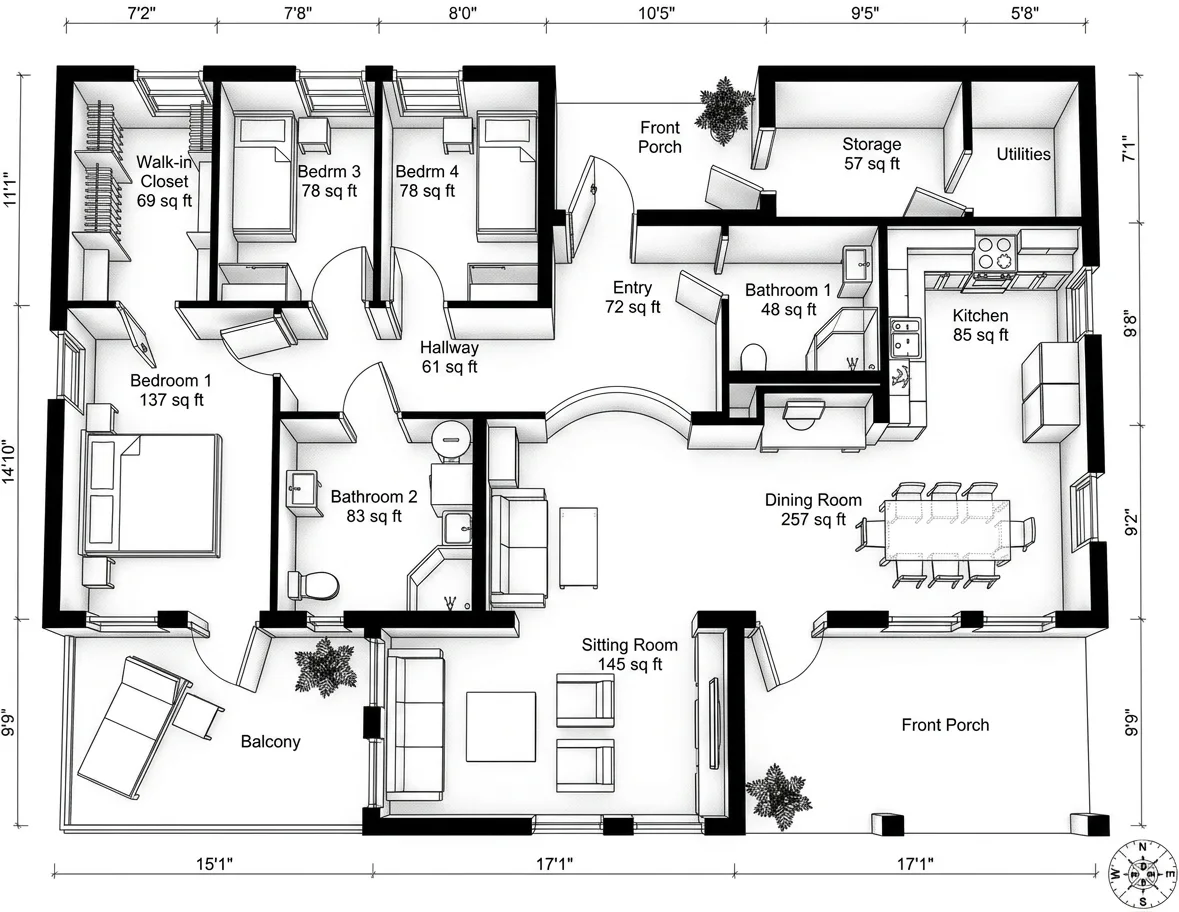
From a sketch, the floor plan to 3D tool reads your measured drawing, hand-drawn or scanned, and returns it as a clean plan, a 3D model or a photorealistic top-down render, walls and openings where you drew them. It reads walls and door arcs very well, labels well on clean handwriting, and the dashed layer above the cut poorly, so draw the wall cabinets after the conversion rather than before. What comes back is good for layout, proportion and furnishing; it is not a construction drawing, and the tool says so.
Draft it, or draw it and see it
- No drawing yet? Describe the rooms and the floor plan creator drafts a labelled concept plan in about twenty seconds.
- Have a sketch or an old plan? Photograph it and the floor plan to 3D tool returns a clean 2D plan, a 3D model or a furnished render.
- Furnish it with real products. The pieces in the render link to items with dimensions, so the plan you drew is one you can order.
The floor plan drawing mistakes we see most
How this article was put together
The six-step sequence is a drawing we made for this guide of a generic 8.4 by 6.0 metre one-bedroom flat, at 1:50, drawn layer by layer so that every panel registers with the last; the wall thicknesses, door widths and furniture sizes are the ones given in the text. The as-built, proposed, flooring and furniture plans are four sheets from a published student drawing set on Behance, redrawn through the MeltFlex engine as clean ink plans so the layouts are faithful and the author’s branding is not reproduced. The revision sequence and the AI plans are our own tools’ output. Stair numbers are designer rules of thumb plus the International Residential Code (R311.7); door and fixture sizes are the common manufactured sizes and vary by market. We build the two tools named in the last section; the drawing method is the one we would teach without them.
How to draw a floor plan FAQ
How do I draw a floor plan by hand?
Measure the rooms wall to wall and every door and window, sketch them roughly with the numbers written on, then redraw the sketch to scale on graph paper: at 1:50 each 5 mm square is 250 mm, at 1/4 inch to the foot each 1/4 inch square is one foot. Draw the exterior walls first as thick double lines, then the partitions, then break the walls for doors and windows, add the door swing arcs, the fixtures and the furniture at real size, and finish with room labels, dimension strings, a north arrow and a scale bar. A simple flat takes one to two hours the first time.
What scale should a floor plan be drawn at?
1:50 in metric countries or 1/4 inch to the foot (1:48) in the United States for a house or flat, 1:100 or 1/8 inch to the foot when the building is too large for the sheet, and 1:20 or 1/2 inch to the foot for an enlarged kitchen or bathroom plan. Pick the scale before you draw anything, write it on the sheet, and add a scale bar so the plan still reads correctly if it is printed at the wrong size.
How do you draw doors on a floor plan?
Break the wall by the width of the door, typically 800 to 900 mm (32 to 36 inches) for an interior door and 900 to 1,000 mm for an entry door. Draw a straight line from one side of the opening into the room, perpendicular to the wall and as long as the door is wide, then a quarter-circle arc from the end of that line back to the other side of the opening. The straight line is the open leaf, the arc is the swing, and the side of the wall the arc is on is the side the door opens toward. Sliding doors are two overlapping offset lines with no arc, pocket doors a line disappearing into a hollow wall, bifold doors a zigzag.
How do you draw windows on a floor plan?
Break the exterior wall by the width of the window and draw two or three thin parallel lines along the wall inside the break: the outer lines are the frame and the inner one the glass. That is a fixed or single-hung window. For a sliding window draw two offset rectangles, for a casement add a thin arc on the outside showing which way it opens, for a bay window project three angled glass segments beyond the wall line. Windows carry no height on a plan; note the sill height beside the symbol if it matters.
How do you draw stairs on a floor plan?
Work out the geometry first: divide the floor-to-floor height by a riser of 170 to 190 mm (7 to 7.5 inches) and round to a whole number of risers; the number of treads is one fewer; multiply treads by 250 to 280 mm (10 to 11 inches) for the total run. Draw a rectangle of that run by the stair width, at least 900 mm or 36 inches, divide it into equal treads with parallel lines, draw an arrow along the centre line from the bottom step and write UP at its tail, and add a diagonal break line about two thirds of the way up where the stair passes through the cut plane. For a winder or spiral, draw the treads radiating from the centre.
What is the best free software to draw a floor plan?
For a quick 2D plan with furniture, a browser tool with a free tier such as Floorplanner, Planner 5D or RoomSketcher will do; SketchUp Free works if you want to pull the plan up into 3D; and for precision drafting the free tiers of draw.io or LibreCAD handle scale and dimensioning properly. If you have no plan at all and want one drafted from a room list, an AI floor plan creator drafts a labelled concept plan in about twenty seconds that you can then edit. Our floor plan software comparison tests all of these.
How do I draw a floor plan of an existing house?
Walk the house room by room with a laser measure, recording each room wall to wall, every door and window and its position from the nearest corner, wall thicknesses at doors and windows, and the positions of fixed things such as the stair, chimney breast, radiators and the boiler. Sketch each room as you go, then draw the whole floor to scale from the sketch and check the overall length against the sum of the rooms and walls; if they do not match, re-measure the wall that is most likely wrong. A measured plan of an existing house is called an as-built or survey plan, and it is the base every renovation plan is drawn on.
Can AI draw a floor plan for me?
Yes, in two directions. From a description, an AI floor plan creator drafts a labelled concept plan from a room list (three bedrooms, two bathrooms, open kitchen, garage, roughly 150 square metres) in about twenty seconds, and you iterate by changing the brief. From a drawing, a floor plan to 3D tool reads a hand sketch or a scanned plan and rebuilds it as a clean 2D drawing, a 3D model or a photorealistic render. What AI does not do is measure your house; the numbers still come from you, and the result is a concept plan, not a construction document.