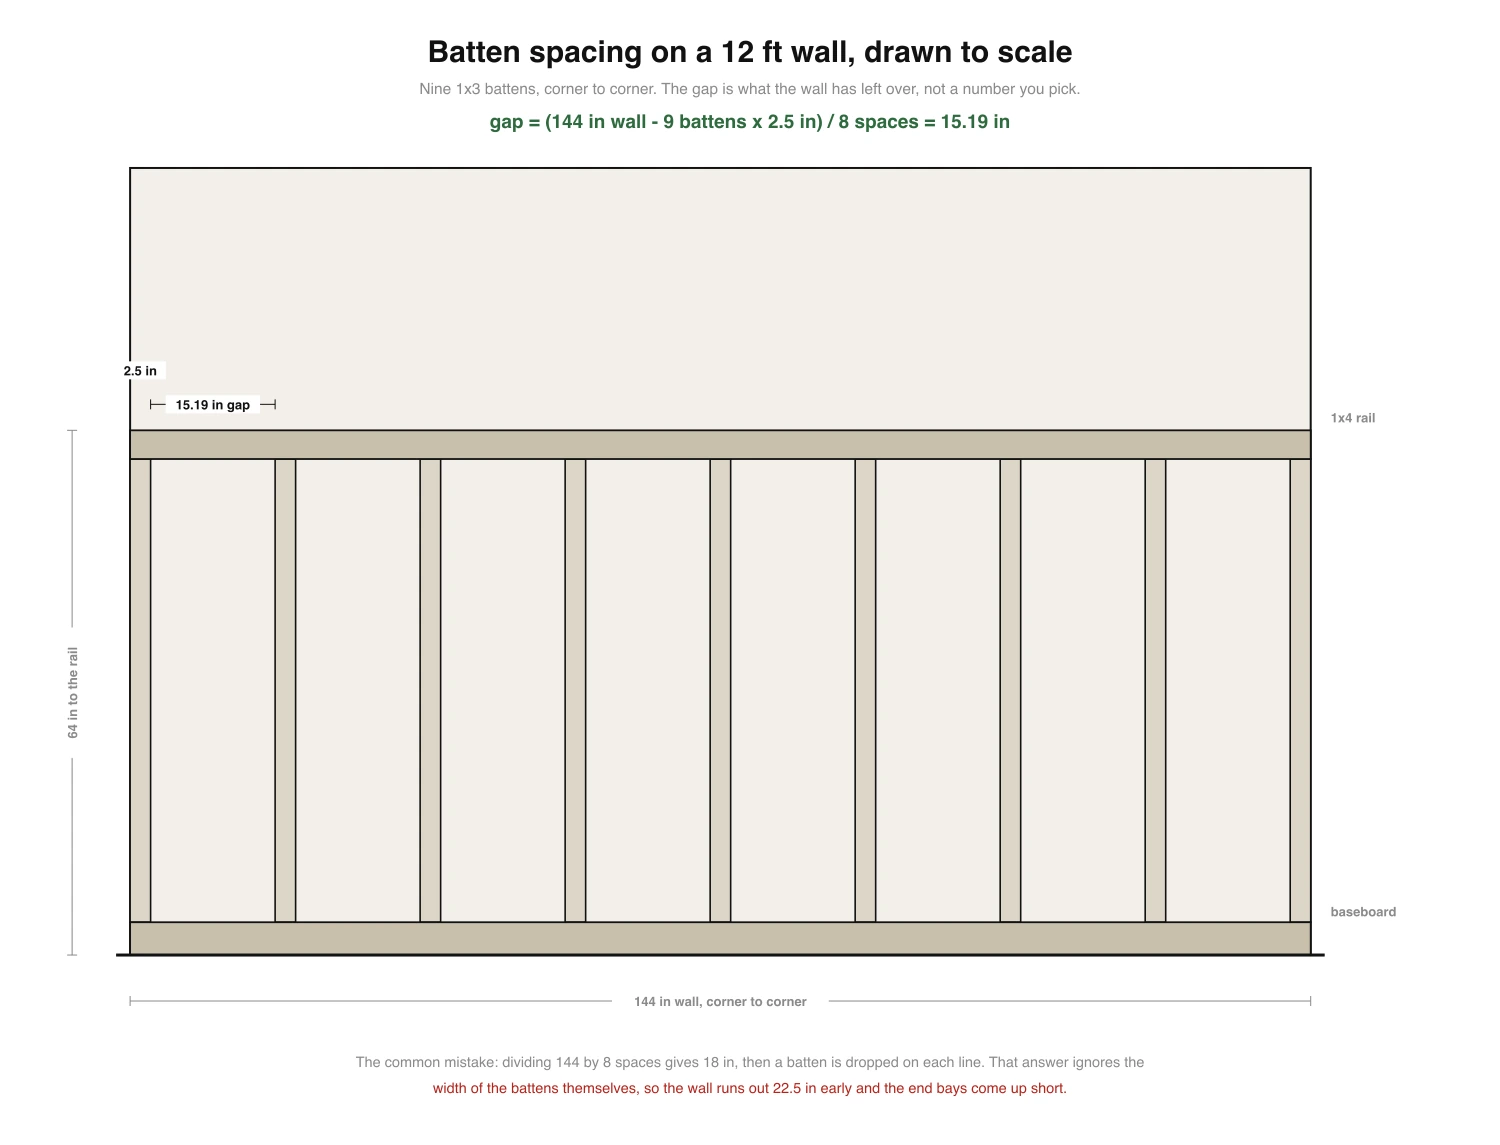
A board and batten wall is a grid of vertical boards over drywall, and the only number that decides whether it looks designed is the gap. The wall starts and ends with a batten, so the gap is what is left over: on a 12 foot wall, nine 1x3 battens leave 15.19 inch gaps. Everything else follows from that one calculation: the cut length, the number of boards, the paint, and whether an outlet ends up half buried under a batten. This guide derives the layout from your own wall, the calculator does the arithmetic, and the drawings show what the ranking pages leave you to guess.
Our articles are still written by humans!
Get human written articles in your Google feed.
This is the interior wall. Cladding the outside of a house in vertical boards is a different product with its own spacing rules, covered in board and batten siding.
FreeUpload photo · freeRepaint my walls for freeUpload a photo and MeltFlex changes the wall colour or finish, with the furniture and layout untouched. Your first AI design is free, no card needed.


The spacing formula, and the version most guides get wrong
Search for batten spacing and you get a range: 12 to 16 inches, sometimes 16 to 24. The range is fine. What no page tells you is how to turn it into marks on a real wall, and the shortcut most of them imply is wrong. Dividing a 144 inch wall into eight equal parts gives 18 inches, and if you then drop a batten on each line, you have quietly ignored the width of the battens themselves. Nine 2.5 inch boards eat 22.5 inches of wall. The layout runs out before it reaches the far corner and the end bays come up short, which is exactly the wall that looks slightly wrong in photographs without anyone being able to say why.
The arithmetic that closes on the wall is one line:
gap = (wall width - number of battens x batten width) / (number of battens - 1)
N battens leave N minus 1 spaces, because both corners get a batten. Rearranged, the count you want is roughly the wall width plus one gap, divided by one batten plus one gap. For a 12 foot wall with 1x3 battens at a 16 inch target that lands on nine battens and a 15.19 inch gap, and the numbers close: nine boards at 2.5 inches plus eight gaps at 15.19 inches is 144 inches exactly.
The batten width in that formula is the real one, not the label. Under Voluntary Product Standard PS 20-20, the American Softwood Lumber Standard, a nominal 1 inch dry board dresses to 3 quarters of an inch thick, and nominal 2, 3, 4 and 6 inch widths dress to 1.5, 2.5, 3.5 and 5.5 inches. A layout drawn off the nominal numbers is half an inch out per batten, which on nine battens is four and a half inches of drift across one wall.
Wider boards do not tighten the gaps, they reduce the count. The same 12 foot wall takes nine 1x3 battens at 15.19 inches or eight 1x4 battens at 16.57 inches. Neither is more correct. A 1x2 grid reads fine and modern, a 1x4 grid reads heavier and more traditional, and past 1x6 you are building a panelled accent wall rather than battens.
Every row targets a 16 inch gap and lets the wall decide the rest. Notice that no row gives you a round number. That is the point: a wall that ends on a whole inch was measured badly.
Batten layout calculator
Enter your own wall and the layout comes out with the cut list, the paint and the price attached. It also checks one thing nobody else does: whether an outlet lands under a batten, and how far to shift the grid if it does.
Interactive calculator
Loading… if it does not appear, refresh the page.
Two habits make the output trustworthy. Measure the wall at rail height rather than at the floor, because baseboards and settled framing lie, and measure the height at both ends, because floors are rarely level. If the two heights differ by more than a quarter inch, set the rail off a level line and let the bottom of the battens run long into the baseboard, where the difference disappears.
How high the rail goes, which is the whole design decision
Spacing decides whether the wall looks competent. Height decides what it says. There are three proportions in normal use, and they are fractions of your wall, not fixed measurements, so a 9 foot ceiling moves every number.
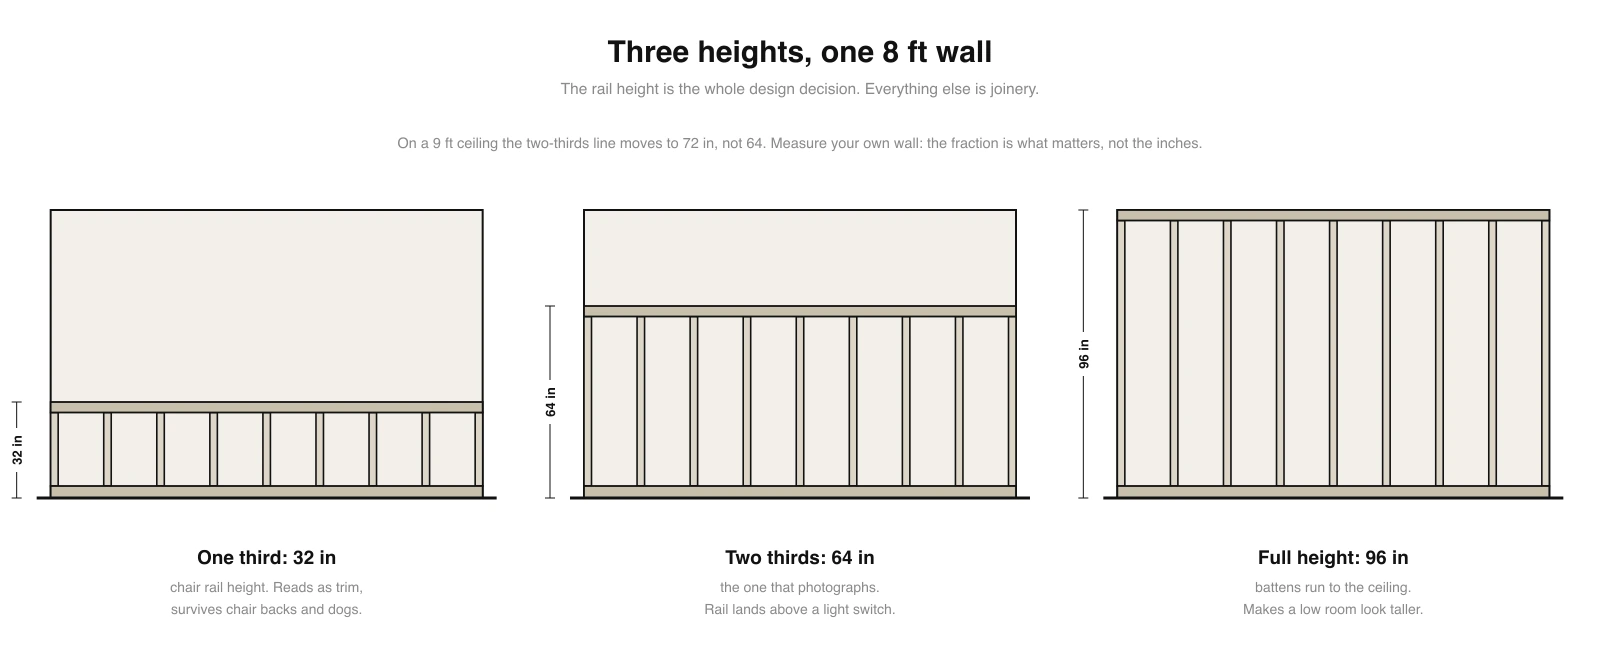
The cut length is the rail height minus the baseboard minus the rail width, which is why the two-thirds row lands on 56.5 inches on a standard 8 foot ceiling. Hold that number. It is the single most expensive dimension in the whole project, for a reason nobody mentions in the how-to posts, and the cost section below is where it bites.
One placement rule that saves a repaint: on the two-thirds wall the rail lands just above a standard light switch, so a switch plate sits in the panelled zone and looks deliberate. On the one-third wall the switch sits above the rail. What you want to avoid is the rail crossing a switch or a picture frame line at the same height, because two horizontals an inch apart read as a mistake.
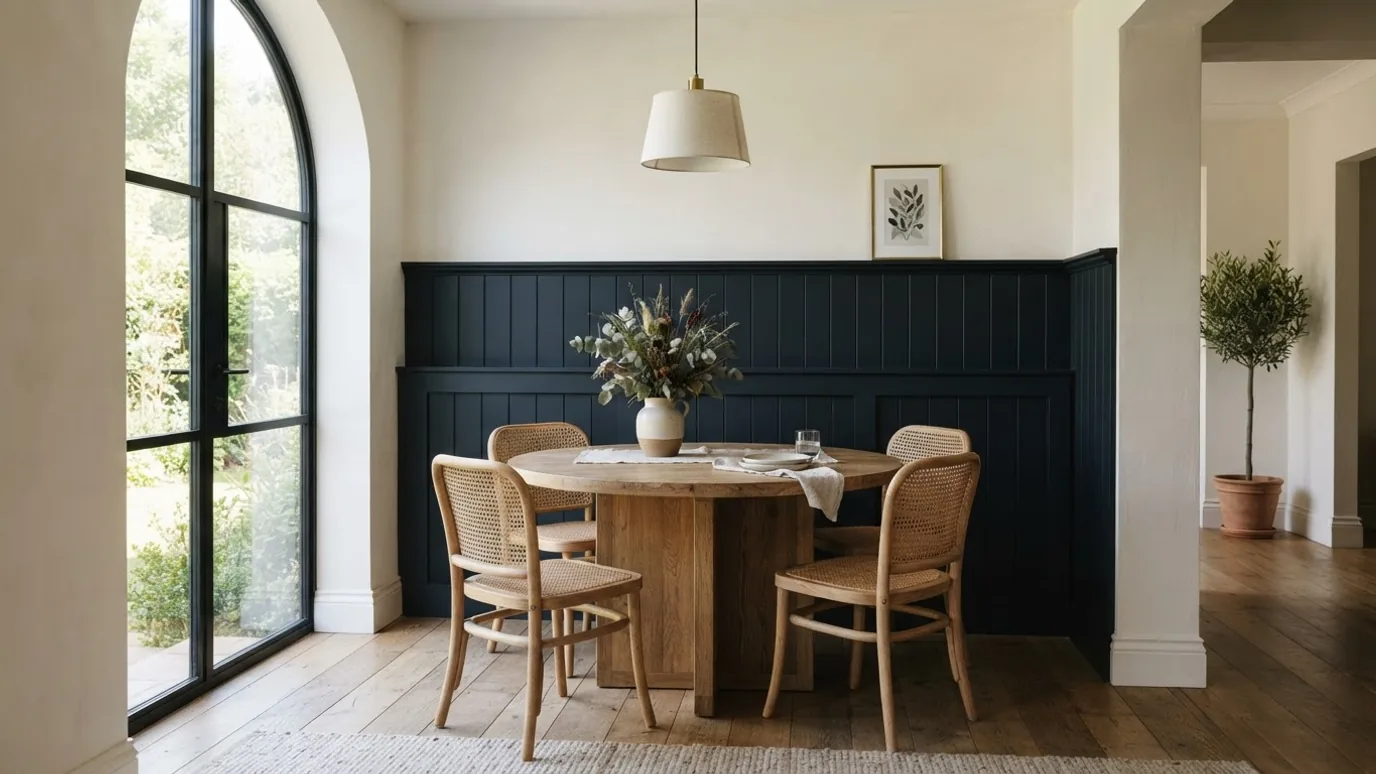
Colour behaves differently above and below the rail. A dark batten zone under a pale wall grounds a room and hides scuffs at chair height, which is why dining rooms and room by room design guides take navy and charcoal so well. Painting the battens and the wall above them the same colour, which is what colour drenching does, makes the treatment read as architecture instead of decoration. Our guide to choosing paint colours and the wall colour tool roundup both cover that decision in more depth than this page needs to.
Which board to buy, and the one that fails
All four candidates are three quarters of an inch thick, all four take paint, and in a finished photograph you cannot tell them apart. What separates them is what happens at the cut end.
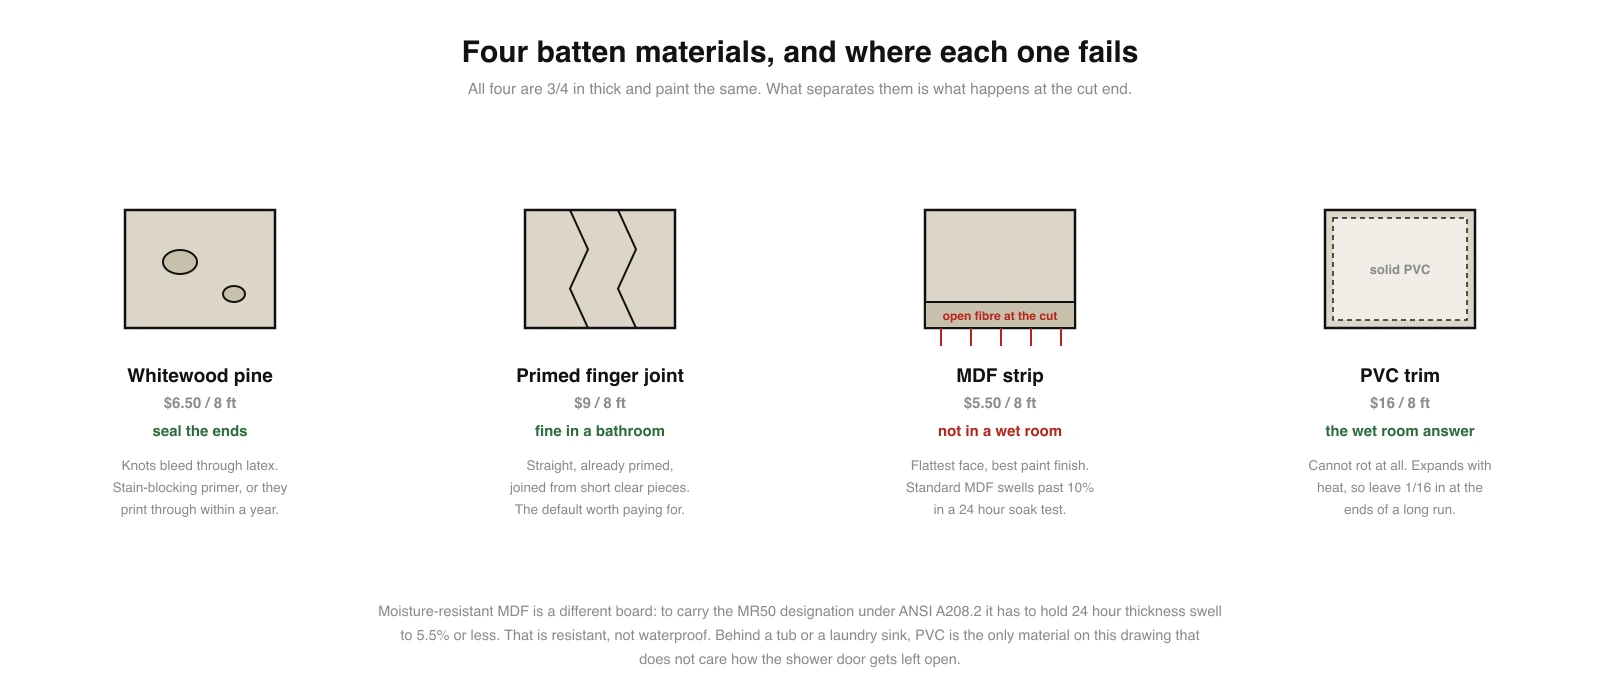
MDF dominates the photographs because it has the flattest face and no grain to print through the paint. It is genuinely the best surface in a dry bedroom. The failure is specific rather than general: to carry the MR50 moisture designation under ANSI A208.2, a panel has to hold its 24 hour thickness swell to 5.5 percent or less, and the ordinary strips stacked in the trim aisle are not that board. Moisture resistant MDF is a separate product, and even that is resistant rather than waterproof.
Prices above are US big box ballparks from the trim aisle rather than a quoted takeoff, which is why the calculator lets you overwrite the board price with what your yard actually charges. The relative order is what matters and it is stable: MDF cheapest, primed pine a few dollars more, PVC roughly double.
What a board and batten wall actually costs
For the reference wall, 12 feet wide and 8 feet high with a rail at 64 inches, materials land between 144 and 259 dollars depending on the board, which is 1.50 to 2.70 dollars per square foot of wall. That includes a gallon of paint and 28 dollars of adhesive, brads, caulk and filler. Paint is figured at 350 square feet per gallon over two coats, the low end of the 350 to 400 square feet Sherwin-Williams publishes, because battens add edges that drink paint.
Now the 56.5 inch cut. A two-thirds wall on an 8 foot ceiling needs battens 56.5 inches long, and an 8 foot board is 96 inches, so every board yields exactly one batten and 39.5 inches goes in the bin. Nine battens means nine boards and nearly 30 feet of offcut. The same cut takes two battens out of a 10 foot board with 7 inches left over, so the pile drops from nine boards to five.
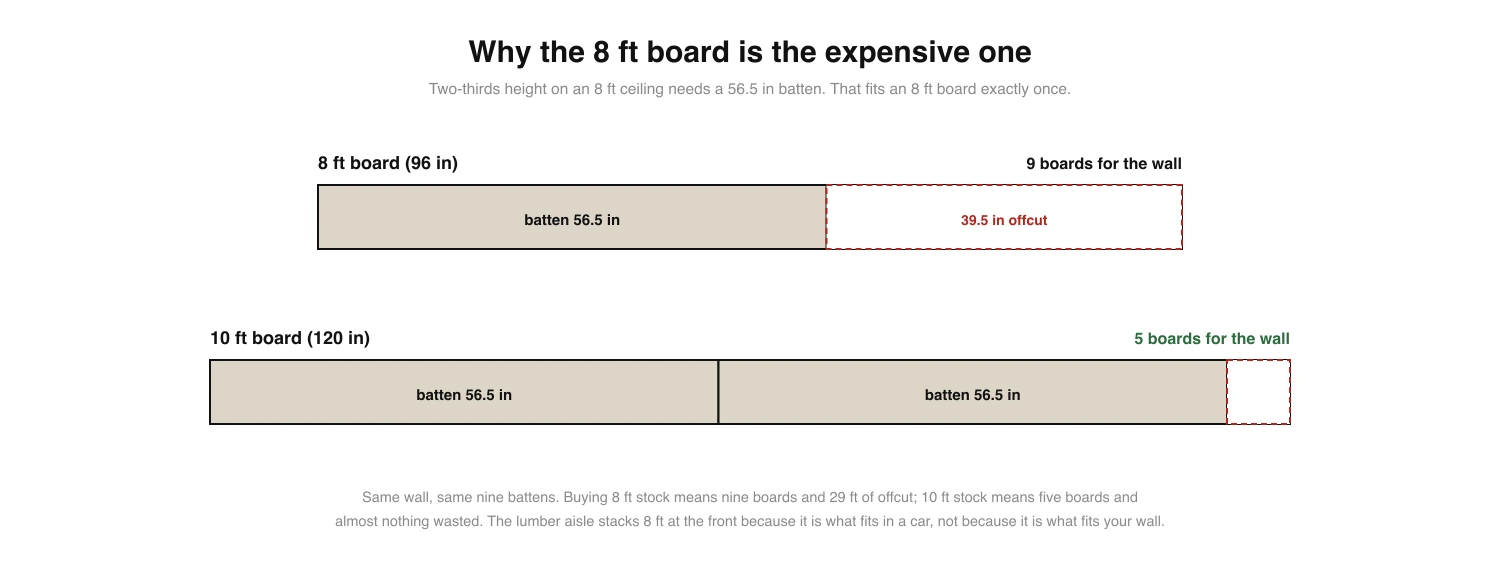
Nobody writes this down because the lumber aisle stacks 8 foot boards at the front, where they fit in a car. The calculator flags the better stock length for your own cut, and on a full-height wall the advice reverses: an 88.5 inch batten needs the 8 foot board and wastes almost nothing. Check before you buy, not after you have cut.
Installed prices are a different conversation. Every online estimate for board and batten fitted by a carpenter is a range wide enough to be useless, because the labour depends on the room, the trim you are matching and how level the floor is. What you can rely on is the number above: the materials for one wall cost less than a mid range floor lamp, and they are the reason this treatment spreads through trend roundups every year.
Outlets, corners and doors
A single-gang outlet plate is 2.75 inches wide, so it needs 1.375 inches of clear wall each side of the box centre. Run the layout first and check where the boxes fall, because a batten sitting under a cover plate cannot be fixed later: the plate will not lie flat, and there is no trim that hides it.
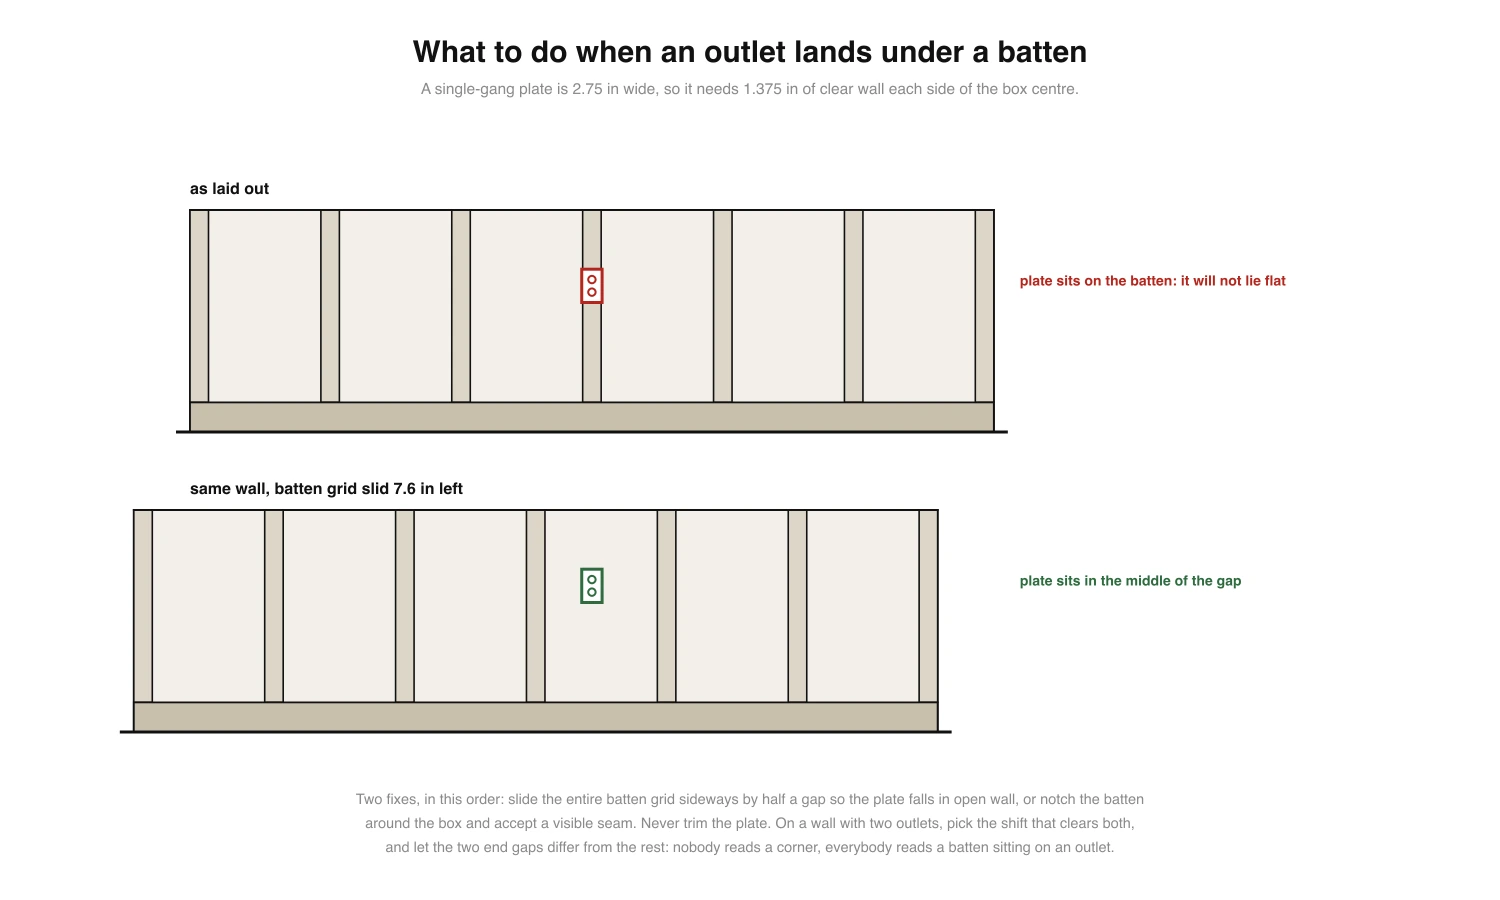
Three fixes, in this order. Try one more or one fewer batten first: the pitch changes by an inch or two, every board moves with it, and the equal gaps and corner battens survive intact. If that does not clear the box, slide the entire grid sideways by half a gap so the plate falls in open wall, which costs you two slightly different end bays, and nobody reads a corner. Last, notch the batten around the box and accept a visible seam. Never trim the plate. If a wall has two outlets, pick the shift that clears both, and if no shift clears both, notch the less visible one.
Corners are simpler than they look. On an inside corner, run a batten tight into the corner on both walls, so the two boards meet at right angles and the caulk line does the rest. On an outside corner, mitre the two battens or, if the corner is out of square (most are), butt them and fill. Around a door, treat the casing as the end of the wall: measure from the casing to the next corner and lay out that section on its own. A rail that dies into door casing at the same height as the casing top looks intentional; a rail that lands two inches below it does not.
Do not chase studs. Framing runs 16 inches on centre in most US construction and your batten pitch will be something like 17.69 inches, so they will almost never coincide. That is fine, because the load is trivial: nine pine battens and a rail on a 12 foot wall weigh roughly 22 pounds spread over the whole surface. Construction adhesive is the fixing here, and the brads are just clamps that hold the board while it cures. This is the opposite of hanging a curtain rod, where a lined pair puts real load on two anchors and the wall type decides everything.
Step by step
Half a day for the boards, an evening for the caulk and paint, and the order below is what keeps it there rather than stretching into a fortnight.
- Measure and lay out. Width at rail height, height at both ends, then run the layout and write the batten count, gap and cut length on the wall in pencil.
- Buy for the cut. Check the yield before you leave: 8 foot boards for a full-height wall, 10 foot boards for a two-thirds wall.
- Paint the wall first, in the final colour, including behind the battens. This is the step people skip and regret.
- Fit the top rail off a level line, not off the ceiling, and cap the baseboard if it is thinner than the battens.
- Mark every batten from the same end, adding batten width plus gap each time, so rounding does not accumulate across the wall.
- Glue and pin. Zigzag bead of construction adhesive, two or three 18 gauge brads per batten, level checked on each one.
- Caulk both edges of every batten, fill the nail holes, sand, then one topcoat over battens and wall together.
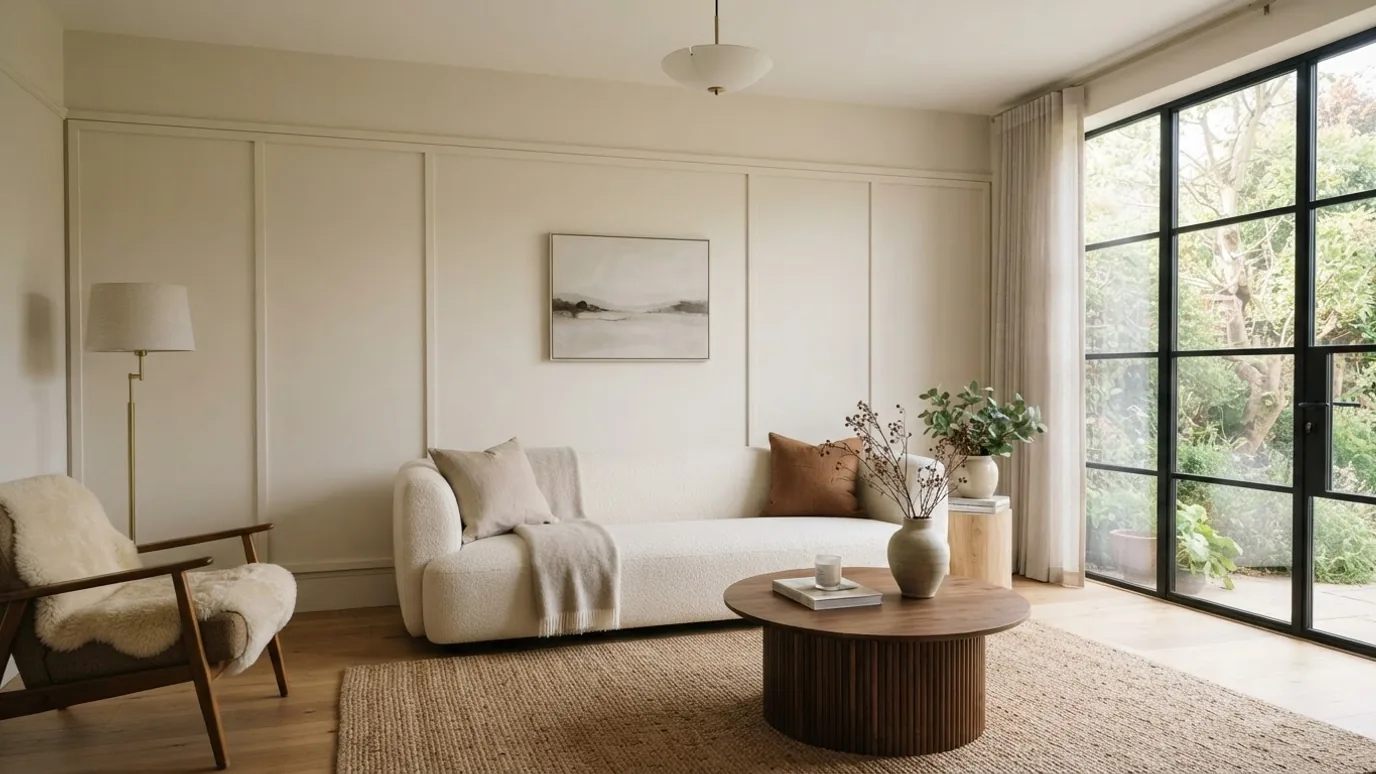
The caulk is not optional trim work, it is the step that turns nine boards stuck on drywall into something that reads as built. A batten with a caulked edge casts one clean shadow line. A batten without one shows a dark hairline gap that follows the board up the wall, and no amount of paint closes it.
Board and batten in a bathroom
A powder room is the best possible use of this treatment. The walls are short, so the material cost is trivial, and the room has no daylight to speak of, so the shadow lines do the work that a window would do elsewhere. Full height is usually right here, because a small room gains from the vertical lines.
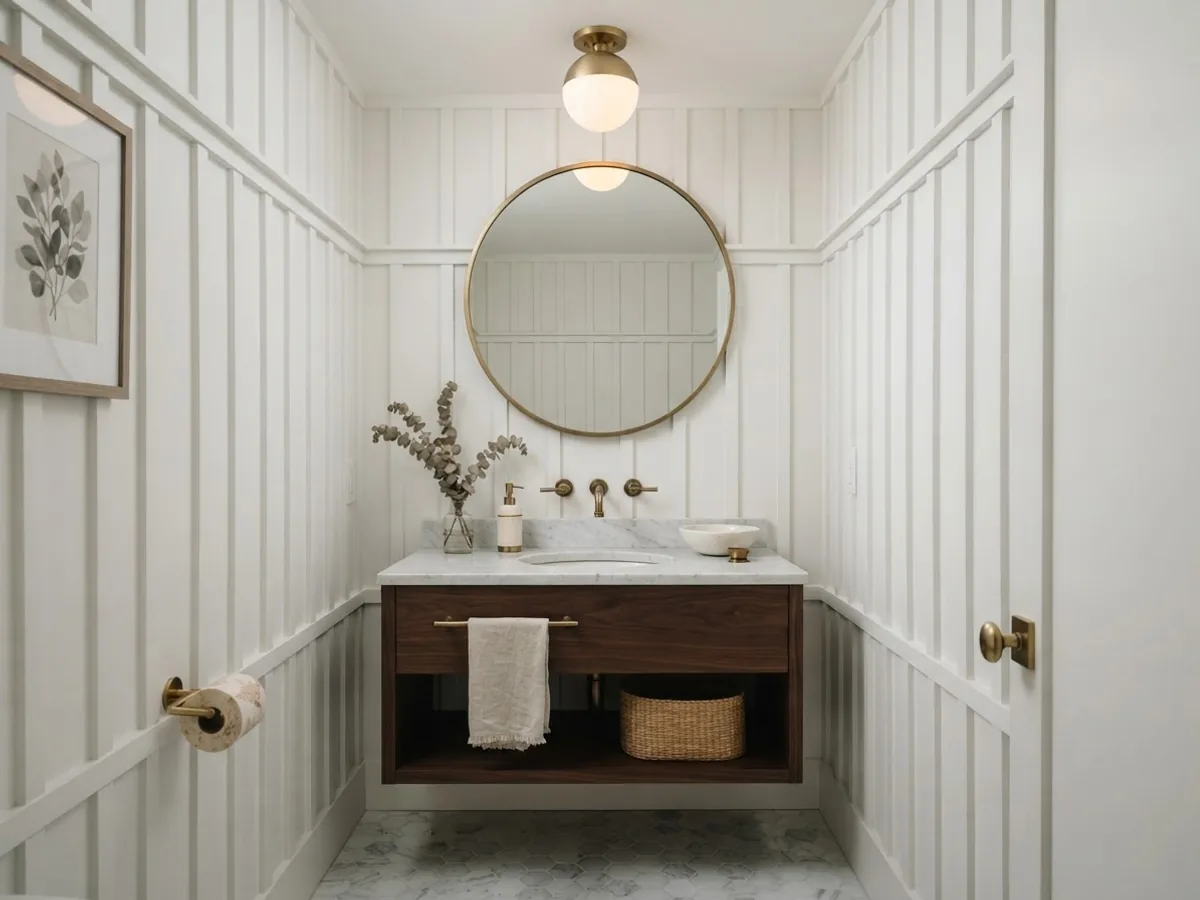
Three rules make the difference between a bathroom that still looks like this in five years and one that does not. Use primed finger joint pine, moisture resistant MDF or PVC, never plain MDF strips. Caulk every joint including the bottom of each batten where it meets the baseboard, because that is where water sits. And keep boards out of the direct splash zone: behind a basin is fine, inside a shower surround is a tiling job, not a joinery one. If you are working out what fits in the room at all, our small bathroom dimensions guide and the AI bathroom design tool handle the layout side.
See it on your own wall before you cut anything
The part that no calculator settles is whether the colour and the height suit your room. That is a visual question and it deserves a visual answer, which is where our own tool earns its place: photograph the wall, and the wall visualiser puts battens, panelling or a new colour on that exact wall, with your furniture and your light still in the frame. Test the two-thirds line against the full-height version before you commit 22 pounds of pine to it.
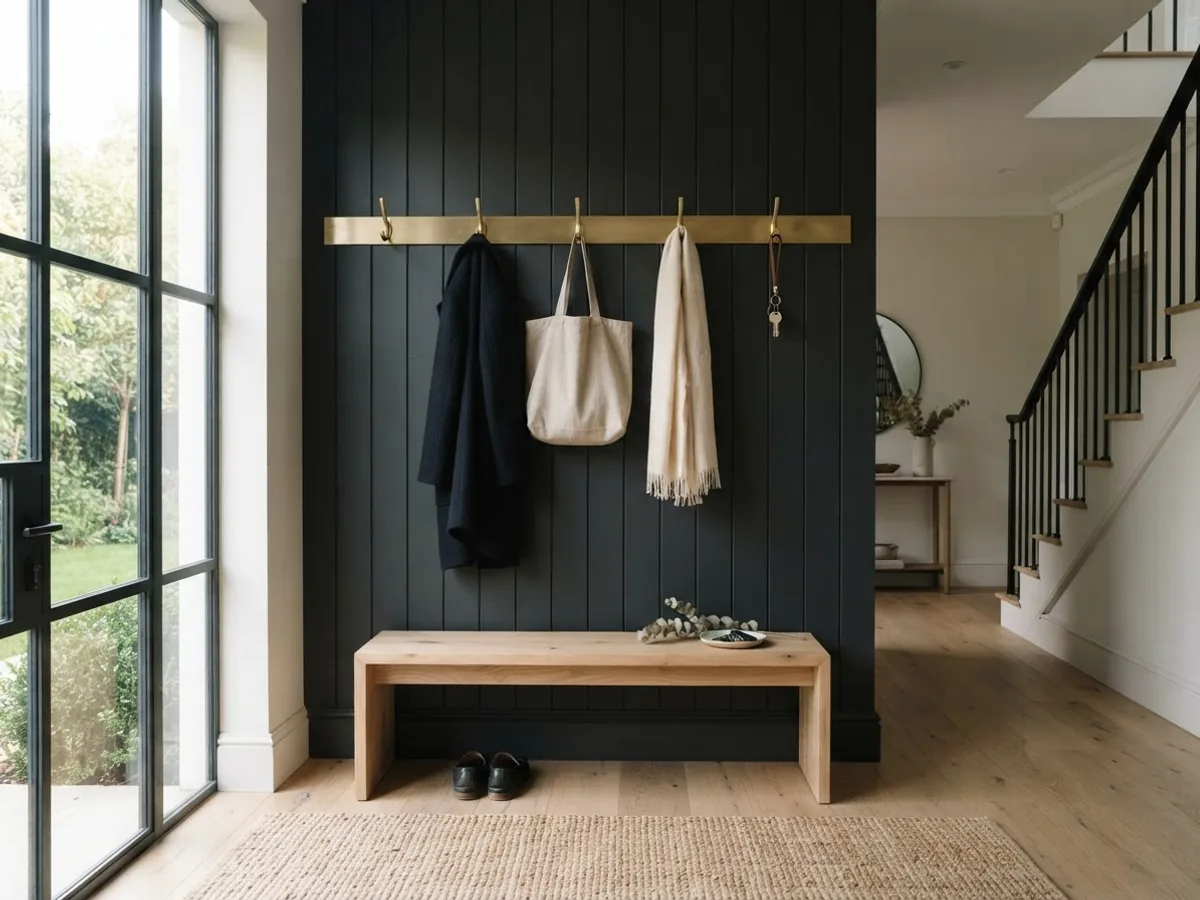
The same trick answers the colour question that follows every batten wall: what happens to the rest of the room. Try the panelled zone in the dark colour you are considering and the wall above it in the existing paint, then try both in the same colour. Our dark and moody guide argues for the second, our farmhouse guide for the first, and whether accent walls are still in style is a fair question to settle with your own room on screen rather than with a magazine. If the answer turns out to be no, wallpaper, a mirror wall and a painted ceiling are the three alternatives worth testing in the same session, and the small room guide covers what vertical lines actually do to a tight space.
When you are ready to price the room rather than the wall, run the wall area through the square footage calculator, and if this wall is one move in a bigger redesign, start from a photo of the room and try the whole scheme before the first board is cut.
Frequently asked questions
How far apart should board and batten be?
Between 12 and 18 inches for most rooms, but the exact number is not yours to pick: the wall starts and ends with a batten, so the gap is what is left over. On a 12 foot wall with 1x3 battens aiming at 16 inches, nine battens leave 15.19 inch gaps. Pick the target, let the arithmetic pick the gap.
How tall should a board and batten wall be?
Two thirds of the wall height is the proportion that photographs well, which is 64 inches on an 8 foot ceiling and 72 inches on a 9 foot one. One third, around 32 inches, reads as chair rail trim. Full height suits low rooms because the vertical lines pull the eye up. Keep the fraction, not the inches.
What size boards do you use for board and batten?
A 1x3 for the battens and a 1x4 laid flat for the top rail is the common pairing. Remember the dressed sizes: under the American Softwood Lumber Standard a 1x3 is actually 2.5 inches wide and 3 quarters of an inch thick. Laying out from the nominal number puts every batten half an inch out of place.
Do board and batten battens need to hit studs?
No. Studs sit 16 inches on centre and your batten pitch will be something like 17.7 inches, so they will rarely line up, and chasing them wrecks the spacing. A 12 foot wall of pine battens and rail weighs about 22 pounds. Construction adhesive plus a few 18 gauge brads carries that easily.
Can you do board and batten in a bathroom?
Yes, with the right material. Standard MDF wicks water at the cut ends and bloats at the baseboard, so it belongs in a dry room. Use primed finger joint pine, moisture resistant MDF or PVC trim, caulk every joint, and keep the boards out of direct splash zones behind a tub or shower.
How much does a board and batten wall cost?
For a 12 by 8 foot wall at two thirds height, materials run about 144 dollars in MDF, 155 in whitewood pine, 182 in primed pine and 259 in PVC, including a gallon of paint and consumables. That is roughly 1.50 to 2.70 dollars per square foot of wall, before any labour.
Is MDF or wood better for board and batten?
MDF has the flatter face and takes paint better, so it wins in a dry bedroom or hallway. Wood wins anywhere with moisture, and primed finger joint pine costs only a few dollars more per board than MDF while being straighter than whitewood and immune to the swelling that ruins an MDF batten.
Do you paint the wall before or after installing battens?
Before, in the final colour, including behind the battens. Then install, caulk both edges of every board, fill the nail holes, and roll one topcoat over the whole wall. Painting a finished grid instead means cutting in around every batten with a brush, which doubles the work for a worse edge.