

To measure for curtains, you need five numbers and none of them is the size of the glass. Put the rod 4 to 6 inches above the window casing and extend it about a quarter of the casing width past each side. Make the panels together 2 to 2.5 times the rod width. Then measure the drop from the bottom of the ring or clip straight down to the floor, and either take off half an inch to float or add one to two inches to break. That is the whole job. Everything below is what happens when a real window refuses to cooperate.
Our articles are still written by humans!
Get human written articles in your Google feed.
The cover is one of our own renders. The curtains in it are doing all four things this page asks for: hung at the ceiling, stacked off the glass, full enough to fold, and floating half an inch clear of the floor.
“On the developer projects I worked on, curtains were the last line item and the one that got measured in a hurry. The specific failure was always the same. Somebody measured the window, ordered eighty four inch panels for every unit because that is what the catalogue leads with, and then the fit-out team hung the rods properly, high and wide, the way the show flat looked. Every curtain in the building finished six inches off the floor. You cannot lengthen a hemmed panel. Two hundred flats got reordered.”
Branislav Hrivnák, Co-Founder, MeltFlex
The short version
- Rod height: casing plus 4 to 6″, or tight to the ceiling.
- Rod width: casing plus about ¼ of the casing width each side. A 36″ window wants a 54″ rod.
- Panel width: rod × 2 to 2.5, then divide by the number of panels.
- Two 50″ panels is not a lot of fabric. Most windows need three, or two wider ones.
- Drop starts at the ring, not the rod, and that is 1 to 1½″ of length.
- Float ½″ clear, break +1 to 2″, puddle +2 to 16″.
- Hang high and 84″ stops working. Price the 96″ panel first.
Jump to: The five measurements · Where the rod goes · Panel width · Float, break, puddle · Standard lengths · Worked example · Awkward windows · Six mistakes · Metric · Seeing it first · FAQ
FreeUpload photo · freeRedesign my windows for freeUpload a photo of the room and MeltFlex redesigns the window frames, glazing and treatments in place. Your first AI design is free, no card needed.


The five measurements, in order
Take them in this order, because each one depends on the one before it. The rod position decides the drop, and the rod width decides how much fabric you need. Measure the casing, meaning the outside of the trim around the window, not the glass and not the frame. If the window has no casing at all, which is common in newer flats, measure the plaster reveal and treat that as the casing.
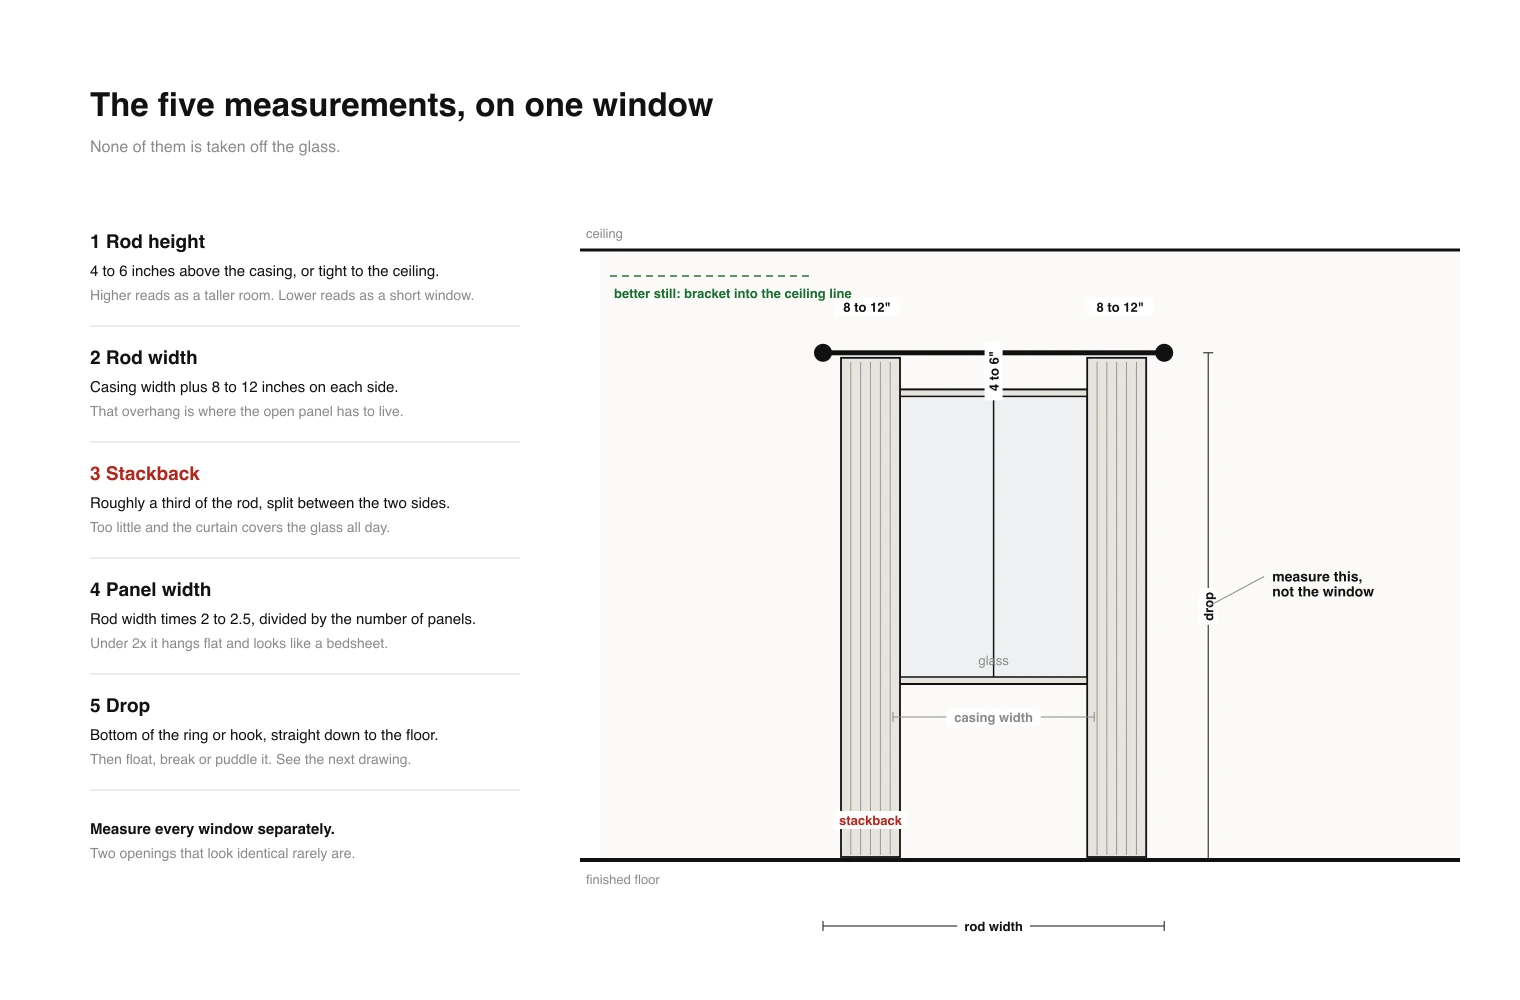
Measure each window in the room separately. Two openings on the same wall are very often a quarter of an inch apart, and on a run of three curtains that is visible.
Where the rod goes, and why the usual advice contradicts itself
Search this and you will be told two different things with equal confidence. Some sources say extend the rod 3 to 6 inches past the frame. Others say 8 to 12 inches per side. A third group says 8 to 12 inches wider than the window in total, which is half of the second answer. They cannot all be right, and the reason they disagree is that none of them is a rule. They are all one specific window rounded to a memorable number.
The actual rule comes from drapery workrooms, where it is called stackback: the width a curtain occupies when it is fully open. The traditional figure is about one third of the rod width, split between the two sides, though a workroom will tell you it moves with fabric weight, lining and header type. A drapery measuring guide puts a 50 inch rod pocket panel at 24 to 28 inches of stack and a pleated one at 15 to 24, so treat one third as an average, not a law.
If you want the glass completely clear when the curtains are open, the overhang on each side has to equal the stack on that side. Set the overhang to o and the casing to W, and the rod is W + 2o. Stack per side is one sixth of the rod. Solve for the case where they match and you get o = W ÷ 4. Overhang each side is a quarter of the window width.
Which is why “8 to 12 inches each side” feels right: it is this formula evaluated for a 32 to 48 inch window, the size most American houses have most of. It falls apart on anything wide, and that is exactly where people quote it hardest.
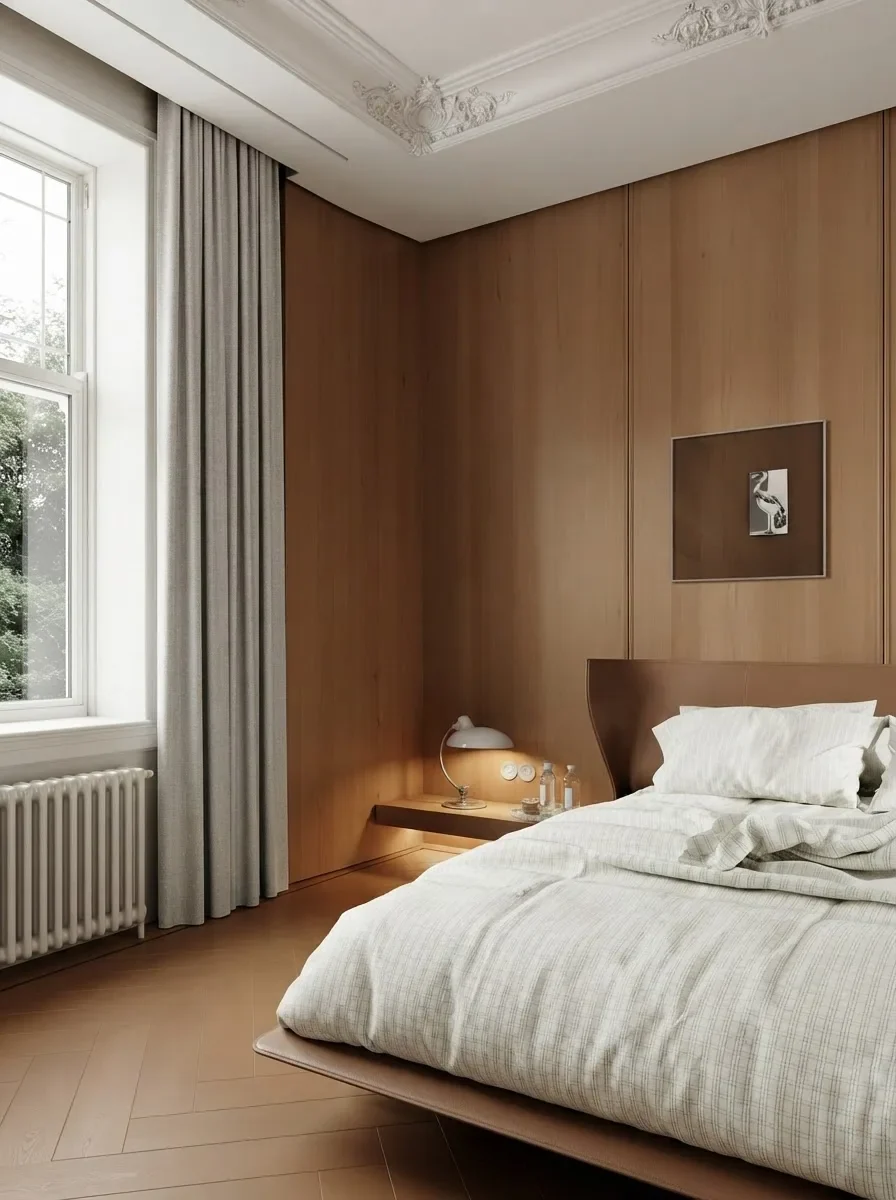
Height is the easier decision and the one with more visual payoff. Four to six inches above the casing is the floor of good practice. Going higher, to within two to four inches of the ceiling or the crown, is better in almost every room, because the eye reads the top of the fabric as the top of the window. If you are also thinking about proportion, our guide to standard ceiling height covers what you are working with above the rod, and standard picture frame sizes does the same job for the wall beside the window. Once the position is settled, the physical job, which anchor holds in which wall and where the drill marks go, is its own guide: how to install a curtain rod.


How wide the panels have to be
Fullness is the ratio of fabric width to rod width, and it is the number that separates a curtain from a sheet hung over a pole. The working range is 2 to 2.5 times the rod width. One and a half times is a flat, tailored look that only works with a heavy fabric and a good header. Three times is hotel territory and is what sheers need, because thin fabric has nothing to show except folds.
Now do the division, because this is where most curtain shopping goes wrong. The most common ready made panel is 50 inches wide. That is 50 inches of flat fabric, and it covers 25 inches of rod at 2× fullness. A pair of them covers 50 inches of rod. On the 54 inch rod from the table above, a pair gives you 1.85×, which is thin.
Round the division up, and stop there. Rounding up a second time to make the number even is a convention, not a rule, and every extra panel adds to the stack. An odd count is normal: hang two on one side and one on the other, or run the whole thing as a one way draw.
One caveat on the stackback figure, because we would rather flag it than let it quietly fail. The one third rule is a design-side rule of thumb for a pleated pair, and measured stacks on real ready made panels run wider. The source quoted above puts a single 50 inch rod pocket panel at 24 to 28 inches of stack on its own. So treat the quarter-width overhang as a minimum rather than a target: if you have the wall, go wider, and on a narrow window accept that a fully open curtain laps an inch or two onto the glass rather than buying less fabric to avoid it.

How long: float, break or puddle
The drop is measured from the point the fabric hangs from, not from the rod. That distinction is worth an inch and a half, and an inch and a half is the difference between a curtain that lands and one that hovers. With rings and clips the panel starts about 1 to 1.5 inches below the rod. With grommets or a rod pocket it starts at roughly the top of the rod. With pinch pleats on hooks, the hook position inside the pleat moves the finished drop by another one to two inches.
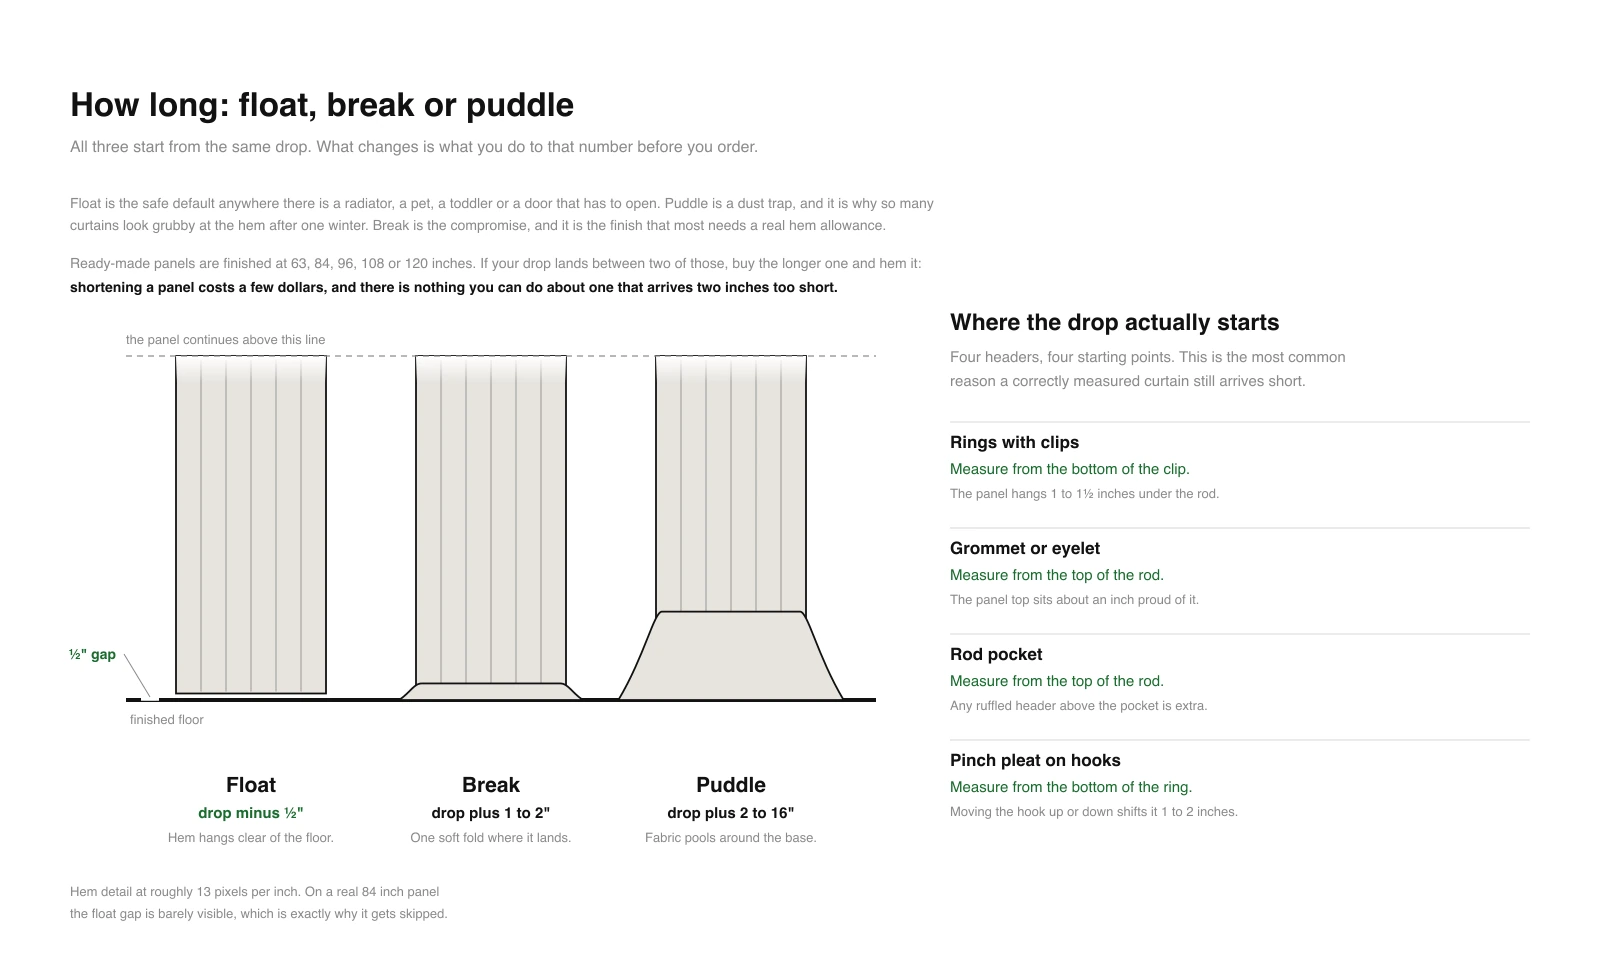
One vocabulary note, because our own pages used to disagree with each other and so does the rest of the internet. A hem that just grazes the floor with no fold gets called a kiss by some workrooms and the short end of a break by others. They are the same hem. We use break here for anything from touching to two inches over; the shorter version has its own page at should curtains touch the floor.
The honest verdict on puddling: it photographs beautifully and it ages badly. A puddled hem is a dust trap, it discolours at the fold, and it has to be rearranged by hand every time anybody walks past. In a room that gets used, float. Keep the puddle for a stationary panel in a room you mostly look at.


Standard curtain lengths, and the 84 inch trap
Ready made panels in the United States come in five lengths. They exist because more than seventy per cent of post-war American single family houses were built with 8 foot ceilings, so the 84 inch panel became the default and everything else became a variant of it.
Here is the contradiction at the centre of every curtain guide on the internet, including the ones selling you the curtains. Hang high, they say. Buy 84 inches, they say. Those two instructions cancel each other out. With a 96 inch ceiling, a rod placed two inches under it sits at 94 inches. Rings drop the panel top to about 92.5 inches. An 84 inch panel then finishes eight and a half inches above the floor, which is not a design choice, it is a mistake with a receipt.
The resolution is simple and nobody says it out loud: if you are hanging near an 8 foot ceiling, you need a 96 inch panel, and you hem it. Buying long and shortening costs a few dollars at any alterations shop or ten minutes with iron-on hem tape. Buying short costs the whole curtain.
A worked example, start to finish
One bedroom window. Casing 36 inches wide. Top of the casing 76 inches above the floor. Ceiling 96 inches. Rings with clips. We want the panels to close properly at night and clear the glass completely by day.
Note the two places this differs from what the packaging would have told you: three panels rather than a pair, and 96 inches rather than the 84 inches that a 96 inch ceiling seems to imply. Both come out of the arithmetic, not out of taste.
And note the trade-off the arithmetic will not resolve for you. Three panels give proper fullness, but three panels also stack wider than the nine inches of wall on each side of this window. Either take the pair at 1.85 times with a fabric that has some body of its own, or hang the three and accept that the open curtain covers an inch or two of glass. On a wider window the conflict eases. On a 36 inch one, somebody has to choose, and no measuring guide can choose for you.
If measuring the room itself is the part you are stuck on, we wrote about measuring a room from a photo and about what size furniture fits your room for exactly this kind of problem, and average room sizes gives you the numbers to sanity check against.
Sliding doors, bays, corners, arches and sloped ceilings
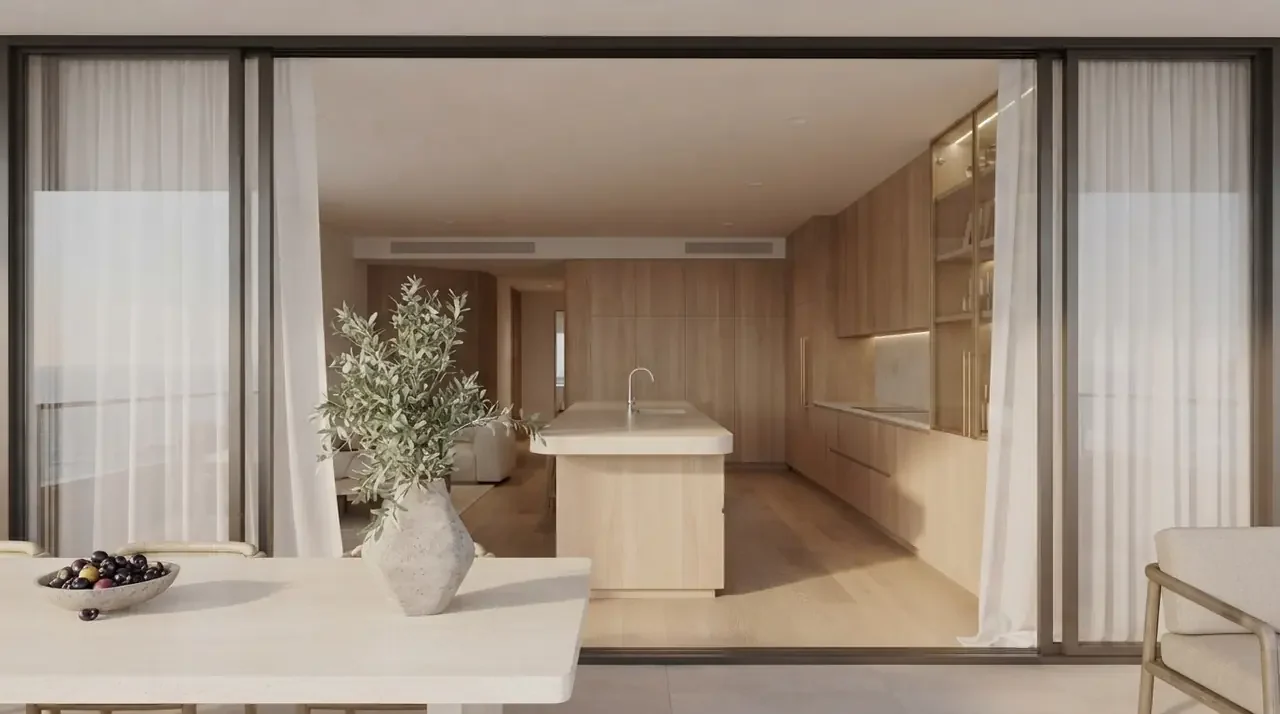
Sliding glass and patio doors. Measure the full frame, mount as close to the ceiling as you can, and float the hem half an inch clear without exception. This is a door somebody opens every day; a breaking or puddled hem gets stood on, dragged and dirty inside a season. Minimum fullness is 2 times the rod, so a 72 inch door needs at least 144 inches of fabric, which is three 50 inch panels, not two. Where there is wall on only one side, a one way draw that stacks entirely to that side beats an unbalanced pair.

Bay windows. Measure each leg separately and treat them as three windows, because they are. A bay rod bent to the angle looks neat but the rings will not pass the bend, so panels either stay stationary or need to be split at each corner. Three separate rods with a panel at each outside edge is usually easier to live with.
Corner windows. The picture further up this page shows the problem: two windows meeting with a narrow pier between them. There is nowhere for the inner panels to stack. Accept it, hang a single panel on the outer edge of each window, and let the inner edges close against the corner.


Radiators, benches and worktops under the window. Apron length, which is 4 to 6 inches below the sill, or float. A floor length curtain drawn over a radiator sends the heat straight up the glass and the fabric yellows above the element. This is one of the few cases where the shorter curtain is the correct one.
Blackout in a bedroom. Measure wider than you think. Light does not come through a blackout panel, it comes around the sides and over the top. Overhanging the casing by a quarter of its width already helps; a wrap-around rod that returns to the wall closes the side gap properly, and only a ceiling track or a pelmet closes the top one. If the bed sits under the window, the geometry gets fussier and we covered that in putting a bed in front of a window. For where curtains show up on a plan, the symbol is in our floor plan symbols guide.
Six mistakes, in the order people make them
- Measuring the glass. Every number on this page comes off the casing or the rod. The glass is the one dimension that never enters the calculation.
- Hanging at the casing line. It is the intuitive place and it makes the window look shorter and the ceiling lower. Four to six inches above is the minimum; higher is better.
- Buying 84 inches by default. Fine if the rod is at 84 to 86 inches. Wrong the moment you take the previous piece of advice.
- Forgetting the ring drop. An inch and a half sounds trivial until the hem is an inch and a half off the floor, which is the one length that reads as an error from across the room.
- Buying a pair. Two 50 inch panels is 100 inches of fabric, whatever the window behind them is doing. Check it against the rod before you check it against the budget.
- Puddling in a working room. It looks right in the shop photograph and wrong by February.
Metric, for the UK and Europe
The method is identical; the conventions are not. In the UK and Ireland you measure the pole or track width rather than the window, and the drop is taken from the eye of the ring. Ready made drops are commonly 54, 72 and 90 inches, sold as 137, 183 and 229 centimetres. Continental European brands work in centimetres throughout, usually in 20 centimetre steps.
One thing to check before ordering in the UK: some brands print the width per pair and some per panel. A pack marked 168 cm can mean two panels of 168 or one pair totalling 168, and the difference is the entire fullness calculation.
Seeing it in your own room before you order
Everything above gets you the right size. It does not tell you whether a heavy oatmeal linen is going to make your north facing living room feel warm or heavy, and that is the question people actually agonise over in the shop. This is what our tool is for: upload a photo of the room as it is, and generate it with different curtains so the length, colour and weight are a decision you look at rather than imagine. There is a dedicated window design tool if the frames and the treatment are being decided together. If the window already has blinds and the question is whether to keep them, how to clean blinds covers what is rescuable and what is simply worn out.
This walkthrough does that on a photo of one room: curtains against blinds, long against short, light fabric against heavy.

The render settles fabric and color. The rod height and panel width still come from the five measurements above.
The limit is the same one we state on every page like this, and it matters more here than usual. A render cannot measure your window. It will happily show you a beautiful floor length curtain that is two inches too short in real life, because it has no idea where your floor is. Use it for colour, weight, fullness and length as a look. Use the tape measure and the tables above for the order form. We were blunt about where these images fall down in why AI renders look fake.
Measuring and hanging is only half the decision. Once the rod is up, our guide to what color curtains go with your walls covers gray, white, beige, blue and green with the value and undertone rule that decides it.
If you are dressing the whole room rather than one window, the neighbouring decisions are in choosing paint colours, what colour furniture goes with grey walls, the AI lighting prompt pack and what size rug a living room needs. Layout first is usually the better order: living room layout and bedroom layout both decide where the seating and the bed sit relative to the window, which changes what the curtain has to do. For small rooms, AI living room design prompts and studio apartment layouts lean harder on the ceiling-height trick than anything else on this page. There are more rooms with curtains in them in our gallery.
What to take from this
Rod 4 to 6 inches above the casing, or higher. Overhang about a quarter of the casing width on each side, which is where the open panels have to park. Panels totalling 2 to 2.5 times the rod width, which is usually three or four of them and almost never a pair. Drop from the bottom of the ring, not the rod. Then float half an inch clear unless you have a specific reason not to. If your finished length lands between two ready made sizes, buy the longer one, because hemming is cheap and short is permanent.
If you are working through the rest of the openings at the same time, standard door sizes covers the doors, black window frames covers what the frame itself is doing to the room, and arranging furniture in a living room covers what ends up in front of the glass.
Frequently asked questions
How do I measure for curtains?
Five numbers, in this order. One, rod height: 4 to 6 inches above the top of the window casing, or higher if the ceiling allows. Two, rod width: the casing width plus roughly a quarter of that width on each side, so a 36 inch window gets a 54 inch rod. Three, stackback: where the open panel parks, which is about a third of the rod width split between the two sides. Four, panel width: rod width multiplied by 2 to 2.5, then divided by the number of panels. Five, drop: from the bottom of the ring or clip straight down to the floor, then subtract half an inch to float or add 1 to 2 inches to break. Nothing is measured off the glass, and every window gets measured separately even when two openings look identical.
How high should I hang curtains?
At minimum 4 to 6 inches above the window casing, and as close to the ceiling as the wall lets you. With a 96 inch ceiling and a standard window, that usually means 84 to 92 inches above the floor. Hanging high works because the eye reads the top of the fabric as the top of the window, so the whole opening looks taller. There is one consequence nobody mentions on the way in: the higher you hang, the longer the panel has to be, and at 92 inches an off the shelf 84 inch curtain finishes about six inches above the floor. If you are going to hang high, price a 96 inch panel before you commit.
How wide should curtains be?
The panels together should measure 2 to 2.5 times the rod width, not the window width. A 54 inch rod therefore wants 108 to 135 inches of total fabric. Below 2 times the rod a closed curtain hangs flat and reads as a bedsheet; sheers and lightweight linens want 2.5 to 3 times because thin fabric needs folds to look like anything. This is the calculation that catches people out, because the most common ready made panel is 50 inches wide, so a pair of them is only 100 inches and covers a 54 inch rod at 1.85 times. On most windows you need three or more panels, or two panels wider than the ready made default.
Should curtains touch the floor?
Yes, in almost every case, and there are three acceptable ways to land. Float means the hem finishes half an inch clear of the floor, which is the right default for anything with a radiator under the window, a door that has to open, a pet or a toddler. Break means 1 to 2 inches longer than the floor distance, giving one soft fold where the fabric lands. Puddle means 2 to 16 inches of extra fabric pooling at the base, which looks expensive in photographs and collects dust in real life. What you should not do is finish an inch or two above the floor by accident, because a curtain that stops just short of the ground is the one length that always looks like a mistake.
What are standard curtain lengths?
In the United States ready made panels come in 63, 84, 96, 108 and 120 inches, which is 160, 213, 244, 274 and 305 centimetres. As a rough guide, 84 inches suits an 8 foot ceiling, 96 inches a 9 foot ceiling, 108 inches a 10 foot ceiling and 120 inches anything taller or a deliberate puddle. In the UK and Ireland the common drops are 54, 72 and 90 inches, sold as 137, 183 and 229 centimetres. The 84 inch panel is by far the biggest seller and it is also the one most often bought in error, because it only reaches the floor when the rod sits at about 84 to 86 inches, which is lower than the high placement everybody recommends.
How many curtain panels do I need?
Multiply the rod width by 2, divide by the width of one panel, then round up. A 50 inch panel is the most common ready made size, so a 54 inch rod needs 108 inches of fabric, which is three panels, or two much wider ones. A 90 inch rod over a patio door needs 180 inches, so four panels. A pair only reaches 2 times fullness on a rod of about 50 inches or less. Do not round up a second time to make the number even: that is a convention rather than a rule, and every extra panel widens the stack. Buying a pair by default is the most common reason a curtain looks thin, and no amount of steaming fixes it, because the problem is arithmetic rather than creasing.
How do I measure for curtains on a sliding glass door?
Measure the full width of the door frame, not the glass, and mount the rod high, usually within a few inches of the ceiling. Extend it as far past the frame on each side as the wall allows, ideally about a quarter of the frame width, so the open panels park off the glass rather than on it. Total panel width should be at least twice the rod width, which on a 72 inch door means at least 144 inches, so three panels rather than two. Always float the hem half an inch clear of the floor: this is a door you use every day, and a breaking or puddled hem gets caught, dragged and dirty within a season. Where there is wall on only one side, a one way draw that stacks entirely to that side is usually better than an unbalanced pair.
Do I measure the window or the rod for curtain length?
Neither, strictly. You measure from the point the fabric will actually hang from, which depends on the header. With rings and clips, measure from the bottom of the clip, which sits about 1 to 1.5 inches below the rod. With grommets or a rod pocket, measure from the top of the rod, since the panel top rides slightly above it. With pinch pleats on hooks, measure from the bottom of the ring and remember that moving the hook up or down in the pleat shifts the finished drop by 1 to 2 inches. Getting this wrong by an inch and a half is the most common reason a correctly measured curtain still arrives too short.